Designing a Social Web Portal

Here’s another novel idea of mine, “Designing a Social Web Portal”  that has made it to IP.com (intellectual property).

I have included below the full article in which the Web Portal is re-imagined by adding the social paradigm to a portal.

Abstract

portalThe Social Web Portal, re-imagines the Web Portal using the social paradigm The Social Web Portal is common portal into which all users would login similar to Facebook, Google+ or Twitter. In the Social Web Portal users can choose their family, friends, acquaintances, professional colleagues. Once users are registered in the portal, the Social Web Portal will analyze the click stream history of all the registered users and display the relevant links for each user based on the user’s social circle. Hence in the Social Web Portal each user will get an instantaneous update of relevant,trending URLs/newsitems of his/her social circle based on the click stream data of the social circle in addition to articles of personal interest. Such a portal becomes important in this age of exploding information. The user is completely abreast of all topics of interest of his immediate social circle and the world at large.

Introduction

A large part of our lives is spent on the net. We browse the web for news, stock prices, technology tends, sports updates etc. To do this we typically go to our favorite web sites which are either news aggregators or news curators or we search the web for the required information. This article describes a completely new web browsing experience that is based on the social networking paradigm. This article describes a web portal where the content displayed is based on the browsing preferences of the user, the user’s friends circle, the user’s professional network and the world at large. So the Social Web Portal will display content that is based on the user own preferences, the collective browsing click streams of his/her social network, the user’s professional friends and the world at large. Such a web portal will give the user a snapshot of the kind of news articles that will be of great interest to
him/her. The inclusion of the social paradigm to web browsing provides the user a web browsing experience that is most closely tailored to the user’s taste.

Summary

Web portals like Lycos, Alta-vista, Yahoo, and Excite had their day in the sun early 1990’s. However all this changed with the entry of Google. It had a webpage with a single search bar. With a single stroke Google pushed all the portals to virtual oblivion.

It became obvious to the user that all information was just a “search away”. But much has changed since then. Many pages have been uploaded into the trillion servers that make up the internet. There is so much more information in the worldwide web. News articles, wikis, blogs, tweets, webinars, podcasts, photos, you tube content, social networks etc.

The internet now contains 8.11+ billion pages has more than 1.97 billion users, 266 million websites. We can expect the size to keep growing as the rate of information generation and our thirst for information keeps increasing.

In this world of exploding information the “humble search” will no longer be sufficient. As a user we would like to browse the web in a much more efficient, effective and personalized way. Neither will site aggregators like StumbleUpon, Digg, Reddit or sites which are news curators will be useful. We need to have a smart way to be able to navigate through this information deluge that is personalized to our tastes and to our social circle’s tastes.

We have now entered into an era of social networking where we keep contact with friends on social sites like Facebook, Google+ and with our professional network on LinkedIn and with the world at large on sites like Twitter and Pinterest. These social web sites deliver content based on our connections or our network.

The social web portal delivers content to the portal based on the user’s social network and the user’s social network’s browsing tendencies. It is in this context that it makes great sense to deliver a web portal experience that is based on the user’s personal, family, friend, professional and world browsing
preferences.

Description

Can a Web Portal render content to a single page with topics & news items based on the user’s social circle centered on the user?

The Social Web Portal discusses such a portal for the user which renders content dynamically based on the click stream of the user’s social network. The Social Web Portal will deliver content that has the user’s browsing preferences as the focal center while also displaying the browsing trends of the user’s family, the user’s close friends, the user’s professional colleagues and associates. Finally the portal would also include inputs from what the world at large is interested in and following. The web portal would analyze the key user’s preferences and then create a web portal based on its analysis of
what the user would like to see.

Social Web Portal – Fundamental concept and premise

The Social Web Portal is not a personalized home page in which RSS feeds or inputs from feed aggregators or site aggregators are taken. The Social Web Portal is common portal into which all users would log into similar to Facebook, Google+ or Twitter. All users can choose their friends, acquaintances, professional colleagues in this portal. Once users are registered the click stream history of the all the registered users are continuously updated by the Social Web Portal to a back-end database. Then based on each individual’s social circle the Social Web Portal will perform a statistical analysis of those URLs which were more relevant in the user’s social circle and display these URLs in the user’s page on the Social Web Portal. So when the user logs into the Social Web Portal the webpage will be personalized based on the user’s individual preferences and the collective browsing history of the user’s social circle (friends, colleagues,acquaintances etc).

The Social Web Portal does not take any feeds from existing social networking web sites like Facebook, Google+, Twitter or Youtube. It is independent of these sites. It does not aggregate the feeds from these sites nor does it depend on the social signals from these sites.

The Social Web Portal will generate ‘social signals” independently and completely based on the user’s social circle and the collective browsing history of the user’s social network.

Also the “Social Web Portal” is fundamentally different from link aggregators or a feed aggregators. As mentioned above the Social Web Portal will be based on a statistical analysis of the user network’s browsing history. So regardless of whether a user manually updates a Facebook/Google status, or a user submits a link to a link aggregating web site, the Social Web Portal will analyze the browsing history of the user’s social network and render the portal with the most browsed content.

The collective click stream of the user’s social circle will be analyzed statistically and the sites that have been most visited based on the user’s social circle will be displayed. Hence the user will be aware of the topics of interest of his/her social circle.

The major difference that the Social Web portal has with respect to link aggregators or feed aggregators mentioned above is that the Social Web Portal does not rely on either links submitted by the user’s social circle nor does it depend on the status updates of the user’s network.

The Web page rendered by the Social Web Portal will be based on a statistical ranking of the browsing history of the user’s social circle and also on the relative importance of the friends in the user’s social circle.

Detailed description

The Social Web Portal is based on the collective click stream activity of a user’s family, friends, professional circle and the world at large. This web portal will required to be signed on like any of the social network sites like FB, Google+ or Twitter. The web portal will have a window on the top right corner where the user can send invites, connection requests to his family members, friends and his professional colleagues. The click streams of all those who accept the user’s invite will be used to provide the web browsing experience for the user.

The user can also assign a degree of importance to each of his associations. So while a typical social network site like FB, Google+ or Twitter will provide the status updates of the connections of the user to the user’s updates and include the user’s updates in the connection’s updates, the Social Web Portal will keep track of the click streams of the all the users who have signed into the Social Web Portal. The browsing history of all the users who are registered in the Social Web Portal will be sent to a back-end database for subsequent processing and displaying in the appropriate social circle. Hence as the registered users travel from site to site their browsing history is captured and sent to the back-end database. The click stream history of all the registered users will be continuously updated to a back-end database. It will then render content to each of the individuals in the Social Web Portal
based on the network of that particular user.

The back-end database will be a repository of the browsing click streams of all the users who have signed up for the Social Web Portal. The browsing history of all registered users will be captured and sent to a back-end database, probably using cookies, on a regular basis. These cookies will be analyzed statistically by an application layer over the database which will then display content to a user based on the browsing history of the user’s social circle. Each association in the social circle will be ranked based on a degree of importance assigned by the user.

When a user opens the Social Web Portal the portal will query the back-end database based on the social network that the user has and the degree of importance that the user has for each of his/her connections.

The query will return the overall browsing preferences that are based on the user’s network i.e. the Social Web Portal will render the web page with the aggregate, collective web browsing tendencies of the user’s family, friends, colleagues and friends besides including the user’s own tastes and browsing preferences. So every user will be aware of the common trends and popular items in his/her social circle along with the trending topics in the world at large.

This can be represented in the diagram below

win

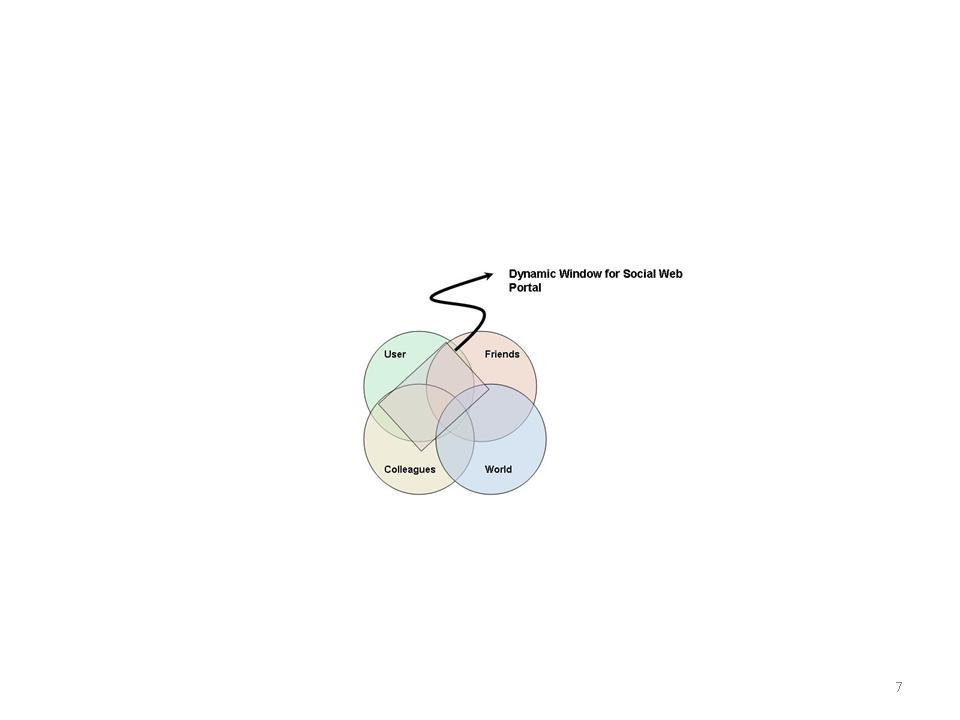
Fig 1. Dynamic Window in the Social Web Portal

The rectangle shown in the above window is something that can be tuned by each user for his/ her individual taste. The user can specify how much of the browsing tendencies of friends, family and colleagues he or she would like to include in the Social Web Portal. Based on the user’s taste the content that will be displayed on the user’s Social Web Portal will have appropriate content of the user’s family, friend, colleagues and World

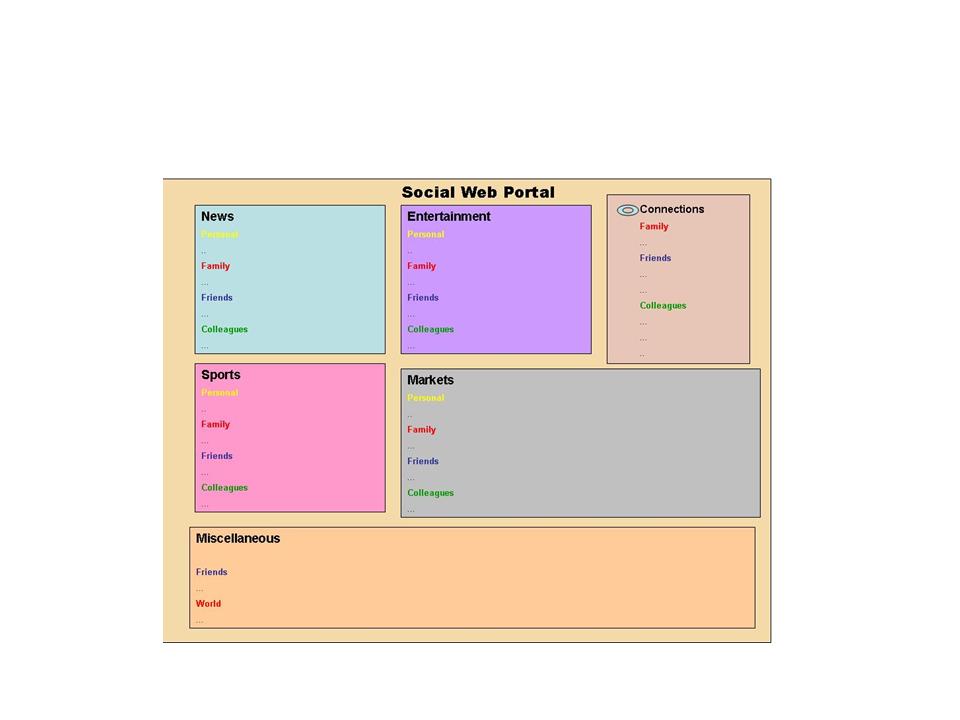
The Social Web Portal for a user can be visualized to be represented as shown below

portal

Fig 2. Snapshot of what each user would see when he logs into the Social Web Portal

As can be seen this Web page will be customized to the user. It will display all the relevant news items and articles of interest for the user. Any user will also be interested to see what people in his/her particular domain are reading. For e.g. a person in finance would like to see specific topics in finance while also being interested in the other relevant news items that he may have missed but may have been read by his/her friends or colleagues.

In other words each user will get a snapshot of information. This information will be tailored to the user based on the individual’s personal preferences, the trending topics in among his family, friends, colleagues, acquaintances and the world at large. So every user will be fully abreast of the popular topics issues in the world without having to individually browse sites. The above figure shows how this snapshot would look for each user.

People also typically like to see if they are up to date with the world on topics. The Social Web Portal will ensure that popular articles automatically bubble up to each and every user.

A diagrammatic representation of the Social Web Portal in action can be represented as below

data

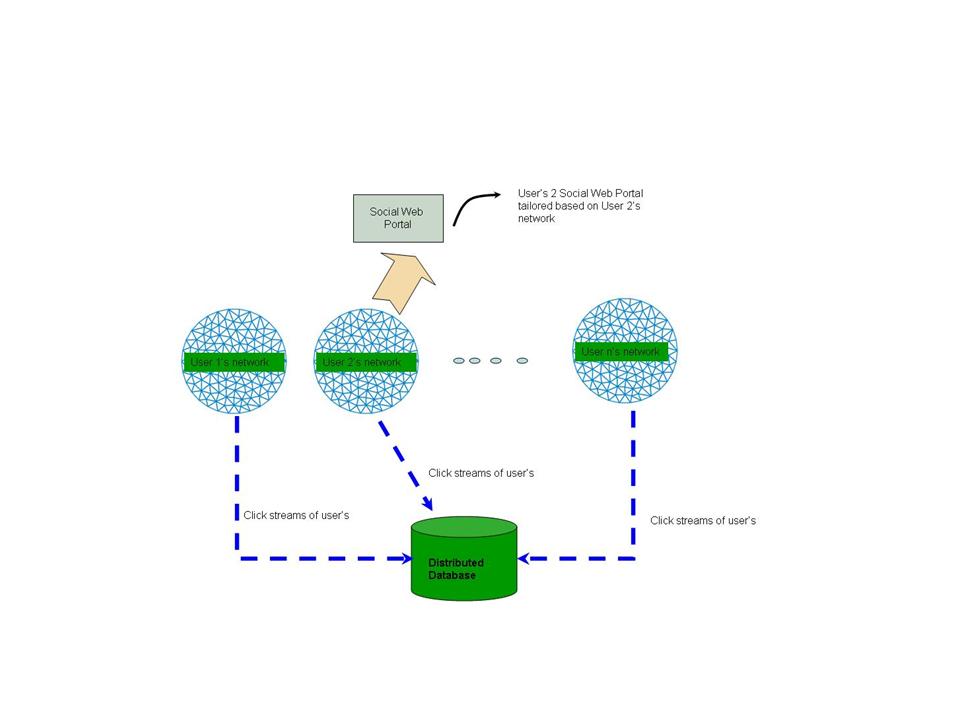
Fig 3. Browsing history maintained in a back-end database and displayed for each user.

In the above figure the click streams of the network of all the users of the Social Web Portal are collected in the distributed database. When a user logs into his Social Web Portal the query will return the overall browsing trends of the user’s family, friends, professional colleagues and the world. Those news items that are popular will be bubbled up to the user along with his or her own preferences. Hence the user will feel connected to his/her network and will have a novel browsing experience.

A diagrammatic representation of the Social Web Portal is shown below

swp1

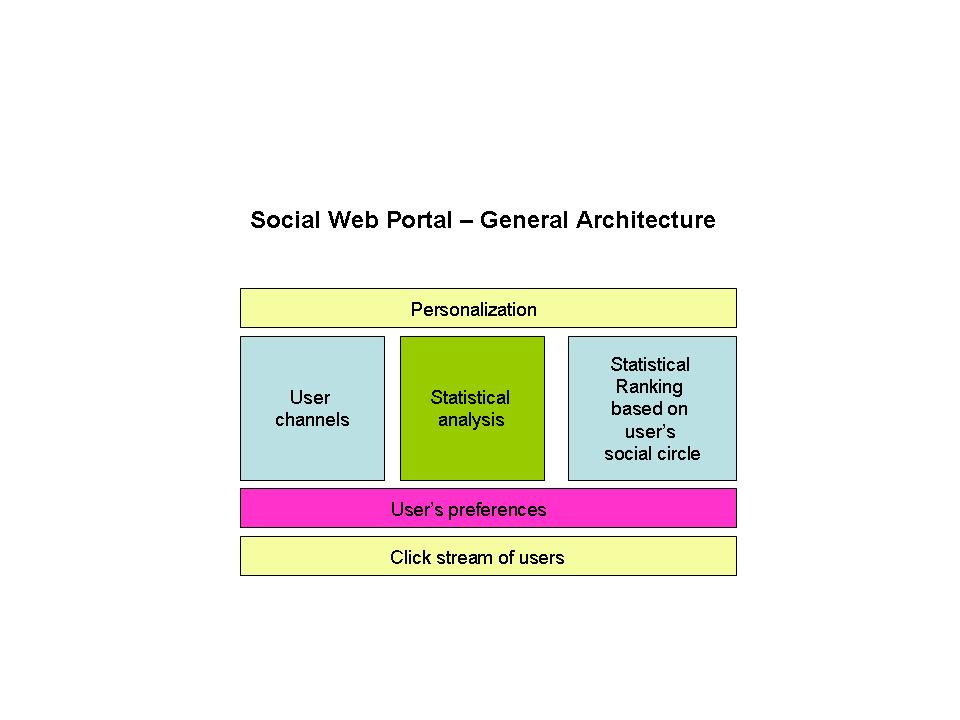
Fig 4. A schematic of how the personalization happens in the Social Web Portal

In Fig 4 it can be seen that the bottom most layer contains the collective browsing history of all the registered users as they browse different web sites. This click stream will be updated at regular intervals. This browsing history is analyzed statistically to determine the most relevant and popular sites for each user’s social network and then ranked on the degree of importance of each individual in the social circle.

fc

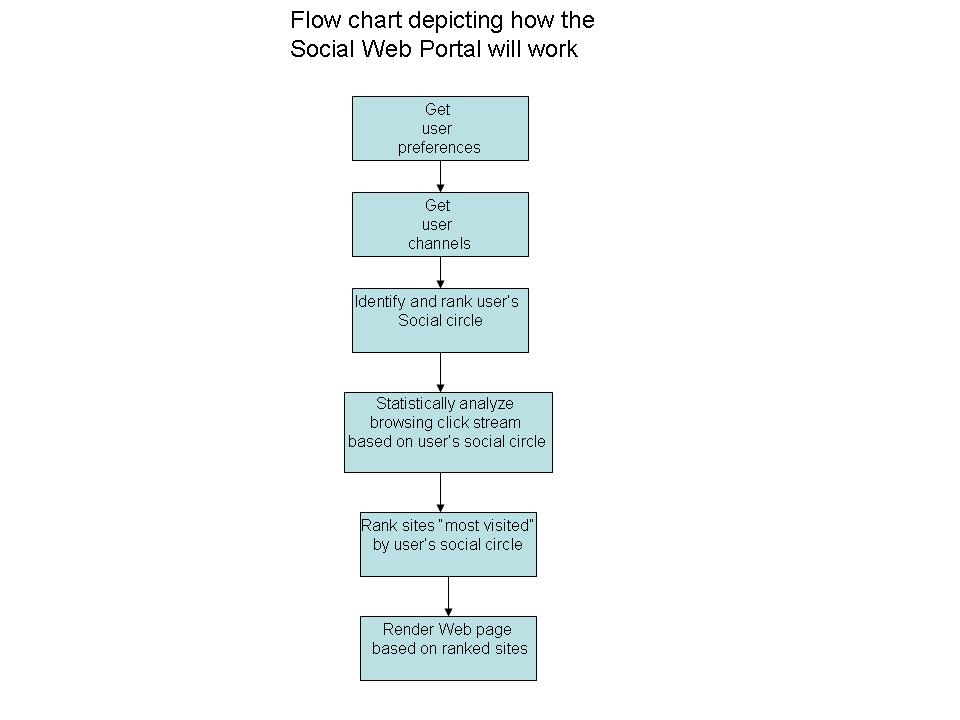
Fig 5. Flow chart for the Social Web Portal

Hence the Social Web Portal will broadly perform the following activities

  • The collective browsing history of all registered users of the Social Web Portal will be sent for analysis to a back-end database
  • The Social Web Portal will render content based on the statistical analysis of the collective click stream activity of a user’s family, friends, professional circle and the world at large
  • The Social Web Portal will render content dynamically based on the statistical ranking of browsing history of user’s social circle
  • A user can configure the order of importance to each of the people in his/her social circle. The Social Web Portal the portal will query the back-end database based on the relative importance of each of the acquaintance of the user and also the statistical weight of “visited sites”
  • The Social Web Portal will render the web page with the “most visited sites” based on the aggregate, collective web browsing tendencies of the user’s family, friends, colleagues and friends besides including the user’s own tastes and browsing preferences.

Benefits

The Social Web Portal will usher in a completely new Web browsing experience. Adding the social paradigm to a user’s browsing experience can have multiple benefits. It will allow each user to know what new articles or items are popular among his or her network. A person can keep abreast of all the trends that are of interest to him/her. The Social Web Portal will be novel experience that will be completely tailored to each and every user.

Find me on Google+

A method for optimal bandwidth usage by auctioning available bandwidth using the OpenFlow protocol

Here is a recent idea of mine that has made it to IP.com (Intellectual Property.com). See link

A method for optimal bandwidth usage by auctioning available bandwidth using the OpenFlow protocol.  Here is the full article from IP.com

In this article I provide some more details to my earlier post – Towards an auction-based internet.

Abstract:
As the data that traverses the internet continues to explode exponentially the issue of a huge bandwidth crunch will be a distinct possibility in the not too distant future. This invention describes a novel technique for auctioning the available bandwidth to users based on bid price, quality of service expected and the type of traffic. The method suggested in this invention is to use the OpenFlow protocol to dynamically allocate bandwidth to users for different flows over a virtualized network infrastructure.

Introduction:
Powerful smartphones, bandwidth-hungry applications, content-rich applications, and increasing user awareness, have together resulted in a virtual explosion of mobile broadband and data usage. There are 2 key drivers behind this phenomenal growth in mobile data. One is the explosion of devices viz. smartphones, tablet PCs, e-readers, laptops with wireless access. The second is video. Over 30% of overall mobile data traffic is video streaming, which is extremely bandwidth hungry. Besides these, new technologies like the “Internet of Things” & “Smart Grids” now have millions and millions of sensors and actuators connected to the internet and contending for scarce bandwidth. In other words there is an enormous data overload happening in the networks of today.
Two key issues of today’s computing infrastructure deal with data latency and the economics of data transfer. Jim Gray (Turing award in 1998) in his paper on “Distributed Computing Economics” tells us that the economics of today’s computing depends on four factors namely computation, networking, database storage and database access. He then equates $1 as follows
One dollar equates to
= 1 $
≈ 1 GB sent over the WAN
≈ 10 Tops (tera CPU operations)
≈ 8 hours of CPU time
≈ 1 GB disk space
≈ 10 M database accesses
≈ 10 TB of disk bandwidth
≈ 10 TB of LAN bandwidth
As can be seen from above breakup, there is a disproportionate contribution by the WAN bandwidth in comparison to the others. In others words while the processing power of CPUs and the storage capacities have multiplied accompanied by dropping prices, the cost of bandwidth has been high. Moreover the available bandwidth is insufficient to handle the explosion of data traffic.
It is claimed that the “cheapest and fastest way to move a Terabyte cross country is sneakernet (i.e. the transfer of electronic information, especially computer files, by physically carrying removable media such as magnetic tape, compact discs, DVDs, USB flash drives, or external drives from one computer to another).
While there has been a tremendous advancement in CPU processing power (CPU horsepower in the range of petaflops) and enormous increases in storage capacity(of the order of petabytes) coupled with dropping prices, there has been no corresponding drop in bandwidth prices in relation to the bandwidth capacity.
It is in this context an auction-based internet makes eminent sense. An auction-based internet would be a business model in which bandwidth would be allocated to different data traffic on the internet based on dynamic bidding by different network elements. Such an approach becomes imperative while considering the economics and latencies involved in data transfer and the emergence of the promising technology known as the OpenFlow protocol. This is further elaborated below

Description

As mentioned in Jim Turing’s paper a key issue that we are going to face in the future has to do with the economics of data transfer and the associated WAN latencies
As can be seen there are 3 distinct issues with the current state of technology
1) There is an exponential increase in data traffic circling the internet. According to a Cisco report the projected increase in data traffic between 2014 and 2015 is of the order of 200 exabytes (10^18)).The internet is thus clogged due to the many bandwidth hungry applications and millions of devices that make the internet
2) WAN latencies and the economics of data transfers are two key issues of the net
3) Service Providers have not found a good way to monetize this data explosion.
Clearly bandwidth is a resource that needs to be utilized judiciously given that there are several contenders for the usage of bandwidth.
Detailed description: This invention suggests a scheme by which internet bandwidth can be auctioned between users based on their bid price, Quality of Service (QoS) required and the type of traffic (video, voice, data, streaming). The energy utility already auctions electricity to the highest bidder. This invention suggests a similar approach to auction scarce bandwidth to competing bidders.
The internet pipes get crowded at different periods of the day, during seasons and during popular sporting events. This invention suggests the need for an intelligent network to price data transfer rates differently depending on the time of the day, the type of traffic and the quality of service required. In this scheme of things the internet will be based on an auction mechanism in which different devices bid for scarce bandwidth based on the urgency, speed and quality of services required.
Such a network can be realized today provided the network and the network elements that constitute the internet implement the OpenFlow protocol.
Software Defined Networks (SDNs) is the new, path breaking innovation in which network traffic can be controlled programmatically through the use of the OpenFlow protocol. SDN is the result of pioneering effort by Stanford University and University of California, Berkeley and is based on the Open Flow Protocol and represents a paradigm shift to the way networking elements operate.

SDNs can be made to dynamically route traffic flows based on decisions in real time. The flow of data packets through the network can be controlled in a programmatic manner through the OpenFlow protocol. In order to dynamically allocate smaller or fatter pipes for different flows, it necessary for the logic in the Flow Controller to be updated dynamically based on the bid price, QoS parameters and the traffic type.

The OpenFlow protocol has a Flow Controller element which can be made to create different flows by manipulating the flow tables of the different network elements. Hence the Flow Controller depending on the bid price, the bandwidth rate and the QoS will auction the different bids and create different flows for different users. The Flow Controller will then update the flow tables of the network elements that will participate to realize this end-to-end flow of traffic for different users.

A typical scenario can be visualized as below

pat1

In the above figure different users bid for available bandwidth. For e.g. User A could bid for A Mbps @ $a/bit for traffic type A, User B could bid for B Mbps @ $b/bit for traffic type B and User C could bid for C Mbps @ $c/bit for traffic type C. The different QoS parameters like delay, throughput, and jitter are all sent in the user requests. The Flow controller receives all these bids with associated parameters and auctions the available bandwidth against the bid prices that the network elements bid for. The Flow Controller then ranks the bids against the most optimal bandwidth allocation that has the highest return.

The Flow Controller can then allocate different bandwidths to the different users based on the bids from the highest to the lowest, quality of service and the type of traffic. Software Defined Networks (SDNs) can then create different flows for across the networks. SDN can create different slices of network elements from end-to–end for each of the different flow requirements.

The Flow Controller can then create these flows and update the flow tables of the network elements based on the allotted speeds for the bid price.

This is shown diagrammatically below

pat2


For e.g. we could assume that a corporate has 3 different flows namely, Immediate, ASAP (As soon as possible) and  price below $x. Based on the upper ceiling for the bid price, the OpenFlow controller will allocate a flow for the immediate traffic of the corporation. For the ASAP flow, the corporate would have requested that the flow be arranged when the bid price falls between a range $a – $b. The OpenFlow Controller will ensure that it can arrange for such a flow. The last type of traffic will be allotted a default flow during non-peak hours. This will require that the OpenFlow controller be able to allocate different flows dynamically based on winning the auction process that happens in this scheme.

Using the OpenFlow paradigm to auction bandwidth

These will be the typical steps that will occur during

  1. Let us assume that it is the period of the day when the usage is at its peak
  2. Let there be 3 users User A, User B and User C who would like to video-conference, video stream and make a voice call respectively
  3. Depending on the urgency and the price that the users can afford these 3 users will bid for a slice of a bandwidth to complete their call
  4. Let user A request A Mbps @ $a/bit for QoS parameters p(a). Let user B request B Mbps @ $b/bit for QoS parameters p(b) and user C request C Mbps @ $c/bit for QoS parameters p(c).
  5. When the Flow Controller receives these requests, based on the available bandwidth at its disposal (assuming it has already used X Mbps for already existing flows) it will normalize these requests and auction them so that it results in the highest bid winning its requested bandwidth slice followed by the ones lower than it. If a user does not qualify the auction the user will have a bid at a later time according to some algorithm. Let us assume that user A and user C win their bids
  6. The Flow Controller will now algorithmically decide the contents of the flow tables of the intervening network elements and will accordingly populate these flow tables
  7. The flows for User A and User C are now in progress.
  8. The Flow Controller will accept bids whenever there is spare bandwidth that can be put up for auction.

As can be seen such a mechanism will result in a varying price for bandwidth with the highest value during peak periods and lower values during off-peak periods.

Benefits: The current protocols of the internet of today namely IntServ, DiffServ allocate pipes based on the traffic type & class which is static once allocated. This strategy enables OpenFlow to dynamically adjust the traffic flows based on the current bid price prevailing in that part of the network. Moreover the usage of OpenFlow protocol can generate a lot more granualar flow types.

The ability of the OpenFlow protocol to be able to dynamically allocate different flows will once and for all solve the problem of being able to monetize mobile and fixed line data This will be a win-win for both the Service Providers and the consumer. The Service Provider will be able to get a ROI for the infrastructure based on the traffic flowing through his network. Users can decide the type of service they are interested and choose appropriately. The consumer rather than paying a fixed access charge could have a smaller charge because of low bandwidth usage.

Conclusion: An auction-based internet is a worthwhile business model to pursue. The ability to route traffic dynamically based on an auction mechanism in the internet enables the internet infrastructure to be utilized optimally. It will serve the dual purpose of solving traffic congestion, as highest bidders will get the pipe but will also monetize data traffic based on its importance to the end user.

Find me on Google+

The computer is not a dumb machine!

computer“The computer is a dumb machine. It needs to be told what to do at every step”. How often have we heard of this refrain from friends and those who have only an incidental interaction with computers?  To them a computer is like a ball which has to be kicked from place to place. These people are either ignorant of computers, say it by force of habit or have a fear of computers. However this is so far from the truth.  In this post, my 100th, I come to the defense of the computer in a slightly philosophical way.

The computer is truly a marvel of technology. The computer truly embodies untapped intelligence. In my opinion even a safety pin is frozen intelligence. From a piece of metal the safety pin can now hold things together while pinning them, besides incorporating an aspect of safety.

Stating that the computer is a dumb machine is like saying that a television is dumb and an airplane is dumber.  An airplane probably represents a modern miracle in which the laws of flight are built into every nut and bolt that goes into the plane. The electronics and the controls enable it to lift off, fly and land with precision  and perform a miracle in every flight.

Similarly a computer from the bare hardware to the upper most layer of software is nothing but layer and layer of human ingenuity, creativity and innovation. At the bare metal the hardware of the computer is made up integrated chips that work at the rate of 1 billion+ instructions per second. The circuits are organized so precisely that they are able to work together and produce a coherent output, all at blazing speeds of less than a billionth of a second.

computer3

On top of the bare bones hardware we have some programs that work at the assembly and machine code made of 0’s and 1’s. The machine code is nothing more than an amorphous strings of 0’s and 1’s. At this level   the thing that is worked on (object) and the thing that works on it (subject) are indistinguishable. There is no subject and object at this level. What distinguishes then is the context.

Over this layer we have the Operating System (OS) which I would like to refer to as the mind of the computer. The OS is managing many things all at once much like the mind has complete control over sense organs which receive external input. So the OS manages processes, memory, devices and CPU (resources)

As humans, we like to pride ourselves that we have consciousness. Rather than going into any metaphysical discussion on what consciousness is or isn’t it is clear that the OS keeps the computer completely conscious of the state of all its resources.  So just like we react to data received through our sense organs the computer reacts to input received through devices (mouse, keyboard) or its memory etc. So does the computer have consciousness?

You say human beings are capable of thought. So what is thought but some sensible evaluation of known concepts? In a way the OS is also constant churning in the background trying to make sense of the state of the CPU, the memory or the disk.

Not to give in I can hear you say “But human beings understand choice”. Really! So here is my program for a human being

If provoked
Get angry

If insulted
Get hurt

If ego stoked
Go mad with joy

Just kidding! Anyway the recent advances in cognitive computing now show it is possible to have computers choose the best alternative. IBM’s Watson is capable of evaluation alternative choices.

Over the OS we have compilers and above that we have several applications.
The computer truly represents layers and layers of solidified human thought. Whether it is the precise hardware circuitry, the OS, compilers, or any application they are all result of human thought and they are constantly working in the computer.

So if your initial attempt to perform something useful did not quite work out, you must understand that you are working with decades of human thought embodied in the computer. So your instructions should be precise and logical. Otherwise your attempts will be thwarted.

computer1
So whether it’s the computer, the mobile or your car, we should look and appreciate the deep beauty that resides in these modern conveniences, gadgets or machinery.

Find me on Google+

Blob with an attitude in Android

DSC00044This post is an enhanced version of my earlier blob post Creating a blob in Android with Box2D physics engine and AndEngine.. To introduce tautness to the overall blob structure I used revoluteJoint between adjacent bodies as follows

}

// Create a revoluteJoint between adjacent bodies – Lacks stiffness

for( int i = 1; i < nBodies; i++ ) {

final RevoluteJointDef revoluteJointDef = new RevoluteJointDef();

revoluteJointDef.initialize(circleBody[i], circleBody[i-1], circleBody[i].getWorldCenter());

revoluteJointDef.enableMotor = false;

revoluteJointDef.motorSpeed = 0;

revoluteJointDef.maxMotorTorque = 0;

this.mPhysicsWorld.createJoint(revoluteJointDef);

}

// Create a revolute joint between first and last bodies

final RevoluteJointDef revoluteJointDef = new RevoluteJointDef();

revoluteJointDef.initialize(circleBody[0], circleBody[19], circleBody[0].getWorldCenter());

revoluteJointDef.enableMotor = false;

revoluteJointDef.motorSpeed = 0;

revoluteJointDef.maxMotorTorque = 0;

this.mPhysicsWorld.createJoint(revoluteJointDef);

The motorSpeed, maxMotorTorque is set to 0 and the enableMotor is set to false. However I found that this joint still lacks stiffness.

So I replaced the revoluteJoint with the weldJoint which is probably more appropriate

// Create a weldJoint between adjacent bodies – Weld Joint has more stiffness

for( int i = 1; i < nBodies; i++ ) {

final WeldJointDef weldJointDef = new WeldJointDef();

weldJointDef.initialize(circleBody[i], circleBody[i-1], circleBody[i].getWorldCenter());

this.mPhysicsWorld.createJoint(weldJointDef);

}

// Create a weld joint between first and last bodies

final WeldJointDef weldJointDef = new WeldJointDef();

weldJointDef.initialize(circleBody[0], circleBody[19], circleBody[0].getWorldCenter());

this.mPhysicsWorld.createJoint(weldJointDef);

Here are clips of the the Blob with more attitude

Blob with attitude – Part 1

Blob with attitude – Part 2

You can clone the project from Github at Blob_v1

Find me on Google+

Creating a Blob in Android using Box2D physics engine and AndEngine

DSC00037Here is a short post on my attempt to create a Blob using Box2D physics engine and AndEngine. This demo tries to recreate the Blob Joint at GwtBox2D Showcase. This Blob Joint demo in Java uses a ConstantVolume Joint for creating the Blob. For my blob I use a distanceJoint for maintaining the shape of the Blob.

Here is the clip of the blob in action : Blob clip
You can clone the project from Github from the Blob code

A Blob is created in the initial shape of an ellipse as follows
// Add 20 circle bodies around an ellipse
for (int i=0; i<nBodies; ++i) {
FIXTURE_DEF = PhysicsFactory.createFixtureDef(30f, 0.5f, 0.5f)
Vector2 v1 = new Vector2(x1,y1);
final VertexBufferObjectManager vb = this.getVertexBufferObjectManager();
circle[i] = new AnimatedSprite(x1, y1, this.mCircleFaceTextureRegion, this.getVertexBufferObjectManager());
circleBody[i] = PhysicsFactory.createCircleBody(this.mPhysicsWorld, circle[i], BodyType.DynamicBody, FIXTURE_DEF);


}

A distance Joint is created between every body as follows

// Create a distanceJoint between every other day
for(int i= 0;i < nBodies-1; i++) {
for(int j=i+1; j 0) {
connectionLine[i] = new Line(centers[i][0],centers[i][1],centers[i-1][0],centers[i-1][1],lineWidth,this.getVertexBufferObjectManager());
connectionLine[i].setColor(0.0f,0.0f,1.0f);
this.mScene.attachChild(connectionLine[i]);
}

// Join the first body with the last body
if(i == 19){
connectionLine[0] = new Line(centers[0][0],centers[0][1],centers[19][0],centers[19][1],lineWidth,this.getVertexBufferObjectManager());
connectionLine[0].setColor(.0f,.0f,1.0f);
this.mScene.attachChild(connectionLine[0]);
}

The connecting lines move along with the moving shapes as below
// Update connection line so that the line moves along with the body
this.mPhysicsWorld.registerPhysicsConnector(new PhysicsConnector(circle[i], circleBody[i], true, true) {
@Override
public void onUpdate(final float pSecondsElapsed) {
super.onUpdate(pSecondsElapsed);
for(int i=1;i < nBodies;i++) {
connectionLine[i].setPosition(circle[i].getX(),circle[i].getY(),circle[i-1].getX(),circle[i-1].getY());

} connectionLine[0].setPosition(circle[0].getX(),circle[0].getY(),circle[19].getX(),circle[19].getY());
}
}
);

So here is the clip of the blob in action : Blob clip
You can clone the project from Github from the Blob code

Some cool simulations using AndEngine & Box2D
1. Simulating the domino effect using Box2D and AndEngine
2. Simulating a Web Joint in Android
3. Modeling a Car in Android
4. Fun simulation of a Chain in Android
5. A closer look at “Robot horse on a Trot! in Android”
and many more
Find me on Google+

Bull in a china shop – Behind the scenes in Android

DSC00032Here are the details about how I constructed the “Bull in a china shop” demo. For this demo I used Box2D physics engine and AndEngine to make the demo. I decided to use sprites for the china shop and picked up images of glasses, wine glasses, bottles etc from www.openclipart.org.

Be extremely careful when creating the TextureRegion using BitmapTextureAtlas. If you don’t get the co-ordinates right the display can be weird.

Here are 2 clips of Bull in a China Shop demo
1.Bull in a china shop in Moon’s gravity
2.Bull in a china shop in Earth’s gravity
The code for this can be cloned  from Github from Bulldozed

Here is a snippet of this

this.mBitmapTextureAtlas = new BitmapTextureAtlas(this.getTextureManager(), 556, 246, TextureOptions.BILINEAR);
this.mTumblerTextureRegion = BitmapTextureAtlasTextureRegionFactory.createFromAsset(this.mBitmapTextureAtlas, this, "tumblr.png", 0, 0);
this.mBitmapTextureAtlas.load();
this.mBottleTextureRegion = BitmapTextureAtlasTextureRegionFactory.createFromAsset(this.mBitmapTextureAtlas, this, "bottle.png",20, 29);
this.mBitmapTextureAtlas.load();
this.mGlassTextureRegion = BitmapTextureAtlasTextureRegionFactory.createFromAsset(this.mBitmapTextureAtlas, this, "glass.png",36, 69);
this.mBitmapTextureAtlas.load();
this.mVaseTextureRegion = BitmapTextureAtlasTextureRegionFactory.createFromAsset(this.mBitmapTextureAtlas, this, "vase.png",56, 89);
this.mBitmapTextureAtlas.load();
...
...

This is very important to get right otherwise you are setting yourself for a lot of grief.

Superficially the demo looks real easy. It appears that creating a pyramid stack should be a breeze as long as you get the coordinates right. Wrong! Building a pyramid using Box2D with the effect of gravity can be a real challenge as I found out. I would build two stacks and the stack would become unstable and collapse.

Anyway here are the findings

  1. Each row is not placed directly over the object below. I leave a gap of 2 px between them The reason is the object below exerts a force ‘F’ upward. The object above exerts a force ‘mg” below and the physics engine tries to resolve this difference in forces and causes instability in the structure. So the key is a to leave a small gap in between
  2. Now that there is a gap between 2 rows the coefficient of restitution ‘e’ is made 0. Even a value as small as 0.1f can make the objects jitter and cause instability.
  3. The friction between the platform and the objects or the objects themselves is made maximum equal to 1.0f to prevent sliding of the objects.

// Add tumblers
for(int i=0; i < 21; i++) {
tumbler = new Sprite(80 + i * 25, 450, this.mTumblerTextureRegion, this.getVertexBufferObjectManager());
FIXTURE_DEF = PhysicsFactory.createFixtureDef(1f, 0.0f, 1f);
tumblerBody = PhysicsFactory.createBoxBody(this.mPhysicsWorld, tumbler, BodyType.DynamicBody, FIXTURE_DEF);
this.mPhysicsWorld.registerPhysicsConnector(new PhysicsConnector(tumbler, tumblerBody, true, true));
this.mScene.attachChild(tumbler);
}

// Add glasses
for(int i=0; i < 14; i++) {
glass = new Sprite(130 + i * 25, 428, this.mGlassTextureRegion, this.getVertexBufferObjectManager());
FIXTURE_DEF = PhysicsFactory.createFixtureDef(1f, 0.0f, 1f);
glassBody = PhysicsFactory.createBoxBody(this.mPhysicsWorld, glass, BodyType.DynamicBody, FIXTURE_DEF);
this.mPhysicsWorld.registerPhysicsConnector(new PhysicsConnector(glass, glassBody, true, true));
this.mScene.attachChild(glass);
...
...

Hopefully if you get everything right you should have a stable structure. I had to do this through trial and error before I got it finally right. Whew!

Once you get a stable structure with the proper sprites in place most of the problem is solved. For the last part I add a bull sprite and set it off at a velocity from the point of touch.

bull = new Sprite(pX, pY, this.mBullTextureRegion, this.getVertexBufferObjectManager());
FIXTURE_DEF = PhysicsFactory.createFixtureDef(25f, 0.0f, 1f);
Log.d("here","here");
bullBody = PhysicsFactory.createBoxBody(this.mPhysicsWorld, bull, BodyType.DynamicBody, FIXTURE_DEF);
if(pX > 360)
bullBody.setLinearVelocity(-5,-5);
else
bullBody.setLinearVelocity(5,5);

DSC00031

Note: Since the sprites are not regular shapes I had to use a box shape. So the collisions are not pixel perfect.
Make sure you set up your project properly in Eclipse. The important settings are
Project->Properties->Android->Android4.2
Project->Properties->Java Compiler: Check the “Enable project specific setting” and also set compiler compliance level to 1.6
Finally click Project->Properties->Android: Under Library click ‘Add’ and add AndEngine and AndEnginePhysicsBox2DExtension
and you are good to go.

Here are 2 clips of Bull in a China Shop demo

1.Bull in a china shop in Earth’s gravity

2.Bull in a china shop in Moon’s gravity

You can clone the project from Github from Bulldozed

Have fun …

Other cool simulations using AndEngine & Box2D
1. Simulating the domino effect using Box2D and AndEngine
2. The making of Total Control Android game
3. Simulating a Web Joint in Android
4. Modeling a Car in Android
5. A closer look at “Robot horse on a Trot! in Android”

Find me on Google+

Simulating the domino effect in Android using Box2D and AndEngine

In this post I describe the steps to create a domino effect in Android. I have used Box 2D which is a physics game engine and AndEngine. The simulation is based on a demo in Java by Daniel Murphy in his site http://www.jbox2d.org/. There is a great tutorial on Box2D at http://www.iforce2d.net/b2dtut/introduction. Box2D is a really powerful 2D physics engine with collision detection, friction and restitution and all the good things of nature.

In this post I deal with some of the basic concepts of Box2D engine. At the most basic level is the ‘Body’. A body has linear,angular velocity,mass, location etc. It is then assigned a ‘shape’ which can be circle or polygon and finally we have assign the bodies to fixtures which carry properties of friction, restitution, density (density x area = mass), etc.

Finally all bodies are part of the ‘world’.
You can take a look at the domino effect in the video clip –  domino clip
The entire project can be cloned from GitHub at Dominoes

So for the domino effect I create floor,roof,left and right walls which are the shapes

//Create the floor

final VertexBufferObjectManager vertexBufferObjectManager = this.getVertexBufferObjectManager();

final Rectangle ground = new Rectangle(0, CAMERA_HEIGHT – 2, CAMERA_WIDTH, 2, vertexBufferObjectManager);

final Rectangle roof = new Rectangle(0, 0, CAMERA_WIDTH, 2, vertexBufferObjectManager);

final Rectangle left = new Rectangle(0, 0, 2, CAMERA_HEIGHT, vertexBufferObjectManager);

final Rectangle right = new Rectangle(CAMERA_WIDTH – 2, 0, 2, CAMERA_HEIGHT, vertexBufferObjectManager);

The body with the fixture is

final FixtureDef wallFixtureDef = PhysicsFactory.createFixtureDef(0, 0.5f, 0.5f);

PhysicsFactory.createBoxBody(this.mPhysicsWorld, ground, BodyType.StaticBody, wallFixtureDef);

PhysicsFactory.createBoxBody(this.mPhysicsWorld, roof, BodyType.StaticBody, wallFixtureDef);

PhysicsFactory.createBoxBody(this.mPhysicsWorld, left, BodyType.StaticBody, wallFixtureDef);

PhysicsFactory.createBoxBody(this.mPhysicsWorld, right, BodyType.StaticBody, wallFixtureDef);

Similarly I create 3 platforms on which I array vertical bricks.

The shape is created by creating a sprite.

platform1 = new Sprite(50, 100, this.mPlatformTextureRegion, this.getVertexBufferObjectManager());

The platform body is created as follows

platformBody1 = PhysicsFactory.createBoxBody(this.mPhysicsWorld, platform1, BodyType.StaticBody, FIXTURE_DEF);

The FIXTURE_DEF is the fixture which is defined as

privatestaticfinal FixtureDef FIXTURE_DEF = PhysicsFactory.createFixtureDef(50f, 0.1f, 0.5f);

where the parameters 50f,0.1f,0,5f correspond to density, coefficient of restitution and friction.

The platform is then added to the scene

this.mScene.attachChild(platform1);

I stack 37 vertical bricks on the platform

// Create 37 bricks

for(int i=0; i < 37; i++) {

brick = new Sprite(50 + i * 15, 50, this.mBrickTextureRegion, this.getVertexBufferObjectManager());

brickBody = PhysicsFactory.createBoxBody(this.mPhysicsWorld, brick, BodyType.DynamicBody, FIXTURE_DEF);

this.mPhysicsWorld.registerPhysicsConnector(new PhysicsConnector(brick, brickBody, true, true));

this.mScene.attachChild(brick);

brick.setUserData(brickBody);

}

I tilt the first few bricks to create the domino effect as follows

float angle = brickBody.getAngle();

Log.d(“Angle”,“angle:”+ angle);

// Tilt first 4 bricks

if (i == 0 || i == 1 || i == 2 || i == 3 || i == 4) {

brickBody.setTransform(120/PIXEL_TO_METER_RATIO_DEFAULT,80/PIXEL_TO_METER_RATIO_DEFAULT,(65 – (i*10)) * DEGTORAD);

}

Note: The PIXEL_TO_METER_RATIO_DEFAULT which divides the units.

I tried to make the end of the domino effect in the 1st platform trigger the domino effect in the 2nd which would trigger in the 3rd. However I could not make it happen consistently. So I trigger the domino effect in each of the 3 platforms by tilting the first few bricks.

Anyway it was good fun.

You can take a look at the domino effect in the domino clip

The entire project can be cloned from Dominoes

Take a look at some cool simulations using AndEngine & Box2D
1. Bull in a china shop – Behind the scenes in android
2. Creating a blob in Android using  Box2D physics Engine & AndEngine
3. The making of Total Control Android game
4. Simulating an Edge Shape in Android
5. Simulating a Web Joint in Android
6. Modeling a Car in Android
7. Fun simulation of a Chain in Android
8. “Is it animal? Is it an insect?” in Android
Find me on Google+

A Github Primer

This post gives some of the basic commands to get started on Git Hub. GitHub is the Open source source code management system that enables anybody to share code, projects, and work on other open source projects. The beauty of GitHub lies in its simplicity. A very good tutorial is given at Git Reference

I found that the using Git Hub on Linux command line is extremely simple and straight forward. This article gives the steps to push your project on to the Git Hub repository hosted on the web.

1) To get started create a GitHub account at https://github.com. Sign up for an account with your details.

2) On the GitHub page create a repository. This will be the icon next to your user account with a ‘+” sign. Let’s say I create a repository called ‘unity’

3) On Fedora Linux you can install git using the following command as root

$yum install git-core

4) Once git is installed it is a good idea to set your name and your email with commands below

$ git config –global user.name ‘tvganesh’
$ git config –global user.email tvganesh.85@gmail.com

5) Change to the directory which contains your project files .
cd unity

6) Setup for git using
git init
Initialized empty Git repository in /home/tvganesh/git/unity/.git/

7) You can check that Git has been initialized as follows which will show up a .git file
ls -a
. .. .git unity

8) Check the status of the git uodate with
git status -s
?? unity/

9) Add all the files and folders in your project directory recursively to the staging area with

git add .

10) Check that all the files & folders are in the staging area by checking the status again
git status -s
A unity/.classpath
A unity/.project
A unity/.settings/org.eclipse.jdt.core.prefs
A unity/AndroidManifest.xml
A unity/bin/jarlist.cache
A unity/ic_launcher-web.png
A unity/libs/android-support-v4.jar

The A shows that the files have been added to the staging area

11) A more detailed status check is below

[tvganesh@localhost unity]$ git status
# On branch master
#
# Initial commit
#
# Changes to be committed:
# (use “git rm –cached <file>…” to unstage)
#
# new file: unity/.classpath
# new file: unity/.project
# new file: unity/.settings/org.eclipse.jdt.core.prefs
# new file: unity/AndroidManifest.xml
# new file: unity/bin/jarlist.cache
# new file: unity/ic_launcher-web.png
# new file: unity/libs/android-support-v4.jar

12) Now commit the files to the local repository with the command below

git commit -m “Unity – Unit converter code”
[master (root-commit) aedab49] Unity – Unit converter code
39 files changed, 2068 insertions(+), 0 deletions(-)
create mode 100644 unity/.classpath
create mode 100644 unity/.project
create mode 100644 unity/.settings/org.eclipse.jdt.core.prefs
create mode 100644 unity/AndroidManifest.xml
create mode 100644 unity/bin/jarlist.cache

13) Check the status again which shows all files commmitted to the repository

git status
# On branch master
nothing to commit (working directory clean)

14) Create an alias for the remote GitHub repository
git remote add unity https://github.com/tvganesh/unity.git

15) Push your local repository to GitHub
git push unity master
Username:
Password:
Counting objects: 56, done.
Delta compression using up to 2 threads.
Compressing objects: 100% (48/48), done.
Writing objects: 100% (56/56), 430.66 KiB, done.
Total 56 (delta 12), reused 0 (delta 0)
To https://github.com/tvganesh/unity.git
* [new branch] master -> master

Check github for update

16) If you have a README.md at Github while creating you may get the following error
To https://github.com/tvganesh/unity.git
! [rejected] master -> master (non-fast-forward)
error: failed to push some refs to ‘https://github.com/tvganesh/unity.git&#8217;
To prevent you from losing history, non-fast-forward updates were rejected
Merge the remote changes before pushing again. See the ‘Note about
fast-forwards’ section of ‘git push –help’ for details.

17) To fix this simply do

git pull unity master
git merge master

and then
git push unity master

16) Now check Git Hub you should see all your files in the repository you pushed to. You should see an exact replica

unity

17) You can clone an entire poject from GitHub using
git clone https://github.com/tvganesh/unity.git

<a href=”https://plus.google.com/103077316191161424665/?rel=author”>Find me on Google+</a>

The making of Dino Pong android game

DSC00016Dino Pong is my first android game from concept to completion. It is based on the android game engine AndEngine. This post gives the main hightights in the making of this fairly simple but interesting game.

Do take a look at my earlier post “Creating a simple android game using AndEngine” to understand how the basic game can be setup.

You can clone the entire project at Git Hub Dino Pong game

A video clip of Dino Pong in action can be seen here – Dino Pong clip

For the Dino Pong game I wanted the following

  1. 3 animated sprites that bounced off walls and moved with different velocities and paddle
  2. A DigitalOnScreenController that controls the paddle
  3. Collision detection between the paddle and the sprites and between the sprites themselves
  4. Points awarded for hitting a sprite with a paddle and points deducted for misses at the point of contact
  5. A game board showing hits, misses and the total score

So I created 3 animated sprites. Take a look at my earlier post on how to create an animated dino. So in the onCreateResources the 3 animated sprites and the paddle are created as below

Animated Sprites and paddle

// Create a ball

this.mBitmapTextureAtlas = new BitmapTextureAtlas(this.getTextureManager(), 64, 32, TextureOptions.BILINEAR);

this.mFaceTextureRegion = BitmapTextureAtlasTextureRegionFactory.createTiledFromAsset(this.mBitmapTextureAtlas, this, “face_circle_tiled.png”, 0, 0, 2, 1);

this.mBitmapTextureAtlas.load();

// Create a bront

this.mBitmapTextureAtlas = new BitmapTextureAtlas(this.getTextureManager(), 160, 64, TextureOptions.BILINEAR);

this.mBrontTextureRegion = BitmapTextureAtlasTextureRegionFactory.createTiledFromAsset(this.mBitmapTextureAtlas, this, “bront2_tiled.png”, 0, 0, 5, 1); //

this.mBitmapTextureAtlas.load();

// Create a paddle

this.mBitmapTextureAtlas = new BitmapTextureAtlas(this.getTOnCextureManager(), 90, 30, TextureOptions.BILINEAR);

this.mPaddleTextureRegion = BitmapTextureAtlasTextureRegionFactory.createFromAsset(this.mBitmapTextureAtlas, this, “paddle1.png”, 0, 0);

this.mBitmapTextureAtlas.load();

// Create a Box face

this.mBitmapTextureAtlas = new BitmapTextureAtlas(this.getTextureManager(), 64, 64, TextureOptions.BILINEAR);

this.mBoxFaceTextureRegion = BitmapTextureAtlasTextureRegionFactory.createTiledFromAsset(this.mBitmapTextureAtlas, this, “face_box_tiled.png”, 0, 0, 2, 1); // 64×32

this.mBitmapTextureAtlas.load();

In the onCreateScene the animated sprites and the paddle are added to the scene and attached to it as below

// Add ball to scene

finalfloat Y = (CAMERA_HEIGHTthis.mFaceTextureRegion.getHeight()) / 2;

ball = new Ball(X, Y, this.mFaceTextureRegion, this.getVertexBufferObjectManager());

scene.attachChild(ball);

// Add box to scene

finalfloat X1 = (CAMERA_WIDTHthis.mBoxFaceTextureRegion.getWidth()) / 2;

finalfloat Y1 = 270;

box = new Box(X1, Y1, this.mBoxFaceTextureRegion, this.getVertexBufferObjectManager());

scene.attachChild(box);

// Add paddle

finalfloat centerX = (CAMERA_WIDTHthis.mPaddleTextureRegion.getWidth()) / 2;

float centerY = 320;

paddle = new Sprite(centerX, centerY, this.mPaddleTextureRegion, this.getVertexBufferObjectManager());

final PhysicsHandler physicsHandler = new PhysicsHandler(paddle);

paddle.registerUpdateHandler(physicsHandler);

scene.attachChild(paddle);

// Create a shaking brontosaurus

finalfloat cX = (CAMERA_WIDTHthis.mBrontTextureRegion.getWidth())/2;

finalfloat cY = 50;

bront = new Bront(cX, cY, this.mBrontTextureRegion, this.getVertexBufferObjectManager());

bront.registerUpdateHandler(physicsHandler);

scene.attachChild(bront);

The paddle is registered with a physicsHandler. All the animated instances all register with the physicsHandler to be able to detect collisions.

DigitalOnScreenController for controlling paddle : For this game I have used a DigitalOnScreenController as opposed to the analog version. The digital controller seems to have a smoother movement and diagonal movements are disabled. The code for this taken from AndEngine examples.

// Add a digital on screen control

this.mDigitalOnScreenControl = new DigitalOnScreenControl(50, CAMERA_HEIGHTthis.mOnScreenControlBaseTextureRegion.getHeight() + 20, this.mCamera, this.mOnScreenControlBaseTextureRegion, this.mOnScreenControlKnobTextureRegion, 0.1f, this.getVertexBufferObjectManager(), new IOnScreenControlListener() {

@Override

publicvoid onControlChange(final BaseOnScreenControl pBaseOnScreenControl, finalfloat pValueX, finalfloat pValueY) {

physicsHandler.setVelocity(pValueX * 100, 0);

}

});

this.mDigitalOnScreenControl.getControlBase().setBlendFunction(GLES20.GL_SRC_ALPHA, GLES20.GL_ONE_MINUS_SRC_ALPHA);

this.mDigitalOnScreenControl.getControlBase().setAlpha(0.5f);

this.mDigitalOnScreenControl.getControlBase().setScaleCenter(0, 128);

this.mDigitalOnScreenControl.getControlBase().setScale(1.25f);

this.mDigitalOnScreenControl.getControlKnob().setScale(1.25f);

this.mDigitalOnScreenControl.refreshControlKnobPosition();

scene.setChildScene(this.mDigitalOnScreenControl);

One of the thing I did was to disable vertical movements of the controlled object the paddle. Hence the physicsHandler sets the y value to ‘0’ as shown above

publicvoid onControlChange(final BaseOnScreenControl pBaseOnScreenControl, finalfloat pValueX, finalfloat pValueY) {

physicsHandler.setVelocity(pValueX * 100, 0);

}

Handling collisions :

As I mentioned above all the animated sprites (brontosaurus, face_circle & face_box) register with physics handler when the object is instantiated

privatestaticclass Bront extends AnimatedSprite {

privatefinal PhysicsHandler mPhysicsHandler;

floatx,y;

public Bront(finalfloat pX, finalfloat pY, final TiledTextureRegion pTextureRegion, final VertexBufferObjectManager pVertexBufferObjectManager) {

super(pX, pY, pTextureRegion, pVertexBufferObjectManager);

this.animate(100);

this.mPhysicsHandler = new PhysicsHandler(this);

this.registerUpdateHandler(this.mPhysicsHandler);

// Change the angle to the horizontal

this.mPhysicsHandler.setVelocity(BRONT_VELOCITY, BRONT_VELOCITY);

}

If the paddle misses the sprite then when the sprite collides with the bottom wall a point is deducted

if(this.mY < 0) {

this.mPhysicsHandler.setVelocityY(BRONT_VELOCITY);

//bText.setText(“”);

} elseif(this.mY + this.getHeight() + 80 > CAMERA_HEIGHT) {

x = this.getX();

y = this.getY();

bText.setPosition(x-10,y + 20);

bText.setText(“-1”);

misses = misses – 1;

score = score -1;

missesText.setText(“Misses: “+ misses);

scoreText.setText(“Score: “ + score);

Also the sprite is restarted from the top at the same ‘x’ coordinate

// At bottom. Restart from the top

this.setPosition(x, 0);

this.mPhysicsHandler.setVelocityY(-BRONT_VELOCITY);

The collision with the paddle, face_circle & face_box are checked here

if(paddle.collidesWith(this) || this.collidesWith(paddle)){

x = this.getX();

y = this.getY();

bText.setPosition(x+10,y+10);

bText.setText(“+1”);

hits = hits + 1;

score = score + 1;

float vx = this.mPhysicsHandler.getVelocityX();

float vy = this.mPhysicsHandler.getVelocityY();

this.mPhysicsHandler.setVelocity(-vx,-vy);

}

if(ball.collidesWith(this)){

float vx = this.mPhysicsHandler.getVelocityX();

float vy = this.mPhysicsHandler.getVelocityY();

this.mPhysicsHandler.setVelocity(-vx,-vy);

}

Similarly the collision checks are done for the other 2 sprites.

When the paddle successfuly hits a sprite the points are awarded at the point of contact

if(paddle.collidesWith(this) || this.collidesWith(paddle)){

x = this.getX();

y = this.getY();

bText.setPosition(x-10,y + 20);

bText.setText(“-1”);

The score is updated simulataneously for each hit or miss

hitsText.setText(“Hits: “+ hits);

scoreText.setText(“Score: “ + score);

hits = hits + 1;

score = score + 1;

Additional tweaks

  1. The size of the DigitalOnScreenController was shrunk by half as it seemed oversized for my Android phone

  2. A box is drawn within which the sprites can bounce off allowing space for the score at the bottom

final Line line1 = new Line(0, 0, 320, 0, 5, this.getVertexBufferObjectManager());

final Line line2 = new Line(320, 0, 320, 400, 5, this.getVertexBufferObjectManager());

final Line line3 = new Line(320, 400, 0, 400, 5, this.getVertexBufferObjectManager());

final Line line4 = new Line(0, 400, 0, 0, 5, this.getVertexBufferObjectManager());

// Add bounded rectangle to scene

scene.attachChild(line1);

scene.attachChild(line2);

scene.attachChild(line3);

scene.attachChild(line4);

  1. The velocities of the 3 sprites are made slightly different

  2. The x & y components of the velocity of the face_circle and face_box differ to enable a slightly different angle of motion.

A video clip of Dino Pong in action can be seen here – Dino Pong clip

You can clone the entire project at Git Hub  Dino Pong game

or the complete code can be downloaded at DinoPong.zip

Issues: One of the issues I see is that when the paddle hits the middle of any sprite then the sprite appears to get locked and does not bounce off. Sometimes 2 sprites also get into this ‘deadly embrace’ before getting themselves released. It appears that successive collisions happen before the velocity and position can be changed hence resulting in this lock up. Any ideas on fixing this are welcome.

Do let me know your thoughts on this game.

Find me on Google+

Creating a simple android game using AndEngine

IMG_8928AndEngine is the really cool android game engine developed by Nicolas Gramlich. This post gives the steps needed to create a simple android game using AndEngine. Please look at my previous post “Getting started with AndEngine” for details of downloading and configuring the AndEngine in your Eclipse environment.

Fortunately AndEngine comes with a lot of examples which are a good starting point for creating of a game. After you installed AndEngine on your phone do give the examples a try and understand their behavior. You should then be able to suitably mix & match different components for the game you need.

In my case as a start I wanted to develop a simple Pong game with a paddle and an animated sprite for the ball. So I checked out the following examples

  1. Drawing a Sprite – SpriteExample.java
  2. Removing a Sprite – SpriteRemoveExample.java
  3. Drawing Animated Sprites – AnimatedSpriteExample.java
  4. A Moving ball example – MovingBallExample.java
  5. Analog On Screen Control – AnalogOnScreenControlExample.java
  6. Collision Detection – CollisionDetectionExample.java

Once I was fairly familiar with the above examples I started by creating an Android Project from Eclipse. I next copied the entire contents of AnalogOnScreenControlExample .java to the /src folder in a file named Pong.java. I changed the package details and also the class name from AnalogOnScreenControlExample to Pong.

Once this is done you have to do the following steps which is very important

  1. Click Project->Properties->Java Compiler and chose “Enable project specific setting” and select 1.6
  2. Click Project->Properties->Android and select Android 4.2
  3. Click Project-> Properties->Android  and under Library click the Add button and select AndEngine as a library.

Managing a paddle with the AnalogOnScreenController

Since I wanted to move a Pong paddle instead of the sprite in the above example I downloaded a jpg file for the paddle and copied it to

/assets/gfx

You must also copy the onscreen_control_base.png and onscreen_control_knob.png to /assets/gfx folder.

Build and run you program by connecting your phone through a USB cable. You should see the on screen control and the paddle. For my game I did not need the rotary control so I removed it and only kept the control for handling the velocity of my paddle.

Once you have your basic code working you can add the other parts. For my game I needed the following

  1. Animated Sprite
  2. A moving animated sprite
  3. Collision detection of the sprite with the paddle

Animated Sprite: To create an animated sprite you have to create a tiled picture with slight variations of the image. I downloaded a jpg of a brontosaurus and used GIMP to tile the picture with 5 tiles. For this in GIMP choose Filters->Map-> and choose %. Unlink the Width & Height and set the Width to 500% and height to 100%. This will create 5 vertical adjacent tiles. Then I applied transform->shear to each individual tile so that in effect it will look like an animated dino.

One this png is created you will have to copy it to assets/gfx folders and use in onCreateResources()

this.mBitmapTextureAtlas = new BitmapTextureAtlas(this.getTextureManager(), 64, 160, TextureOptions.BILINEAR);

this.mBrontTextureRegion = BitmapTextureAtlasTextureRegionFactory.createTiledFromAsset(this.mBitmapTextureAtlas, this, “bront1_tiled.png”, 0, 0, 1, 5); //

this.mBitmapTextureAtlas.load();

This typically is animated as follows

bront = new AnimatedSprite(pX, pY, this.mBrontTextureRegion, this.getVertexBufferObjectManager());

bront.animate(200);

Creating a moving animated Sprite : For this I picked up the code from the MovingBallExample.java as follows and replaced the ball sprite with my bront sprite

final Bront bront = new Bront(cX, cY, this.mBrontTextureRegion, this.getVertexBufferObjectManager());

bront.registerUpdateHandler(physicsHandler);

scene.attachChild(bront);

….

privatestaticclass Bront extends AnimatedSprite {

public Bront(finalfloat pX, finalfloat pY, final TiledTextureRegion pTextureRegion, final VertexBufferObjectManager pVertexBufferObjectManager) {

super(pX, pY, pTextureRegion, pVertexBufferObjectManager);

this.animate(100);

Create a moving sprite For this I picked up the appropriate code from the MovingBallExample.java and massaged it a bit to handle my animated bront sprite

privatestaticclass Bront extends AnimatedSprite {

privatefinal PhysicsHandler mPhysicsHandler;

public Bront(finalfloat pX, finalfloat pY, final TiledTextureRegion pTextureRegion, final VertexBufferObjectManager pVertexBufferObjectManager) {

….

this.mPhysicsHandler = new PhysicsHandler(this);

this.registerUpdateHandler(this.mPhysicsHandler);

this.mPhysicsHandler.setVelocity(DEMO_VELOCITY, DEMO_VELOCITY);

}

@Override

protectedvoid onManagedUpdate(finalfloat pSecondsElapsed) {

if(this.mX < 0) {

this.mPhysicsHandler.setVelocityX(DEMO_VELOCITY);

} elseif(this.mX + this.getWidth() > CAMERA_WIDTH) {

this.mPhysicsHandler.setVelocityX(-DEMO_VELOCITY);

}

if(this.mY < 0) {

this.mPhysicsHandler.setVelocityY(DEMO_VELOCITY);

} elseif(this.mY + this.getHeight() > CAMERA_HEIGHT) {

this.mPhysicsHandler.setVelocityY(-DEMO_VELOCITY);

}

Handling collisions: To handle the collisions the code in CollisionDetectionExample.java comes handy. So the paddle which is controlled by the onScreenAnalogControl will detect collisions with the animated sprite as below

and reverses the velocity component on collision detection

@Override

protectedvoid onManagedUpdate(finalfloat pSecondsElapsed) {

….

if(paddle.collidesWith(this)){

float vx = this.mPhysicsHandler.getVelocityX();

float vy = this.mPhysicsHandler.getVelocityY();

this.mPhysicsHandler.setVelocity(-vx,-vy);

}

super.onManagedUpdate(pSecondsElapsed);

So thats about all. We have a basic pong game ready! The game definitely needs more enhancements which I propose to do in the coming days. Watch this space!

Checkout the video clip of the  Pong game in action.

You can download the code from Pong.zip


Find me on Google+