Here is an idea of mine that has been slow cooking in my head for more than 1 and a 1/2 year. Finally managed to work its way to IP.com. See link below
Architecting a cloud based IP Multimedia System (IMS)
The full article is included below
Abstract
This article describes an innovative technique of “cloudifying” the network elements of the IP Multimedia (IMS) framework in order to take advantage of keys benefits of the cloud like elasticity and the utility style pricing. This approach will provide numerous advantages to the Service Provider like better Return-on-Investment(ROI), reduction in capital expenditure and quicker deployment times, besides offering the end customer benefits like the availability of high speed and imaginative IP multimedia services
Introduction
IP Multimedia Systems (IMS) is the architectural framework proposed by 3GPP body to establish and maintain multimedia sessions using an all IP network. IMS is a grand vision that is access network agnostic, uses an all IP backbone to begin, manage and release multimedia sessions. This is done through network elements called Call Session Control Function (CSCFs), Home Subscriber Systems (HSS) and Application Servers (AS). The CSCFs use SDP over SIP protocol to communicate with other CSCFs and the Application Servers (AS’es). The CSCFs also use DIAMETER to talk to the Home Subscriber System (HSS’es).
Session Initiation Protocol (SIP) is used for signaling between the CSCFs to begin, control and release multi-media sessions and Session Description Protocol (SDP) is used to describe the type of media (voice, video or data). DIAMETER is used by the CSCFs to access the HSS. All these protocols work over IP. The use of an all IP core network for both signaling and transmitting bearer media makes the IMS a very prospective candidate for the cloud system.
This article proposes a novel technique of “cloudifying” the network elements of the IMS framework (CSCFs) in order to take advantage of the cloud technology for an all IP network. Essentially this idea proposes deploying the CSCFs (P-CSCF, I-CSCF, S-CSCF, BGCF) over a public cloud. The HSS and AS’es can be deployed over a private cloud for security reasons. The above network elements either use SIP/SDP over IP or DIAMETER over IP. Hence these network elements can be deployed as instances on the servers in the cloud with NIC cards. Note: This does not include the Media Gateway Control Function (MGCF) and the Media Gate Way (MGW) as they require SS7 interfaces. Since IP is used between the servers in the cloud the network elements can setup, maintain and release SIP calls over the servers of the cloud. Hence the IMS framework can be effectively “cloudified” by adopting a hybrid solution of public cloud for the CSCF entities and the private cloud for the HSS’es and AS’es.
This idea enables the deployment of IMS and the ability for the Operator, Equipment Manufacturer and the customer to quickly reap the benefits of the IMS vision while minimizing the risk of such a deployment.
Summary
IP Multimedia Systems (IMS) has been in the wings for some time. There have been several deployments by the major equipment manufacturers, but IMS is simply not happening. The vision of IMS is truly grandiose. IMS envisages an all-IP core with several servers known as Call Session Control Function (CSCF) participating to setup, maintain and release of multi-media call sessions. The multi-media sessions can be any combination of voice, data and video.
In the 3GPP Release 5 Architecture IMS draws an architecture of Proxy CSCF (P-CSCF), Serving CSCF(S-CSCF), Interrogating CSCF(I-CSCF), and Breakout CSCF(BGCF), Media Gateway Control Function (MGCF), Home Subscriber Server(HSS) and Application Servers (AS) acting in concert in setting up, maintaining and release media sessions. The main protocols used in IMS are SIP/SDP for managing media sessions which could be voice, data or video and DIAMETER to the HSS.
IMS is also access agnostic and is capable of handling landline or wireless calls over multiple devices from the mobile, laptop, PDA, smartphones or tablet PCs. The application possibilities of IMS are endless from video calling, live multi-player games to video chatting and mobile handoffs of calls from mobile phones to laptop. Despite the numerous possibilities IMS has not made prime time.
The technology has not turned into a money spinner for Operators. One of the reasons may be that Operators are averse to investing enormous amounts into new technology and turning their network upside down.
The IMS framework uses CSCFs which work in concert to setup, manage and release multi media sessions. This is done by using SDP over SIP for signaling and media description. Another very prevalent protocol used in IMS is DIAMETER. DIAMETER is the protocol that is used for authorizing, authenticating and accounting of subscribers which are maintained in the Home Subscriber System (HSS). All the above protocols namely SDP/SIP and DIAMETER protocols work over IP which makes the entire IMS framework an excellent candidate for deploying on the cloud.
Benefits
There are 6 key benefits that will accrue directly from the above cloud deployment for the IMS. Such a cloud deployment will
i. Obviate the need for upfront costs for the Operator
ii. The elasticity and utility style pricing of the cloud will have multiple benefits for the Service Provider and customer
iii. Provider quicker ROI for the Service Provider by utilizing a innovative business model of revenue-sharing for the Operator and the equipment manufacturer
iv. Make headway in IP Multimedia Systems
v. Enable users of the IMS to avail of high speed and imaginative new services combining voice, data, video and mobility.
vi. The Service Provider can start with a small deployment and grow as the subscriber base and traffic grows in his network
Also, a cloud deployment of the IMS solution has multiple advantages to all the parties involved namely
a) The Equipment manufacturer
b) The Service Provider
c) The customer
A cloud deployment of IMS will serve to break the inertia that Operators have for deploying new architectures in the network.
a) The Equipment manufactures for e.g. the telecommunication organizations that create the software for the CSCFs can license the applications to the Operators based on innovative business model of revenue sharing with the Operator based on usage
b) The Service Provider or the Operator does away with the Capital Expenditure (CAPEX) involved in buying CSCFs along with the hardware. The cost savings can be passed on to the consumers whose video, data or voice calls will be cheaper. Besides, the absence of CAPEX will provide better margins to the operator. A cloud based IMS will also greatly reduce the complexity of dimensioning a core network. Inaccurate dimensioning can result in either over-provisioning or under-provisioning of the network. Utilizing a cloud for deploying the CSCFs, HSS and AS can obviate the need upfront infrastructure expenses for the Operator. As mentioned above the Service Provider can pay the equipment manufactured based on the number of calls or traffic through the system
c) Lastly the customer stands to gain as the IMS vision truly allows for high speed multimedia sessions with complex interactions like multi-party video conferencing, handoffs from mobile to laptop or vice versa. Besides IMS also allows for whiteboarding and multi-player gaming sessions.
Also the elasticity of the cloud can be taken advantage of by the Operator who can start small and automatically scale as the user base grows.
Description
This article describes a method in which the Call Session Control Function (CSCFs) namely the P-CSCF, S-CSCF,I-CSCF and BGCF can be deployed on a public cloud. This is possible because there are no security risks associated with deploying the CSCFs on the public cloud. Moreover the elasticity and the pay per use of the public cloud are excellent attributes for such a cloudifying process. Similarly the HSS’es and AS’es can be deployed on a private cloud. This is required because the HSS and the AS do have security considerations as they hold important subscriber data like the IMS Public User Identity (IMPU) and the IMS Private User Identity (IMPI). However, the Media Gateway Control Function (MGCF) and Media Gateway (MGW) are not included this architecture as these 2 elements require SS7 interfaces
Using the cloud for deployment can bring in the benefits of zero upfront costs, utility style charging based on usage and the ability to grow or shrink elastically as the call traffic expands or shrinks.
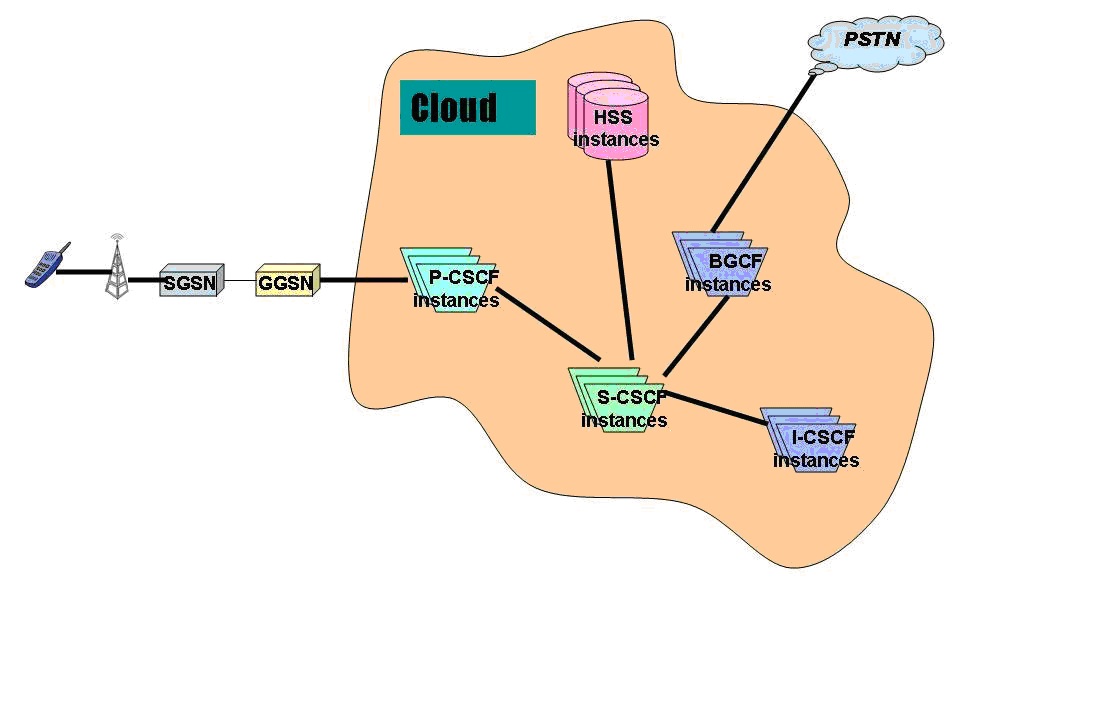
This is shown diagrammatically below where all the IMS network elements are deployed on a cloud.
In Fig 1., all the network elements are shown as being part of a cloud.

Fig 1. Cloudifying the IMS architecture.
Detailed description
This idea requires that the IMS solution be “cloudified “i.e. the P-CSCF, I-CSCF, S-CSCF and the BGCF should be deployed on a public cloud. These CSCFs are used to setup, manage and release calls and the information that is used for the call does not pose any security risk. These network elements use SIP for signaling and SDP over SIP for describing the media sessions. The media sessions can be voice, video or data.
However the HSS and AS which contain the Public User Identity (IMPU) and Private User Identity (IMPI) and other important data can be deployed in a private cloud. Hence the IMS solution needs a hybrid solution that uses both the public and private cloud. Besides the proxy SIP servers, Registrars and redirect SIP servers also can be deployed on the public cloud.
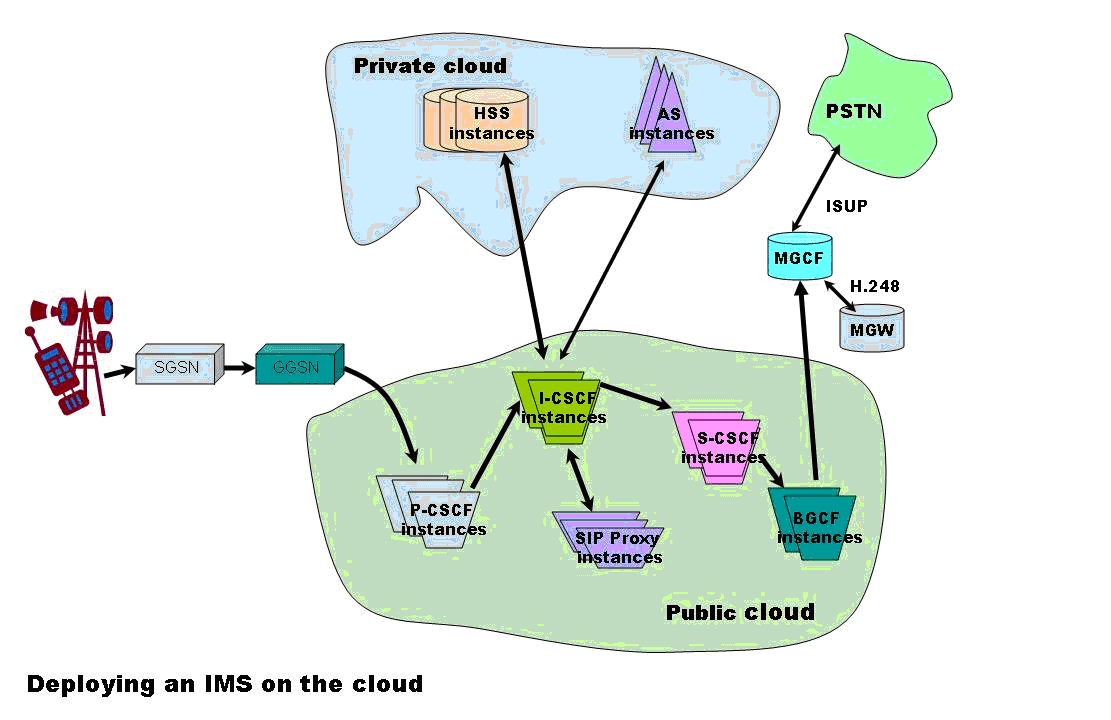
The figure Fig 2. below shows how a hybrid cloud solution can be employed for deploying the IMS framework

Fig 2: Utilizing a hybrid cloud solution for deploying the IMS architecture
The call from a user typically originated from a SIP phone and will initially reach the P-CSCF. After passing through several SIP servers it will reach a I-CSCF. The I-CSCF will use DIAMETER to query the HSS for the correct S-CSCF to handle the call. Once the S-CSCF is identified the I-CSCF then signals the S-CSCF to reach a terminating a P-CSCF and finally the end user on his SIP phone. Since the call uses SDP over SIP we can imagine that the call is handled by P-CSCF, I-CSCF, S-CSCF and BGCF instances on the cloud. Each of the CSCFs will have the necessary stacks for communicating to the next CSCF. The CSCF typically use SIP/SDP over TCP or UDP and finally over IP. Moreover query from the I-CSCF or S-CSCF to the HSS will use DIAMTER over UDP/IP. Since IP is the prevalent technology between servers in the cloud communication between CSCFs is possible.
Methodology
The Call Session Control Functions (CSCFs P-CSCF, I-CSCF, S-CSCF, BGCF) typically handle the setup, maintenance and release of SIP sessions. These CSCFs use either SIP/SDP to communicate to other CSCFs, AS’es or SIP proxies or they use DIAMETER to talk to the HSS. SIP/SDP is used over either the TCP or the UDP protocol.
We can view each of the CSCF, HSS or AS as an application capable of managing SIP or DIAMETER sessions. For this these CSCFs need to maintain different protocol stacks towards other network elements. Since these CSCFs are primarily applications which communicate over IP using protocols over it, it makes eminent sense for deploying these CSCFs over the cloud.
The public cloud contains servers in which instances of applications can run in virtual machines (VMs). These instances can communicate to other instances on other servers using IP. In essence the entire IMS framework can be viewed as CSCF instances which communicate to other CSCF instances, HSS or AS over IP. Hence to setup, maintain and release SIP sessions we can view that instances of P-CSCF, I-CSCF, S-CSCF and B-CSCF executed as separate instances on the servers of a public cloud and communicated using the protocol stacks required for the next network element. The protocol stacks for the different network elements is shown below
The CSCF’s namely the P-CSCF, I-CSCF, S-CSCF & the BGCF all have protocol interfaces that use IP. The detailed protocol stacks for each of these network elements are shown below. Since they communicate over IP the servers need to support 100 Base T Network Interface Cards (NIC) and can typically use RJ-45 connector cables, Hence it is obvious that high performance servers which have 100 Base T NIC cards can be used for hosting the instances of the CSCFs (P-CSCF, I-CSCF, S-CSCF and BGCF). Similarly the private cloud can host the HSS which uses DIAMETER/TCP-SCTP/IP and AS uses SDP/SIP/UDP/IP. Hence these can be deployed on the private cloud.
Network Elements on the Public Cloud
The following network elements will be on the public cloud
a) P-CSCF b) I-CSCF c) S-CSCF d) BGCF
The interfaces of each of the above CSCFs are shown below
a) Proxy CSCF (P-CSCF) interface

As can be seen from above all the interfaces (Gm, Gq, Go and Mw) of the P-CSCF are either UDP/IP or SCTP/TCP/IP.
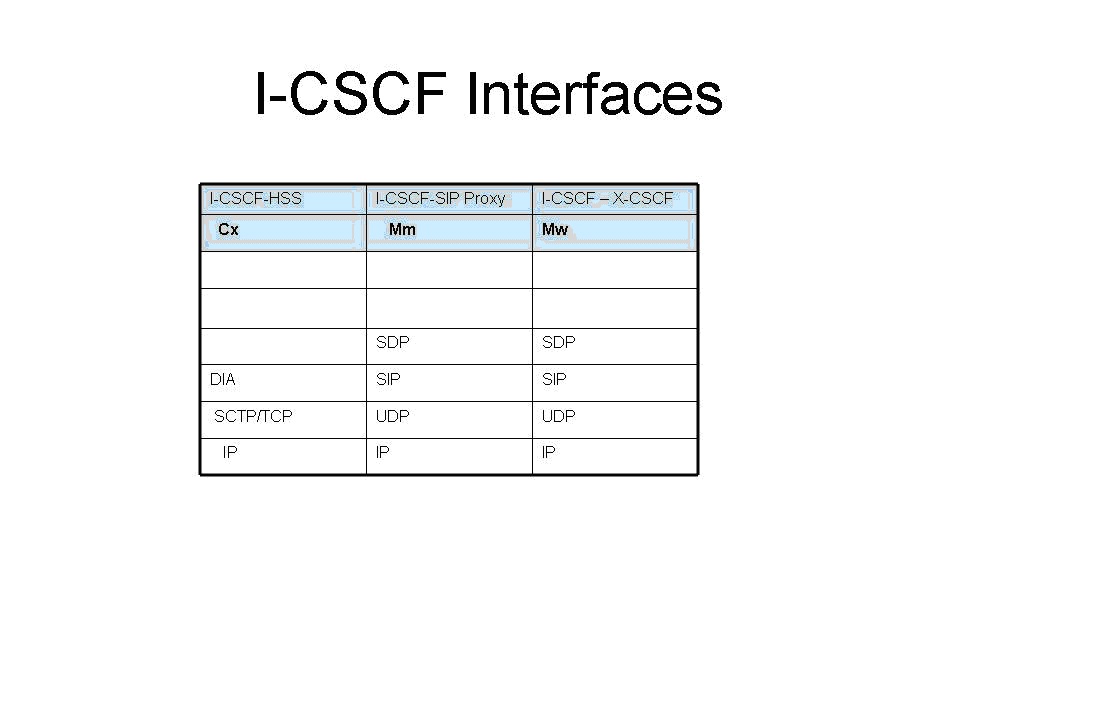
b) Interrogating CSCF(I- CSCF) interface

As can be seen from above all the interfaces (Cx, Mm and Mw) of the I-CSCF are either UDP/IP or SCTP/TCP/IP.
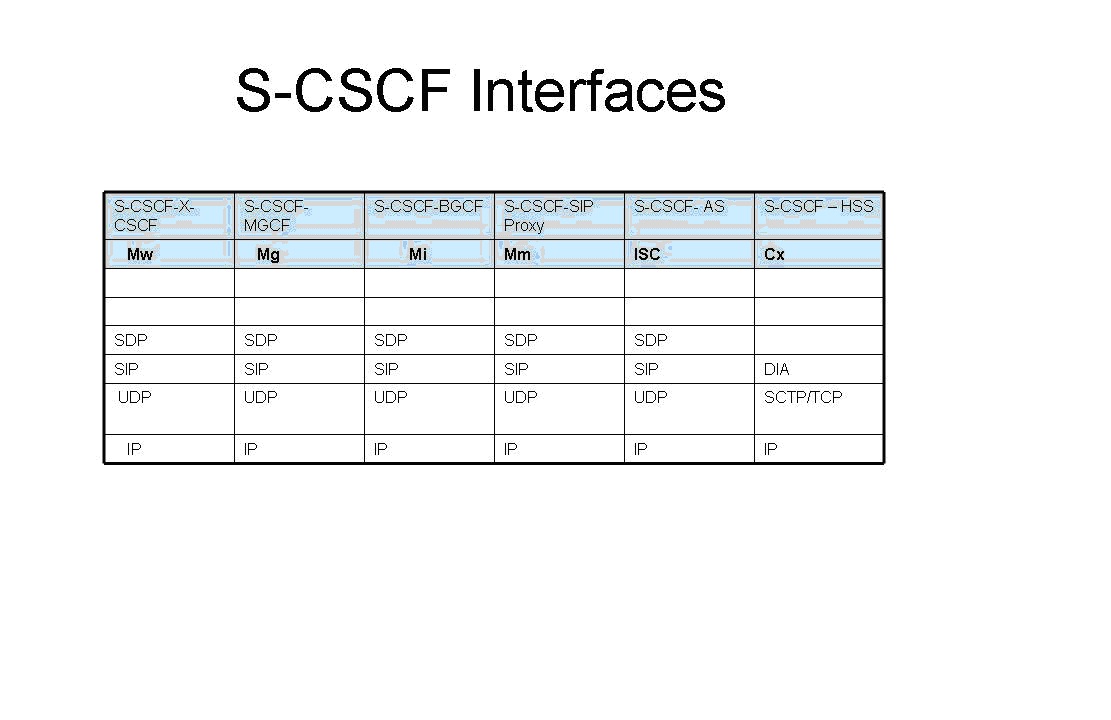
c) Serving CSCF (S-CSCF) interfaces
The interfaces of the S-CSCF (Mw, Mg, Mi, Mm, ISC and Cx) are all either UDP/IP or SCTP/TCP/IP

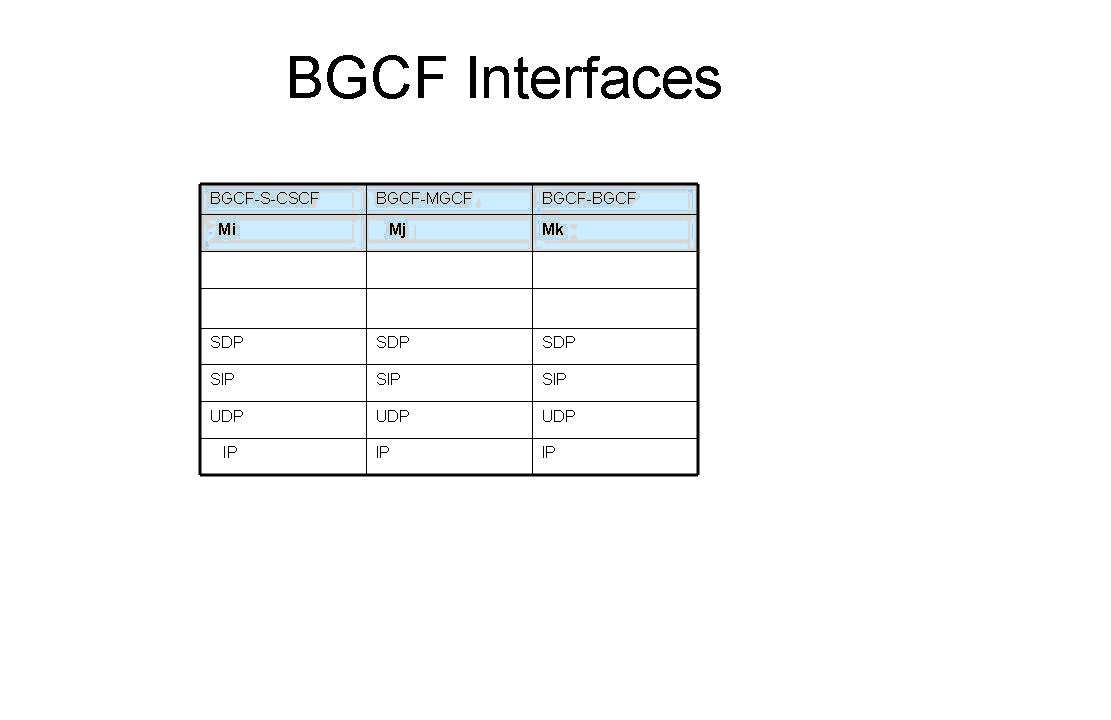
d) Breakout CSCF (BGCF) interface
The interfaces of the BGCF (Mi, Mj, Mk) are all UDP/IP.

Network elements on the private cloud
The following network elements will be on the private cloud
a) HSS b) AS
a) Home Subscriber Service (HSS) interface
The HSS interface (Cx) is DIAMETER/SCTP/TCP over IP.

b) Application Server (AS) Interface

The AS interface ISC is SDP/SIP/UDP over IP.
As can be seen the interfaces the different network elements have towards other elements are over either UDP/IP or TCP/IP.
Hence we can readily see that a cloud deployment of the IMS framework is feasible.
Conclusion
claimtoken-515bdc0894cdb
Thus it can be seen that a cloud based IMS deployment is feasible given the IP interface of the CSCFs, HSS and AS. Key features of the cloud like elasticity and utility style charging will be make the service attractive to the Service providers. A cloud based IMS deployment is truly a great combination for all parties involved namely the subscriber, the Operator and the equipment manufactures. A cloud based deployment will allow the Operator to start with a small customer base and grow as the service becomes popular. Besides the irresistibility of IMS’ high speed data and video applications are bound to capture the subscribers imagination while proving a lot cheaper.
Also see my post on “Envisioning a Software Defined Ip Multimedia System (SD-IMS)”
Find me on Google+
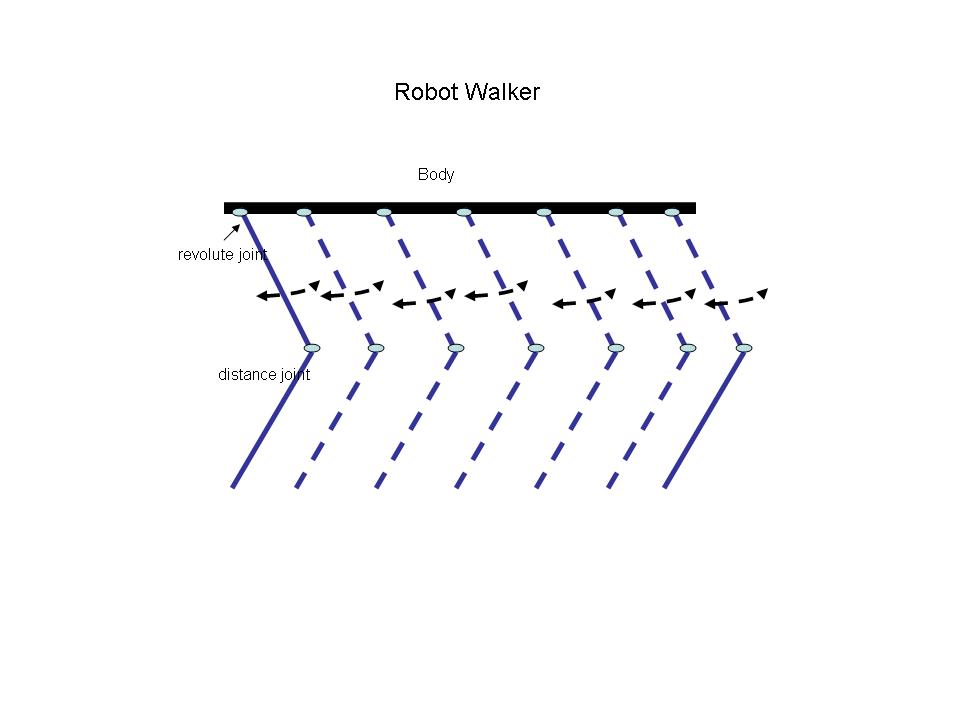 “Is it an animal? Is it an insect?”. The answer is neither. In fact it is my version of a ‘robot walker’ in android using Box2D & AndEngine. I got interested in this simulation after I saw the Theo Jansen walker in JBox2D (look under Joints) . I did take a look at the code for this but I found it difficult to follow so I made my own version of a robot walker.