Bend it like Bluemix, MongoDB using Auto-scaling – Part 2!

This post takes off from my previous post Bend it like Bluemix, MongoDB using Auto-scale –  Part 1! In this post I generate traffic using Multi-Mechanize a performance test framework and check out the auto-scaling on Bluemix, besides also doing some rudimentary check on the latency and throughput for this test application. In this particular post I generate concurrent threads which insert documents into MongoDB.

Note: As mentioned in my earlier post this is more of a prototype and the typical situation when architecting cloud applications. Clearly I have not optimized my cloud app (bluemixMongo) for maximum efficiency. Also this a simple 2 tier application with a rudimentary Web interface and a NoSQL DB at This is more of a Proof of Concept (PoC) for the auto-scaling service on Bluemix.

As earlier mentioned the bluemixMongo app is a modification of my earlier post Spicing up a IBM Bluemix cloud app with MongoDB and NodeExpress. The bluemixMongo cloud app that was used for this auto-scaling test can be forked from Devops at bluemixMongo or from GitHib at bluemix-mongo-autoscale. The Multi-mechanize config file, scripts and results can be found at GitHub in multi-mechanize

The document to be inserted into MongoDB consists of 3 fields – Firstname, Lastname and Mobile. To simulate the insertion of records into MongoDB I created a Multi-Mechanize script that will generate random combination of letters and numbers for the First and Last names and a random 9 digit number for the mobile. The code for this script is shown below

1. The snippet below measure the latency for loading the ‘New User’ page

v_user.py
def run(self):
# create a Browser instance
br = mechanize.Browser()
# don"t bother with robots.txt
br.set_handle_robots(False)
print("Rendering new user")
br.addheaders = [("User-agent", "Mozilla/5.0Compatible")]
# start the timer
start_timer = time.time()
# submit the request
resp = br.open("http://bluemixmongo.mybluemix.net/newuser")
#resp = br.open("http://localhost:3000/newuser")
resp.read()
# stop the timer
latency = time.time() - start_timer
# store the custom timer
self.custom_timers["Load Add User Page"] = latency
# think-time
time.sleep(2)

The script also measures the time taken to submit the form containing the Firstname, Lastname and Mobile

# select first (zero-based) form on page
br.select_form(nr=0)
# Create random Firstname
a = (''.join(random.choice(string.ascii_uppercase) for i in range(5)))
b = (''.join(random.choice(string.digits) for i in range(5)))
firstname = a + b
# Create random Lastname
a = (''.join(random.choice(string.ascii_uppercase) for i in range(5)))
b = (''.join(random.choice(string.digits) for i in range(5)))
lastname = a + b
# Create a random mobile number
mobile = (''.join(random.choice(string.digits) for i in range(9)))
# set form field
br.form["firstname"] = firstname
br.form["lastname"] = lastname
br.form["mobile"] = mobile
# start the timer
start_timer = time.time()
# submit the form
resp = br.submit()
print("Submitted.")
resp.read()
# stop the timer
latency = time.time() - start_timer
# store the custom timer
self.custom_timers["Add User"] = latency

2. The config.cfg file is setup to generate 2 asynchronous thread pools of 10 threads for about 400 seconds

config.cfg
run_time = 400
rampup = 0
results_ts_interval = 10
progress_bar = on
console_logging = off
xml_report = off
[user_group-1]
threads = 10
script = v_user.py
[user_group-2]
threads = 10
script = v_user.py

3. The code to add a new user in the app (adduser.js) uses the ‘async’ Node module to enforce sequential processing.

adduser.js
async.series([
function(callback)
{
collection = db.collection('phonebook', function(error, response) {
if( error ) {
return; // Return immediately
}
else {
console.log("Connected to phonebook");
}
});
callback(null, 'one');
},
function(callback)
// Insert the record into the DB
collection.insert({
"FirstName" : FirstName,
"LastName" : LastName,
"Mobile" : Mobile
}, function (err, doc) {
if (err) {
// If it failed, return error
res.send("There was a problem adding the information to the database.");
}
else {
// If it worked, redirect to userlist - Display users
res.location("userlist");
// And forward to success page
res.redirect("userlist")
}
});
collection.find().toArray(function(err, items) {
console.log("**************************>>>>>>>Length =" + items.length);
db.close(); // Make sure that the open DB connection is close
});
callback(null, 'two');
}
]);

4. To checkout auto-scaling the instance memory was kept at 128 MB. Also the scale-up policy was memory based and based on the memory of the instance exceeding 55% of 128 MB for 120 secs. The scale up based on CPU utilization was to happen when the utilization exceed 80% for 300 secs.

6

5. Check the auto-scaling policy

7

6. Initially as seen there is just a single instance

9

7. At around 48% of the script with around 623 transactions the instance is increased by 1. Note that the available memory is decreased by 640 MB – 128 MB = 512 MB.

10

8. At around 1324 transactions another instance is added

Note: Bear in mind

a) The memory threshold was artificially brought down to 55% of 128 MB.b) The app itself is not optimized for maximum efficiency

12

9. The Metric Statistics tab for the Autoscaling service shows this memory breach and the trigger for autoscaling

13

10. The Scaling history Tab for the Auto-scaling service displays the scale-up and scale-down and the policy rules based on which the scaling happened

14

11. If you go to the results folder for the Multi-mechanize tool the response and throughput are captured.

The multi-mechanize commands are executed as follows
To create a new project
multimech-newproject.exe adduser
This will create 2 folders a) results b) test_scripts and the file c) config.cfg. The v_user.py needs to be updated as required

To run the script
multimech-run.exe adduser

12.The results are shown below

a) Load Add User page (Latency)

Load Add User Page_response_times_intervals

b) Load Add User (Throughput)

Load Add User Page_throughput

c)Load Add User (Latency)

Add User_response_times_intervals

d) Load Add User (Throughput)

Add User_throughput

The detailed results can be seen at GitHub at multi-mechanize

13. Check the Monitoring and Analytics Page

a) Availability

16

b) Performance monitoring

15

So once the auto-scaling happens the application can be fine-tuned and for performance. Obviously one could do it the other way around too.

As can be seen adding NoSQL Databases like MongoDB, Redis, Cloudant DB etc. Setting up the auto-scaling policy is also painless as seen above.

Of course the real challenge in cloud applications is to make them distributed and scalable while keeping the applications themselves lean and mean!

See also

Also see
1.  Bend it like Bluemix, MongoDB with autoscaling – Part 1
3. Bend it like Bluemix, MongoDB with autoscaling – Part 3

You may like :
a) Latency, throughput implications for the cloud
b) The many faces of latency
c) Brewing a potion with Bluemix, PostgreSQL & Node.js in the cloud
d)  A Bluemix recipe with MongoDB and Node.js
e)Spicing up IBM Bluemix with MongoDB and NodeExpress
f) Rock N’ Roll with Bluemix, Cloudant & NodeExpress

a) Latency, throughput implications for the cloud

b) The many faces of latency

c) Design principles of scalable, distributed systems

Disclaimer: This article represents the author’s viewpoint only and doesn’t necessarily represent IBM’s positions, strategies or opinions

A Cloud medley with IBM Bluemix, Cloudant DB and Node.js

Published as a tutorial in IBM Cloudant – Bluemix tutorial and demos

Here is an interesting Cloud medley based on IBM’s Bluemix PaaS platform, Cloudant DB and Node.js. This application  creates a Webserver using Node.js and uses REST APIs to perform CRUD operations on a Cloudant DB. Cloudant DB is a NoSQL Database as a service (DBaaS) that can handle a wide variety of data types like JSON, full text and geo-spatial data. The documents  are stored, indexed and distributed across a elastic datastore spanning racks, datacenters and perform replication of data across datacenters.Cloudant  allows one to work with self-describing JSON documents through  RESTful APIs making every document in the Cloudant database accessible as JSON via a URL.

This application on Bluemix uses REST APIs to perform the operations of inserting, updating, deleting and listing documents on the Cloudant DB.  The code can be forked from Devops at bluemix-cloudant. The code can also be clone from GitHub at bluemix-cloudant.

1) Once the code is forked the application can be deployed on to Bluemix using

cf login -a https://api.ng.bluemix.net
cf push bm-cloudant -p . -m 512M

2) After this is successful go to the Bluemix dashboard and add the Cloudant DB service.  The CRUD operations can be performed by invoking REST API calls using an appropriate REST client like SureUtils ot Postman in the browser of your choice.

Here are the details of the Bluemix-Cloudant application

3) Once the Cloudant DB service has been added to the Web started Node.js application we need to parse the process.env variable to obtain the URL of the Cloudant DB and the port and host to be used for the Web server.

The Node.js Webserver is started based on the port and host values obtained from process.env

require('http').createServer(function(req, res) {
//Set up the DB connection
if (process.env.VCAP_SERVICES) {
// Running on Bluemix. Parse for  the port and host that we've been assigned.
var env = JSON.parse(process.env.VCAP_SERVICES);
var host = process.env.VCAP_APP_HOST;
var port = process.env.VCAP_APP_PORT;
....
}
....
// Perform CRUD operations through REST APIs
// Insert document
if(req.method == 'POST') {
insert_records(req,res);
}
// List documents
else if(req.method == 'GET') {
list_records(req,res);
}
// Update a document
else if(req.method == 'PUT') {
update_records(req,res);
}
// Delete a document
else if(req.method == 'DELETE') {
delete_record(req,res);
}
}).listen(port, host);

2) Access to the Cloudant DB Access to Cloudant DB is obtained as follows

if (process.env.VCAP_SERVICES) {
// Running on Bluemix. Parse the port and host that we've been assigned.
var env = JSON.parse(process.env.VCAP_SERVICES);
var host = process.env.VCAP_APP_HOST;
var port = process.env.VCAP_APP_PORT;
console.log('VCAP_SERVICES: %s', process.env.VCAP_SERVICES);
// Also parse Cloudant settings.
var cloudant = env['cloudantNoSQLDB'][0]['credentials'];
}
var db = new pouchdb('books'),
remote =cloudant.url + '/books';
opts = {
continuous: true
};
// Replicate the DB to remote
console.log(remote);
db.replicate.to(remote, opts);
db.replicate.from(remote, opts);

Access to the Cloudant DB is through the cloudant.url shown above

3)  Once the access to the DB is setup we can perform CRUD operations. There are many options for the backend DB. In this application I have PouchDB.

4) Inserting a document: To insert documents into the Cloudant DB based on Pouch DB we need to do the following

var insert_records = function(req, res) {
//Parse the process.env for the port and host that we've been assigned
if (process.env.VCAP_SERVICES) {
// Running on Bluemix. Parse the port and host that we've been assigned.
var env = JSON.parse(process.env.VCAP_SERVICES);
var host = process.env.VCAP_APP_HOST;
var port = process.env.VCAP_APP_PORT;
console.log('VCAP_SERVICES: %s', process.env.VCAP_SERVICES);
// Also parse Cloudant settings.
var cloudant = env['cloudantNoSQLDB'][0]['credentials'];
}
var db = new pouchdb('books'),
remote =cloudant.url + '/books';
opts = {
continuous: true
};
// Replicate the DB to remote
console.log(remote);
db.replicate.to(remote, opts);
db.replicate.from(remote, opts);
// Put 3 documents into the DB
db.put({
author: 'John Grisham',
Title : 'The Firm'
}, 'book1', function (err, response) {
console.log(err || response);
});
...
...
res.writeHead(200, {'Content-Type': 'text/plain'});
res.write("3 documents is inserted");
res.end();
}; // End insert_records

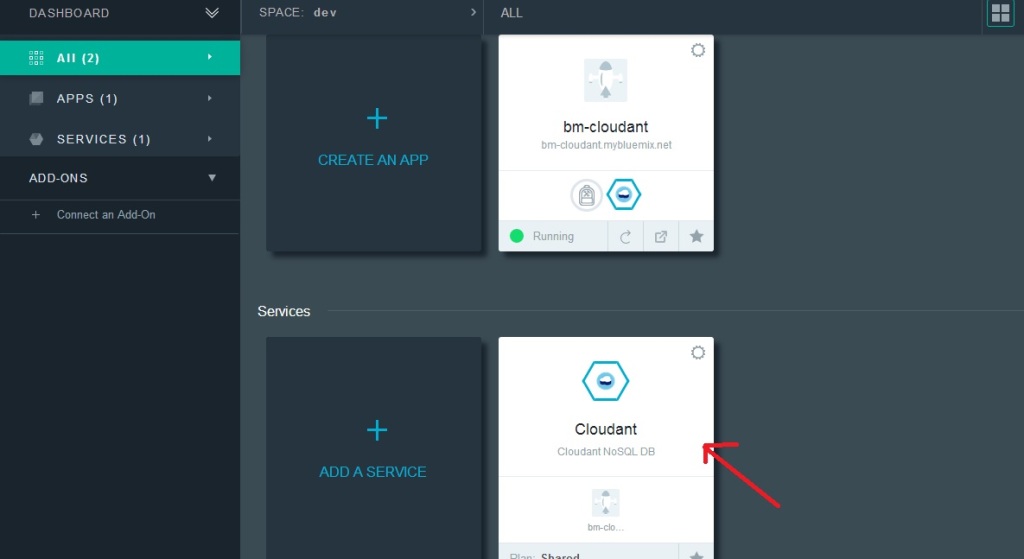
The nice part about Cloudant DB is that you can access your database through the URL. The steps are shown below. Once your application is running. Click on your application. You should see the screen as below.

1

Click on Cloudant as shown by the arrow.

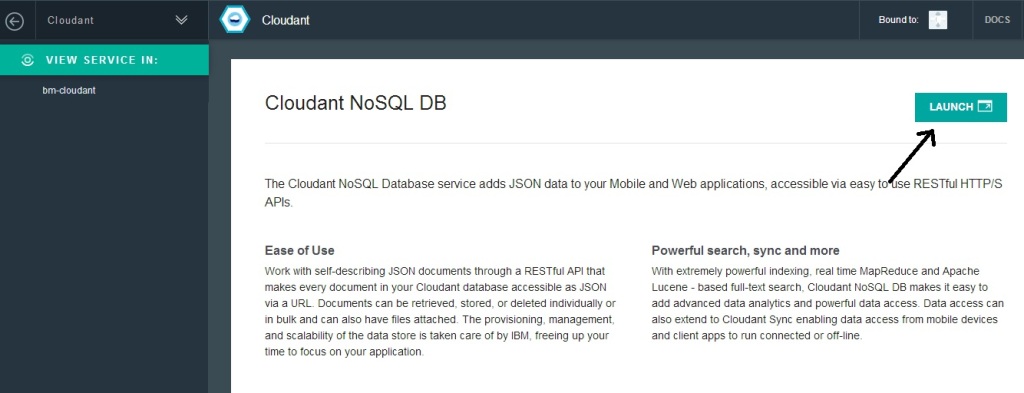
Next click on the “Launch’ icon

2

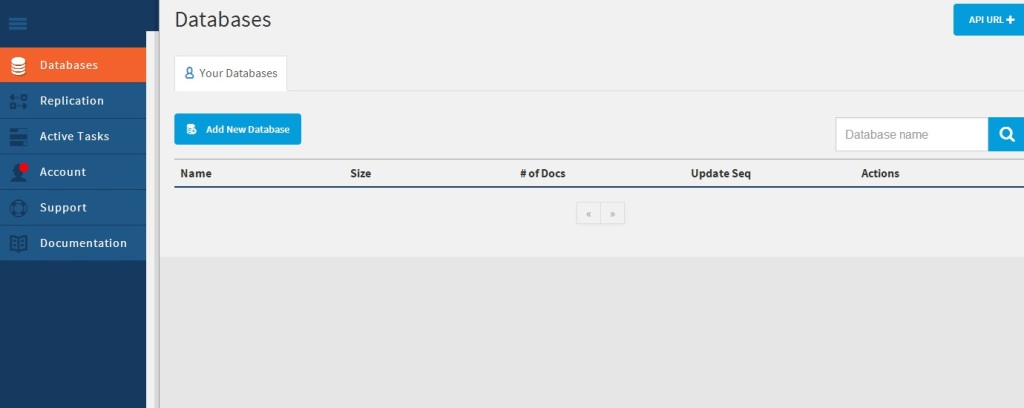
This should bring up the Cloudant dashboard. The database will be empty.

3

If you use a REST API Client to send a POST API call then the Application will insert 3 documents.

4

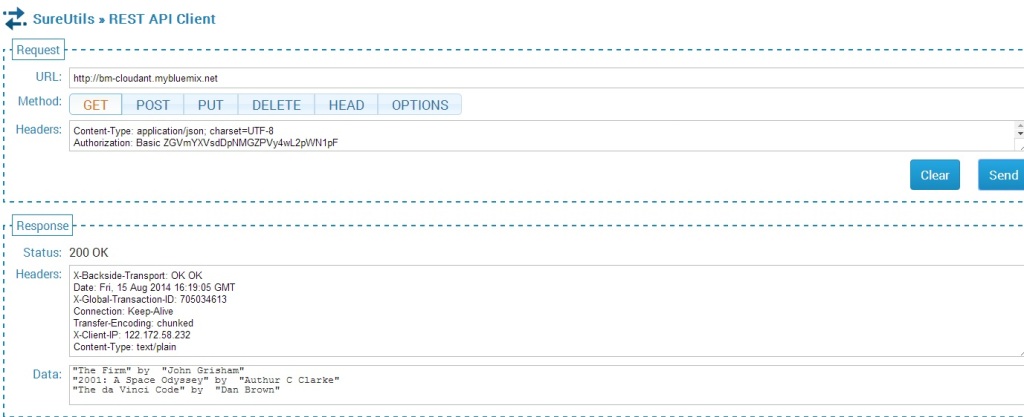
The documents inserted can be seen by sending the GET REST API call.

5

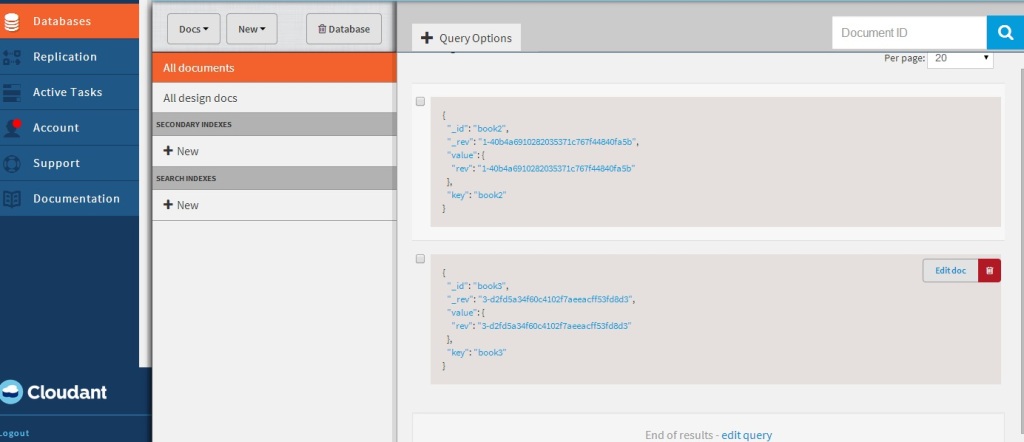
The nice part of Cloudant DB is that you can use the URL to see your database. If you refresh your screen you should see the “books” database added. Clicking this database you should see the 3 documents that have been added

6

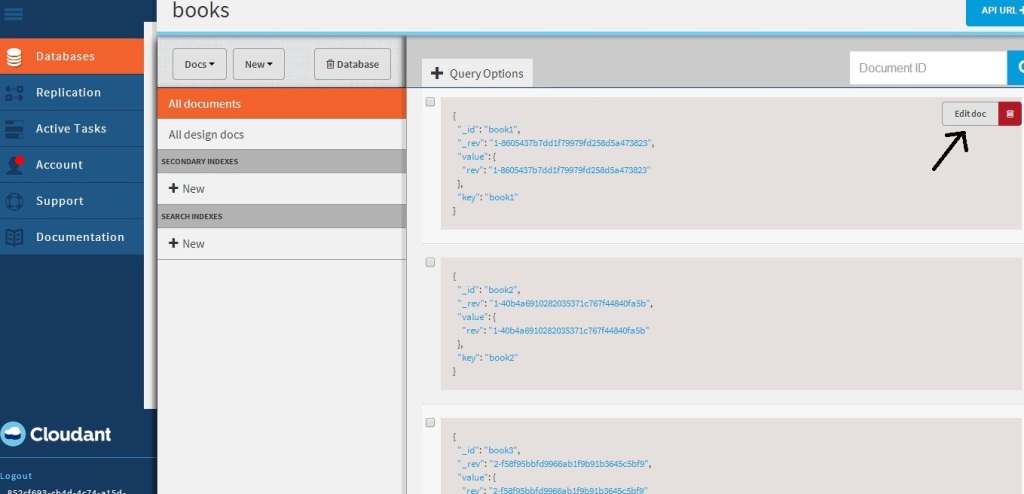
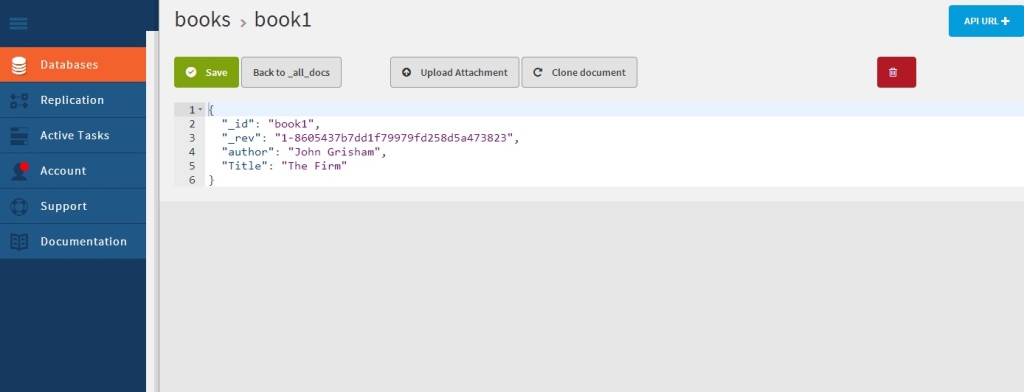
If you click “Edit doc” you should see the details of the document

7

5) Updating a document

The process to update a document in the database is shown below

// Update book3
db.get('book3', function(err, response) {
console.log(response);
return db.put({
_id: 'book3',
_rev: response._rev,
author: response.author,
Title : 'The da Vinci Code',
});
}, function(err, response) {
if (err) {
console.log("error " + err);
} else {
console.log("Success " + response);
}
});

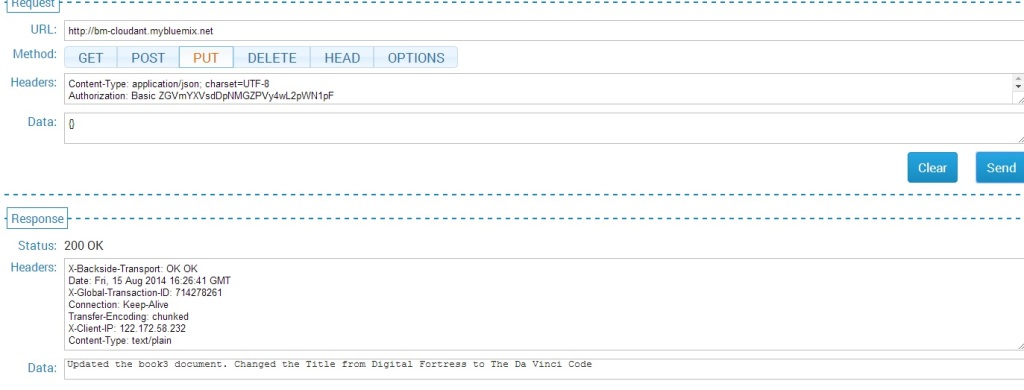
This is performed with a PUT REST API call

8

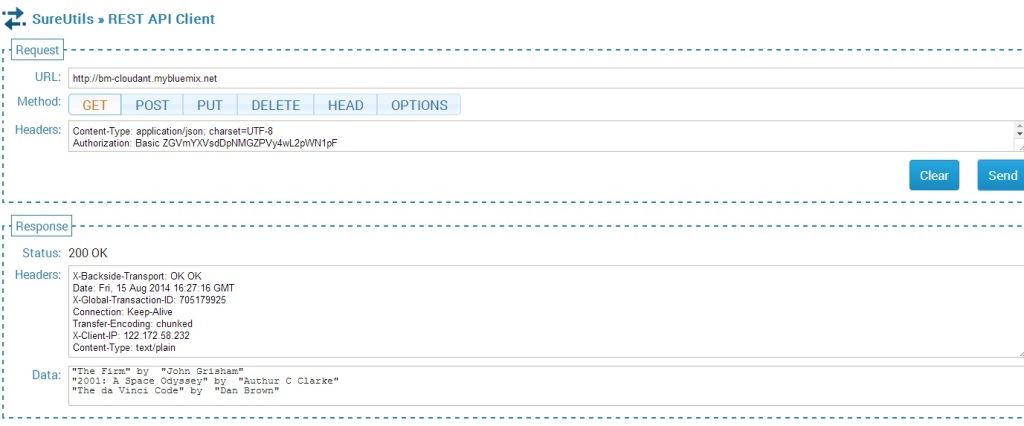
The updated list is shown below

9

This can be further verified in the Cloudant DB dashboard for book3.

10

6) Deleting a document

The code to delete a document in PouchDB is shown below

//Deleting document book1
db.get('book1', function(err, doc) {
db.remove(doc, function(err, response) {
console.log(err || response);
});
});

The REST calls to delete a document and the result  are shown below

11

12

Checking the Cloudant dashboard we see that only book2 & book3 are present and book1 has been deleted

13

7) Displaying documents in the database

The code for displaying the list of documents is shown below

var docs = db.allDocs(function(err, response) {
val = response.total_rows;
var details = "";
j=0;
for(i=0; i < val; i++) {
db.get(response.rows[i].id, function (err,doc){
j++;
details= details + JSON.stringify(doc.Title) + " by  " +  JSON.stringify(doc.author) + "\n";
// Kludge because of Node.js asynchronous handling. To be fixed - T V Ganesh
if(j == val) {
res.writeHead(200, {'Content-Type': 'text/plain'});
res.write(details);
res.end();
console.log(details);
}
}); // End db.get
} //End for
}); // End db.allDocs

If you happened to notice, I had to use a kludge to work around Node.js’ idiosyncracy of handling asynchronous calls. I was fooled by the remarkable similarity of Node.js & hence  javascript to C language that I thought functions within functions would work sequentially. However I had undergo much grief  trying to get Node.js to work sequentially. I wanted to avoid the ‘async’ module but was unsuccessful with trying to code callbacks. So the kludge! I will work this out eventually but this workaround will have to do for now!

As always you can use the “Files and Logs” in the Bluemix dashboard to get any output that are written to stdout.

Note: As always I can’t tell how useful the command
'cf  logs <application name> -- recent is for debugging.

Hope you enjoyed this Cloud Medley of Bluemix, Cloudant and Node.js!

Disclaimer: This article represents the author’s viewpoint only and doesn’t necessarily represent IBM’s positions, strategies or opinions

You may also like
1. Brewing a potion with Bluemix, PostgreSQL & Node.js in the cloud
2.  A Bluemix recipe with MongoDB and Node.js
3.  Spicing up IBM Bluemix with MongoDB and NodeExpress
4.  Rock N’ Roll with Bluemix, Cloudant & NodeExpress


Find me on Google+

A Bluemix recipe with MongoDB and Node.js

Here is a tasty IBM Bluemix recipe with a dash of MongoDB and a pinch of Node.js. This posts shows the steps needed to perform basic CRUD (Create, Remove, Update & Delete) operations on the MongoDB database using REST APIs of PUT,GET, UPDATE & DELETE.

You can fork the code for the below app from Devops at mymongodb

The code can also be cloned from GitHub at mymongodb

For this,  the first  thing we need to do is to create a Webserver using Node.js as shown below

Webserver

require('http').createServer(function(req, res) {
if ( typeof mongodb !== 'undefined' && mongodb ) {
// Perform CRUD operations through REST APIs
if(req.method == 'POST') {
insert_records(req,res);
}
else if(req.method == 'GET') {
list_records(req,res);
}
else if(req.method == 'PUT') {
update_records(req,res);
}
else if(req.method == 'DELETE') {
delete_record(req,res);
}
} else {
res.writeHead(200, {'Content-Type': 'text/plain'});
res.write("No MongoDB service instance is bound.\n");
res.end();
}
}).listen(port, host);

The Webserver users the port and host values obtained as shown above to wait for  HTTP requests.

The REST API calls are handled by individual  Node.js functions to perform the operations of insert, update, delete and select.

Insertions

The code for insertions is shown below. For this a set of 5 documents are created and then inserted using Node.js

var insert_records = function(req, res) {
var MongoClient = require('mongodb').MongoClient;
// Connect to the db
MongoClient.connect (mongo.url, function(err, db) {
//Create a collection test
var collection = db.collection('books', function(err, collection) {
//Create a set of documents to insert
var book1 = { book: "The Firm", author: "John Grisham", qty: 3 };
var book2 = { book: "Foundation", author: "Isaac Asimov", qty: 5 };
collection.remove(mycallback);
//Insert the books
console.log("Insert the books");
collection.insert(book1,function(err,result){});
collection.insert(book2, {w:1}, function(err, result) {
});
collection.insert(book5, {w:1}, function(err, result) {});
console.log('Inserted 5 books');
}); //var collection
}); // End MongoClient.connect
}; // End insert_records

Updating documents in Mongodb

For update 2 documents are changed as shown below

var update_records = function(req, res) {
var MongoClient = require('mongodb').MongoClient;
MongoClient.connect (mongo.url, function(err, db) {
// Update
var collection = db.collection('books', function(err, collection) {
collection.update({book:"Fountainhead"},{$set:{qty:2}}, {w:1},function(err,result) {});
collection.update({book:"Animal Farm"},{$set:{author:"George Orwell"}}, {w:1},function(err,result) {});
console.log("Updated 2 books");

}); // var collection
}); //End MongoClient.connect

}; //End update-records

Deletions

The delete functions requires a callback method which is included

var delete_record = function(req, res) {
var MongoClient = require('mongodb').MongoClient;
MongoClient.connect (mongo.url, function(err, db) {

//Deleting documents
var collection = db.collection(‘books’, function(err, collection) {

collection.remove({book:”Foundation”},mycallback);
collection.remove({book:”The Da Vinci Code”},{w:1},mycallback);
console.log(‘Deleted 2 books’);

});
}); //End MongoClient.connect
}; //End delete-records

Retrieving documents

To retrieve documents the collection.find.stream() method is used as below

var list_records = function(req, res) {
var MongoClient = require('mongodb').MongoClient;
MongoClient.connect (mongo.url, function(err, db) {
//Retrieve documents
var collection = db.collection('books', function(err, collection) {
var stream = collection.find().stream();
console.log("Printing values...");
res.writeHead(200, {'Content-Type': 'text/plain'});
stream.on('error', function (err) {
console.error(err.stack)
});

stream.on(“data”, function(item) {
console.log(item);
res.write(JSON.stringify(item) + “\n”);
});

stream.on(“end”, function() {
console.log(“End”);
res.end();
});
}); //var collection
}); //End MongoClient.connect

The connection between the Node.js & Webserver and the MongoDB is setup using the VCAP_SERVICES as follows

if (process.env.VCAP_SERVICES) {
var env = JSON.parse(process.env.VCAP_SERVICES);
if (env['mongodb-2.2']) {
var mongo = env['mongodb-2.2'][0]['credentials'];
}
} else {
var mongo = {
"username" : "user1",
"password" : "secret",
"url" : "mongodb://user1:secret@localhost:27017/test"
}
}

To get started you can fork the code for the above Bluemix- MongoDB app from Devops from mymongodb

The code can also be cloned from GitHub at mymongodb

After you have forked the code you can clone the code into a local directory on your machine.

Now use the ‘cf’ command to push the code onto IBM Bluemix as shown. In my case I named the app as mymongodb01

cf login -a https://api.ng.bluemix.net
cf push mymongodb01 -p . -m 512M
cf create-service mongodb 100 mongodb
cf bind-service mymongodb01 mongodb

Instead of the last 2 steps you can also use the Add-service in Bluemix dashboard to add the MongoDB service. (Note: You will have to check Experimental at the top and you will see the service under Data Management.) After the MongoDB service is added check if your app is running in the Bluemix dashboard

If the app is running you can check the CRUD operations on MongoDB using the SureUtils-REST API client extension to Chrome.

The CRUD operations performed are shown below

1.POST + GET

Here 5 documents are inserted in the MongoDB and then displayed subsequently

1

2

2.UPDATE + GET

Here 2 records are updated – The quantity of the book ‘Fountainhead’ is set to 2 and the author of ‘Animal Farm’ is set to George Orwell

3

4

3.DELETE + GET

In this set 2 book are deleted and the result is displayed

5

6

If all things went well you should be able to see the app running.

7

You can also get the output o the console.login Files and Logs in the Bluemix dashboard.

8

Important tip:  While executing the Buemix app if you run into problems and you app crashes with the “Health decreased” for your app and its colour turning red you can use the recent history of ‘cf” command to debug your problem

PS C:\Users\IBM_ADMIN\git\mymongodb> cf logs mymongodb01 –recent

Connected, dumping recent logs for app mymongodb01 in org tvganesh.85@gmail.com / space dev as tvganesh.85@gmail.com…

…….

…….

2014-07-27T11:34:26.45+0530 [App/0]   OUT We are connected to DB
2014-07-27T11:34:26.46+0530 [App/0]   OUT Updated 2 books
2014-07-27T11:34:31.17+0530 [App/0]   OUT We are connected to DB
2014-07-27T11:34:31.17+0530 [App/0]   OUT Updated 2 books
2014-07-27T11:34:31.18+0530 [RTR]     OUT mymongodb01.mybluemix.net - [27/07/2014:06:04:31 +0000] "PUT / HTTP/1.1" 200 1
7 "-" "Mozilla/5.0 (Windows NT 6.1; WOW64) AppleWebKit/537.36 (KHTML, like Gecko) Chrome/35.0.1916.153 Safari/537.36" 75
.126.70.43:19986 vcap_request_id:4fa831610b6e79455d0257581a51014e response_time:0.009122768 app_id:ed49744f-1a29-4e3f-9e
1c-8b45e85c3310
2014-07-27T11:35:02.75+0530 [App/0]   ERR
2014-07-27T11:35:02.75+0530 [App/0]   ERR /home/vcap/app/app.js:95
2014-07-27T11:35:02.75+0530 [App/0]   ERR       MongoClient.connect (mongo.url, function(err, db)   {
2014-07-27T11:35:02.75+0530 [App/0]   ERR       ^
2014-07-27T11:35:02.75+0530 [App/0]   ERR ReferenceError: MongoClient is not defined
2014-07-27T11:35:02.75+0530 [App/0]   ERR     at delete_record (/home/vcap/app/app.js:95:2)
2014-07-27T11:35:02.75+0530 [App/0]   ERR     at Server.<anonymous> (/home/vcap/app/app.js:165:12)
2014-07-27T11:35:02.75+0530 [App/0]   ERR     at Server.emit (events.js:98:17)
2014-07-27T11:35:02.75+0530 [App/0]   ERR     at HTTPParser.parser.onIncoming (http.js:2108:12)
2014-07-27T11:35:02.75+0530 [App/0]   ERR     at HTTPParser.parserOnHeadersComplete [as onHeadersComplete] (http.js:121:
23)
2014-07-27T11:35:02.75+0530 [App/0]   ERR     at Socket.socket.ondata (http.js:1966:22)
2014-07-27T11:35:02.75+0530 [App/0]   ERR     at TCP.onread (net.js:527:27)
2014-07-27T11:35:02.80+0530 [RTR]     OUT mymongodb01.mybluemix.net - [27/07/2014:06:05:02 +0000] "DELETE / HTTP/1.1" Mi
ssingResponseStatusCode 0 "-" "Mozilla/5.0 (Windows NT 6.1; WOW64) AppleWebKit/537.36 (KHTML, like Gecko) Chrome/35.0.19


Happy cooking with Bluemix, MongoDB & Node.js!

Disclaimer: This article represents the author’s viewpoint only and doesn’t necessarily represent IBM’s positions, strategies or opinions

See also
1. Brewing a potion with Bluemix, PostgreSQL & Node.js in the cloud
2. Spicing up IBM Bluemix with MongoDB and NodeExpress
3. A Cloud Medley with IBM’s Bluemix, Cloudant and Node.js
4. Rock N’ Roll with Bluemix, Cloudant & NodeExpress


Find me on Google+

Natural selection of database technology through the years

1Charles Darwin in his landmark book “The Origin of Species’ discusses how flora and fauna evolved through the centuries. The different features of each individual species would undergo a process of natural selection by which modification of attributes would naturally occur that would enable the species to adapt and propagate through time. Those modifications that failed to adapt would naturally become extinct.

In this post I discuss how database (DB) technology has evolved over the years. As new requirements arose database technology has had to adapt and newer paradigms have evolved. However, unlike species which became extinct the older versions still exist as they continue o address the earlier problems that remain today.

Here is a short & brief history of evolution of databases

Relational databases: Relational databases had their genesis when E.F Codd of IBM came up with a relational model of organizing data. In this model all data is organized as tables with several rows. In a relational model each row has several columns and one of the columns contains a unique value for each row called primary key. Relational databases have ruled the enterprise domain for more than 3 decades. An enterprise’s data is organized as a set of related tables. Users can query the database using Structured Query Language or SQL.

I remember in the late 1980’s when I started to work in the industry, programming jobs were much sought after by all of us engineering graduates. In those days database jobs were ‘uncool’ and system programming jobs dealing with writing assemblers, compilers were the really cool jobs. I was also susceptible to this prevailing opinion and stayed away from databases. As fate would have it I eventually moved into telecom and telecom protocol work in which I worked for more than 2 decades and have largely maintained my distance from DB.

However it recent times I did want to look brush up whatever little I knew of DB. Recently I was listening to the Coursera course “Introduction to Data Science‘ by Bill Howe. In one of the lectures the professor uttered something that really caught my fancy. He mentions that SQL is probably the closest to natural language. How true! Once the DB schema and tables have been set up, querying the DB for all sorts of data can be done in SQL which is close to natural language. For e.g.

SELECT a,b,c from TABLE S,T where condition X1 AND/OR condition X2

The power of DBs comes from the fact that all the data is organized as tables and enables one to retrieve any sort of data from it. Trying to accomplish this with any other high level programming language would take several hundreds of lines of code and we would have to write functions for each in individual query.

NoSQL databases: However the utility of relational databases decreases as we scale to hundreds of Gbs of data. In this age of the internet and the worldwide web data is easily of the order of several terabytes to a few petabytes. For e.g. Weather modelling, Social networks like FB,Twitter or LinkedIn all need to operate on millions of status updates or tweets per day. Traditional relational databases cannot handle such large sets of data. This is where the concept of NoSQL DB came into existence. NoSQL databases typically store data as key, value pairs. The singular advantage of NoSQL is that the database can scale horizontally or in other words the performance does not degrade with large increases in data size. In NoSQL databases data is hashed and uniformly distributed across commodity servers through a technique known as ‘consistent hashing’. Also data in NoSQL databases is replicated across servers. This architecture of NoSQL databases is based on common, commodity servers which are expected to crash. However this would not affect the NoSQL DB to function correctly. The strength of NoSQL databases comes from the fact that servers can join or leave the NoSQL DB without affecting the functioning of the DB. Some of the more popular examples of NoSQL DB are CouchDB, MongoDB, Riak, Voldemort, Dynamo etc.Do take a look at my post “When NoSQL makes better sense that MySQL

NewSQL: This variation of DB came into existence as there was a need for extremely fast performance for computing tasks like analytics etc. These DBs exist completely in memory and so the access is blazingly fast. The most famous of DBs of this paradigm is SAP’s HANA.

Graph Databases: Graph databases are the recent entrants into database technology. This strain of databases came into existence to handle associative data more efficiently. In a graph database data is represented as a graph. Nodes in the graph can be entities and edges can be relationships. A search on a graph database will result in a traversal from a specified start node to a specified terminating node. “Friends’ in Facebook, ‘followers/following’ in Twitter and ‘connections’ in LinkedIn all use Graph Database to map association and enable easy search. Graph Databases is what allows these databases to make recommendations like ‘You may know’. E.g. of Graph Database Google’s Graph DB, Neo4j

As we move ahead database technology will continue to evolve into newer architectures to handle

Find me on Google+

Designing a Scalable Architecture for the Cloud

The promise of the cloud is the unlimited computing power and storage capacities coupled with the pay-per-use policy. This makes the cloud particularly irresistible for hosting web applications and applications whose demand vary periodically. In order to take full advantage of the cloud the application must be designed for optimum performance. Though the cloud provides resources on-demand a badly designed application can hog resources and prove to be extremely expensive in the long run.

One of the first requirements for deploying applications on the cloud is that it should be scalable. Scalability denotes the ability to handle increasing traffic simply by adding more computing resources of the same kind rather than adding resources with greater horse power. This is also referred to scaling horizontally.

Assuming that the application has been sufficiently profiled and tuned for high performance there are certain key considerations that need to be taken into account while deploying on the cloud – public or private.  Some of them are being able to scale on demand, providing for high availability, resiliency and having sufficient safeguards against failures.

Given these requirements a scalable design for the Cloud can be viewed as being made up of the following 5 tiers of layers

The DNS tier – In this tier the user domain is hosted on a DNS service like Ultra DNS or Route 53. These DNS services distribute the DNS lookups geographically. This results in connecting to a DNS Server that is geographically closer to the user thus speeding the DNS lookup times. Moreover since the DNS lookups are distributed geographically it also builds geographic resiliency as far as DNS lookups are concerned

Load Balancer-Auto Scaling Tier – This tier is responsible for balancing the incoming traffic among compute instances in the cloud. The load balancing may be made on a simple round-robin technique or may be based on the actual CPU utilization of the individual instances. Typically at this layer we should also have an auto-scaling policy which will add more instances if the traffic to the application increases above a threshold or terminate instances when the traffic falls below a specific threshold.

Compute-Instance Tier – This layer hosts the actual application in individual compute instances on the cloud. It is assumed that the application has been tuned for maximum performance. The choice of small, medium or large CPU should be based on the traffic handling capacity of the instance type versus the cost/hr of the instance.

Cache Tier – This is an important layer in the cloud application where there are multiple instances. The cache tier provides a distributed cache for all the instances. With a distributed caching system like memcached it is possible to share global data between instances. The memcached application uses a consistent-hashing technique to distribute data among a set of participating servers. The consistent hashing method allow for handling of server crashes and new servers joining into the cache layer.

Database Tier – The Database tier is one of the most critical layers of the application. At a minimum the database should be configured in an active-standby mode. Ideally it is always better to have the active and standby in different availability zones to better handle disasters in a particular zone. Another consideration is have separate read replicas that handle reads to database while the primary database handles the write operations

Besides the above considerations it is always good to host the web application in different availability zone thus safeguarding against disasters in a particular region.

A Roundup of Web Technologies

The internet and the World Wide Web are woven into our daily lives so intricately that life without them is  unimaginable. We use the web for our daily news, to finding directions(maps), socializing(Facebook), sending/receiving emails, and buying e-tickets and books over e-retail stores on the net. With a click, a drag and drop or by just moving the mouse over a web page we see results instantaneously. But what are the technologies that power the Web outside of the routers and hubs of the data communication world?

Actually if one peeks into the technologies that power Web 2.0 one would be amazed at the bewildering array of technological choices that one is confronted with. My curiosity was whetted when I found that there were so many possibilities that go behind different websites from Gmail, http://www.amazon.com. Twitter, Facebook or maps.yahoo.com.

This article tries to give a bird’s eye view of the different technologies at the different layers. In many ways this article will be more of name dropping of the technologies rather than doing any real justice to each individual piece. I am merely presenting the different technologies as an interested spectator rather than as a web expert.

Presentation Layer: This is the layer which presents the web page to user. In the presentation layer most of the pages are made of elements of from HTML,CSS, PHP, Javascript, AJAX. These are diferent scripting mechanisms to display or take input from the user. Subsequently there arose the need for technologies called Rich Internet Application (RIA) to provide a much more superior user experience. These technologies are used to display video content and animations. Hence, we have Flash, Flex to more sophisticated technologies like Liferay, Primefaces, Myfaces and Java Server Faces (JSF) to the current HTML5. These technologies allow for drag-and-drop functionality, incorporating videos and animations in the web pages making the user experience similar to what he experiences on the desktop.

Enterprise Layer: At this layer the user input is processed and the client makes necessary requests to the back end server to get the appropriate results. This layer also there is a virtual explosion of technologies that make this possible. In this layer from the earlier C++, Java programs the movement was towards Enterprise Java Beans (EJB) invoked through servlets or Java Server Pages. To make the life of the web developer easier (?) there are several web frameworks that automate some of the common tasks of the developer. Some of them are Django with Python, Ruby on Rails (RoR), Groovy Grails, Perl-Catalyst, Python-Flask and so on. Each web framework has it pros and cons and has different learning curves. While Python developers thrive on “there is only one way to do a thing”, die-hard Ruby developers believe in the “do not repeat yourself (DRY)” philosophy. So the technology choice will be a matter of taste combined with deadlines for the project.

Persistence Layer: At the persistence layer there is Hibernate which converts a relational model to an object model and vice-versa making it easy to manipulate the rows and columns of tables. Usually this layer is coupled with Spring frameworks. Another competing technology is Struts framework.

Database Layer: While Hibernate can be used as a persistence layer it is also possible to access the database through ODBC, JDBC etc.

Exchange of Data: In the earlier days sending and receiving data or invoking remote procedure calls were through CORBA or RPC (Remote Procedure Calls). Subsequently other methods have been implemented for data exchange between servers. They are XML, JSON (Javascript Object Notation),SOAP (Simple Object Access Protocol) to the more current REST (Representational State Transfer)

Hence there are plethora of choices to make prior in the design of web sites complete with back end processing. The choices that are made will depend on the look and feel of the web site coupled with the ease of implementation of the site given the project deadlines.

Find me on Google+