Bend it like Bluemix, MongoDB using Auto-scale – Part 1!

In the next series of posts I turn on the heat on my cloud deployment in IBM Bluemix and check out the elastic nature of this PaaS offering. Handling traffic load and elastically expanding and contracting is what the cloud does best. This is  where the ‘rubber really meets the road”. In this series of posts I generate the traffic load using Multi –Mechanize a performance test framework created by Corey Goldberg.

This post is based on an earlier cloud app that I created on Bluemix namely Spicing up a IBM Bluemix Cloud app with MongoDB and NodeExpress. I had to make changes to this code to iron out issues while handling concurrent  inserts, displays and deletes issued from the multi-mechanize tool and also to manage the asynchronous nightmare of Nodejs.

The code for this Bluemix, MongoDB with Auto-scaling can be forked  from Devops at bluemixMongo. The code can also be cloned from GitHub at bluemix-mongo-autoscale

1.  To get started, fork the code from Devops at bluemixMongo. Then change the host name in manifest.yml to something unique and click the Build and Deploy button on the top right in the page.

26

1a.  Alternatively the code can be cloned from GitHub at bluemix-mongo-autoscale. From the directory where the code is cloned push the code using Cloud Foundry’s cf command as follows

cf login -a https://api.ng.bluemix.net

cf push bluemixMongo –p . –m 128M

2. Now add the MongoDB service and click ‘OK’ to restage the server.

3

3. Add the Monitoring and Analytics (M & A) and also the Auto-scaling service. The M& A gives a good report on the Availability, Performance logging, and also provides Logging Analysis. The Auto-scaling service is the service that allows the app to expand elastically to changing traffic loads.

4

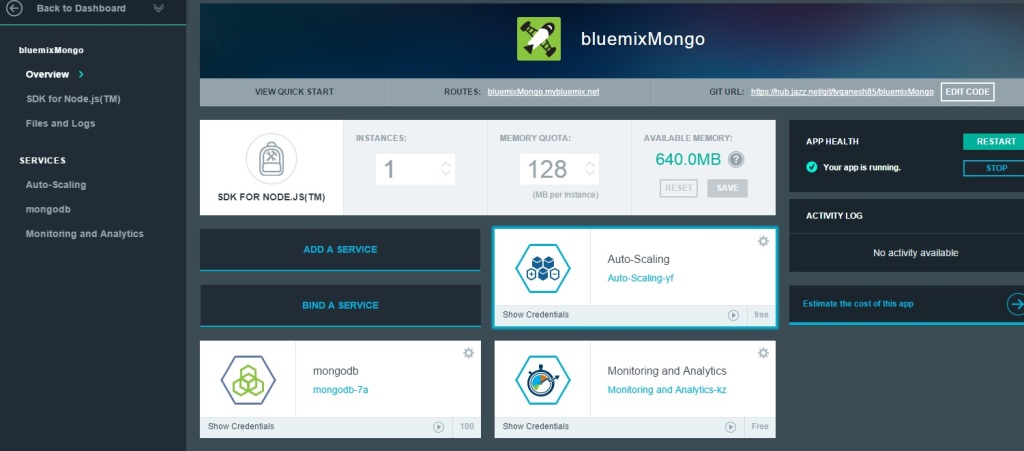
4. You should see the bluemixMongo app running with 3 services MongoDB, Autoscaling and M&A

5

5. You should now be able click the bluemixMongo.mybluemix.net and check the application out.

6.Now you configure the Overload Policy (auto scaling) policy. This is a slightly contrived example and the scaling policy is set to scale up if the Memory exceeds 55%. (Typically the scale up would be configured for > 80% memory usage)

6

7. Now check the configured Auto-scaling policy

7

8. Change the Memory Quota as appropriate. In my case I have kept the memory quota as 128 MB. Note the available memory is 640 MB and hence allows up to 5 instances. (By the way it is also possible to set any other value like 100 MB).

5

9. Click the Monitoring and Analytics service and take a look at the output in the different tabs

8

10. Next you need to set up the Performance test tool – Multi mechanize. Multi-mechanize creates concurrent threads to generate the load on a Web site or service. It is based on Python which  makes it easy to modify the scripts for hitting a website, making a REST call or submitting a form.

To setup Multi-mechanize you also need additional packages like numpy  matplotlib etc as the tool generates traffic based on a user provided script, measures latency and throughput besides also generating graphs for these.

For a detailed steps for setup of Multi mechanize please follow the steps in Trying out multi-mechanize web performance and load testing framework. Note: I would suggest that you install Python 2.7.2 and not the later 3.x version as some of the packages are based on the 2.7 version which has a slightly different syntax for certain Python statements

In the next post I will run a traffic test on the bluemixMongo application using Multi-mechanize and observe how the cloud app responds to the load.

Watch this space!
Also see
Bend it like Bluemix, MongoDB with autoscaling – Part 2!
Bend it like Bluemix, MongoDB with autoscaling – Part 3

You may like :
a) Latency, throughput implications for the cloud
b) The many faces of latency
c) Brewing a potion with Bluemix, PostgreSQL & Node.js in the cloud
d)  A Bluemix recipe with MongoDB and Node.js
e)Spicing up IBM Bluemix with MongoDB and NodeExpress
f) Rock N’ Roll with Bluemix, Cloudant & NodeExpress

Disclaimer: This article represents the author’s viewpoint only and doesn’t necessarily represent IBM’s positions, strategies or opinions

Revisiting Whats up, Watson – Using Watson’s Question and Answer with Bluemix – Part 2

In this I revisit the Bluemix app based on Watson’s Question and Answer service which I had posted in my earlier article “Whats up Watson? Using IBM Watson with Bluemix, NodeExpress – Part 1“. In this post I removed some redundant code and also added some additional checks to the Jade templates to handle responses to “focusless”  questions viz. Am I…? or “Is X contagious?”

You can run the app at Whatsup Watson?

The code can be forked and cloned from Devops at Whatsup

The code is also available at GitHub at Whatsup

The section below briefly describes the details of the implementation of the WhatsupWatson app

A) app.js

In the app.js module the VCAP environment is parsed to get the credentials to use the Watson Question and Answer service as shown below

if (process.env.VCAP_SERVICES) {
  var VCAP_SERVICES = JSON.parse(process.env.VCAP_SERVICES);
  // retrieve the credential information from VCAP_SERVICES for Watson QAAPI
  hostname   = VCAP_SERVICES["question_and_answer"][0].name;               
  passwd = VCAP_SERVICES["question_and_answer"][0].credentials.password; 
  username = VCAP_SERVICES["question_and_answer"][0].credentials.username; 
  watson_url = VCAP_SERVICES["question_and_answer"][0].credentials.url;
}

There different ways of asking Watson questions. Watson’s response will vary depending on the options and parameters that are used to POST the question to Watson. This app uses a route for each ‘question type’ and option. These are

a. Simple Synchronous Query: Post a simple synchronous query to Watson

This is the simplest query that we can pose to Watson. Here we need to just include the text of the question and the also a Sync Timeout. The Sync Timeout denotes the time client will wait for responses from the Watson service

// Ask Watson a simple synchronous query
app.get('/question',question.list);
app.post('/simplesync',simplesync.list);

b. Evidence based question: Ask Watson to respond to evidence given to it

Ask Watson for responses based on evidence given like medical conditions etc.

// Ask Watson for responses based on evidence provided
app.get('/evidence',evidence.list);
app.post('/evidencereq',evidencereq.list);

c. Request for a specified set of answers to a question: Ask Watson to give a specified number of responses to a question

// Ask Watson to provide specified number of responses to a query
app.get('/items',items.list);
app.post('/itemsreq',itemsreq.list);

d. Get a formatted response to a question: Ask Watson to format the response to the question

// Get a formatted response from Watson for a query
app.get('/format',format.list);
app.post('/formatreq',formatreq.list);

To get started with Watson we would need to connect the Bluemix app to the Watson’s QAAPI as a service by parsing the environment variable. This is shown below

B) simplesync.js


The code in simplesync.js, evidencereq.js, itemsreq.js,formatreq.js are similar. The modules construct the question in the format required. The details of the implementation of simplesync.js is included below a. The Watson’s corpus will be set to ‘healthcare’

parts = url.parse(watson_url +'/v1/question/healthcare');

b. The POST headers are set

// Set the required headers for posting the REST query to Watson
headers = {'Content-Type'  :'application/json',
                  'X-synctimeout' : syncTimeout,
                  'Authorization' : "Basic " + new Buffer(username+":"+passwd).toString("base64")};

c. The POST request options are set

// Create the request options to POST our question to Watson
var options = {host: parts.hostname,
port: 443,
path: parts.pathname,
method: 'POST',
headers: headers,
rejectUnauthorized: false, // ignore certificates
requestCert: true,
agent: false};

The question that is to be asked of Watson needs to be formatted appropriately based on the input received in the appropriate form (for e.g. simplesync.jade)

// Get the values from the form
var syncTimeout = req.body.timeout;
var query = req.body.query;
// create the Question text to ask Watson
var question = {question : {questionText :query }};
var evidence = {"evidenceRequest":{"items":1,"profile":"yes"}};
// Set the POST body and send to Watson
req.write(JSON.stringify(question));
req.write("\n\n");
req.end();

Now you POST the Question to Watson and receive the stream of response using Node.js’ .on(‘data’,) & .on(‘end’) shown below

var req = https.request(options, function(result) {
result.setEncoding('utf-8');
// Retrieve and return the result back to the client
result.on(“data”, function(chunk) {
output += chunk;
});

result.on('end', function(chunk) {		  
           var answers = JSON.parse(output);
			      results = answers[0];
			      res.render(
					 'answer', {
                      "results":results
                                        
			   });
			
});

The results are parsed and formatted displayed using Jade. For the Jade templates I have used a combination of Jade and in-line HTML tags.

Included below is the part of the jade template with in-line HTML tagging

c) answer.jade

mplementation details of WhatsupWatsonapp

The section below briefly describes the details of the implementation of the WhatsupWatson app

A) app.js

In the app.js module the VCAP environment is parsed to get the credentials to use the Watson Question and Answer service as shown below

if (process.env.VCAP_SERVICES) {
  var VCAP_SERVICES = JSON.parse(process.env.VCAP_SERVICES);
  // retrieve the credential information from VCAP_SERVICES for Watson QAAPI
  hostname   = VCAP_SERVICES["question_and_answer"][0].name;               
  passwd = VCAP_SERVICES["question_and_answer"][0].credentials.password; 
  username = VCAP_SERVICES["question_and_answer"][0].credentials.username; 
  watson_url = VCAP_SERVICES["question_and_answer"][0].credentials.url;
}

There different ways of asking Watson questions. Watson’s response will vary depending on the options and parameters that are used to POST the question to Watson. This app uses a route for each ‘question type’ and option. These are

a. Simple Synchronous Query: Post a simple synchronous query to Watson

This is the simplest query that we can pose to Watson. Here we need to just include the text of the question and the also a Sync Timeout. The Sync Timeout denotes the time client will wait for responses from the Watson service

// Ask Watson a simple synchronous query
app.get('/question',question.list);
app.post('/simplesync',simplesync.list);

b. Evidence based question: Ask Watson to respond to evidence given to it

Ask Watson for responses based on evidence given like medical conditions etc.

// Ask Watson for responses based on evidence provided
app.get('/evidence',evidence.list);
app.post('/evidencereq',evidencereq.list);

c. Request for a specified set of answers to a question: Ask Watson to give a specified number of responses to a question

// Ask Watson to provide specified number of responses to a query
app.get('/items',items.list);
app.post('/itemsreq',itemsreq.list);

d. Get a formatted response to a question: Ask Watson to format the response to the question

// Get a formatted response from Watson for a query
app.get('/format',format.list);
app.post('/formatreq',formatreq.list);

To get started with Watson we would need to connect the Bluemix app to the Watson’s QAAPI as a service by parsing the environment variable. This is shown below

B) simplesync.js


The code in simplesync.js, evidencereq.js, itemsreq.js,formatreq.js are similar. The modules construct the question in the format required. The details of the implementation of simplesync.js is included below a. The Watson’s corpus will be set to ‘healthcare’

parts = url.parse(watson_url +'/v1/question/healthcare');

b. The POST headers are set

// Set the required headers for posting the REST query to Watson
headers = {'Content-Type'  :'application/json',
                  'X-synctimeout' : syncTimeout,
                  'Authorization' : "Basic " + new Buffer(username+":"+passwd).toString("base64")};

c. The POST request options are set

// Create the request options to POST our question to Watson
var options = {host: parts.hostname,
port: 443,
path: parts.pathname,
method: 'POST',
headers: headers,
rejectUnauthorized: false, // ignore certificates
requestCert: true,
agent: false};

The question that is to be asked of Watson needs to be formatted appropriately based on the input received in the appropriate form (for e.g. simplesync.jade)

// Get the values from the form
var syncTimeout = req.body.timeout;
var query = req.body.query;
// create the Question text to ask Watson
var question = {question : {questionText :query }};
var evidence = {"evidenceRequest":{"items":1,"profile":"yes"}};
// Set the POST body and send to Watson
req.write(JSON.stringify(question));
req.write("\n\n");
req.end();

Now you POST the Question to Watson and receive the stream of response using Node.js’ .on(‘data’,) & .on(‘end’) shown below

var req = https.request(options, function(result) {
result.setEncoding('utf-8');
// Retrieve and return the result back to the client
result.on(“data”, function(chunk) {
output += chunk;
});

result.on('end', function(chunk) {		  
           var answers = JSON.parse(output);
			      results = answers[0];
			      res.render(
					 'answer', {
                      "results":results
                                        
			   });
			
});

The results are parsed and formatted displayed using Jade. For the Jade templates I have used a combination of Jade and in-line HTML tags.

Included below is the part of the jade template with in-line HTML tagging

c) answer.jade

if results.question.qclasslist
    for result in results.question.qclasslist
      p <font color="blueviolet">  Value   = <font color="black "> #{result.value} </font> 
  if results.question.focuslist
    p <font color="blueviolet">  Focuslist  </font> = <font color="black "> #{results.question.focuslist[0].value} </font>
  if latlist
    p <font color="blueviolet">  Latlist  </font> = <font color="black "> #{results.question.latlist[0].value} </font>

Disclaimer: This article represents the author’s viewpoint only and doesn’t necessarily represent IBM’s positions, strategies or opinions

Find me on Google+

What’s up Watson? Using IBM Watson’s QAAPI with Bluemix, NodeExpress – Part 1

Published in IBM developerWorks ‘Whats up Watson? Using Watson QAAPI with Bluemix and NodeExpress

In this post I take the famed IBM Watson through the paces (yes, that’s right!, this post is about  using the same  IBM  Watson which trounced 2 human Jeopardy titans in a classic duel in 2011).  IBM’s Watson (see  What is Watson?) is capable of understanding the nuances of the English language and heralds a new era in the domain of cognitive computing. IBM Bluemix now includes 8 services from Watson ranging from Concept Expansion, Language Identification, Machine Translation, Question-Answer etc. For more information on Watson’s QAAPI and the many services that have been included in Bluemix please see Watson Services.

In this article I create an application on IBM Bluemix and use Watson’s QAAPI (Question-Answer API) as a service to the Bluemix application. For the application I have used NodeExpress to create a Webserver and post the REST queries to Watson.  Jade is used format the results of Watson’s Response.

In this current release of Bluemix Watson comes with a corpus of medical facts. In other words Watson has been made to ingest medical documents in multiple formats (doc, pdf, html, text  etc) and the user can pose medical questions to Dr.Watson. In its current avatar, its medical diet consisted of dishes from (CDC Health Topics, National Heart, Lung, and Blood Institute (NHLBI) National Institute of Arthritis and Musculoskeletal and Skin Diseases (NIAMS), National Institute of Diabetes and Digestive and Kidney Diseases (NIDDK), National Institute of Neurological Disorders and Stroke (NINDS), Cancer.gov (physician data query) etc.)

Try out my Watson app  on Bluemix here –  Whats up Watson?

To get down to Watson QAAPI business with Bluemix app you can fork the code from Devops at whatsup. This can then be downloaded to your local machine. You can also clone the code from GitHub at whatsup

  1. To get started go to the directory where you have cloned the code for Whatsup app

2.Push the app to Bluemix using Cloud Foundry’s ‘cf’ commands as shown below

cf login -a https://api.ng.bluemix.net

3. Next push the app to Bluemix
cf push whatsup –p . –m 512M

In the Bluemix dashboard you should see ‘whatsup’ app running. Now click ‘Add Service’ and under Watson add ‘Question Answer’

1

Add Qatson QAAPI

2

You will be prompted with ‘Restage Application’. Click ‘Ok’. Once you have the app running you should be able to get started with Doc Watson.

The code for this Bluemix app with QAAPI as a Service is based on the following article Examples using the Question and Answer API

  1. Here’s a look at the code for the Bluemix & Watson app.

In this Bluemix app I show the different types of Questions we can ask Watson and the responses we get from it. The app has a route for each of the different types of questions and options

a. Simple Synchronous Query: Post a simple synchronous query to Watson
This is the simplest query that we can pose to Watson. Here we need to just include the text of the question and the also a Sync Timeout. The Sync Timeout denotes the time client will wait for responses from the Watson service
// Ask Watson a simple synchronous query

app.get('/question',question.list);
app.post('/simplesync',simplesync.list);

b. Evidence based question: Ask Watson to respond to evidence given to it
Ask Watson for responses based on evidence given like medical conditions etc. This would be a used for diagnostic purposes I would presume.
// Ask Watson for responses based on evidence provided
app.get('/evidence',evidence.list);
app.post('/evidencereq',evidencereq.list);

c. Request for a specified set of answers to a question: Ask Dr. Watson to give a specified number of responses to a question
// Ask Watson to provide specified number of responses to a query
app.get('/items',items.list);
app.post('/itemsreq',itemsreq.list);

d. Get a formatted response to a question: Ask Dr. Watson to format the response to the question
// Get a formatted response from Watson for a query
app.get('/format',format.list);
app.post('/formatreq',formatreq.list);

  1. To get started with Watson we would need to connect the Bluemix app to the Watson’s QAAPI as a service by parsing the environment variable. This is shown below

//Get the VCAP environment variables to connect Watson service to the Bluemix application

question.js
o o o
if (process.env.VCAP_SERVICES) {
var VCAP_SERVICES = JSON.parse(process.env.VCAP_SERVICES);
// retrieve the credential information from VCAP_SERVICES for Watson QAAPI
var hostname   = VCAP_SERVICES["Watson QAAPI-0.1"][0].name;
var passwd = VCAP_SERVICES["Watson QAAPI-0.1"][0].credentials.password;
var userid = VCAP_SERVICES["Watson QAAPI-0.1"][0].credentials.userid;
var watson_url = VCAP_SERVICES["Watson QAAPI-0.1"][0].credentials.url;

Next we need to format the header for the POST request

var parts = url.parse(watson_url);
// Create the request options to POST our question to Watson
var options = {host: parts.hostname,
port: 443,
path: parts.pathname,
method: 'POST',
headers: headers,
rejectUnauthorized: false, // ignore certificates
requestCert: true,
agent: false};

The question that is to be asked of Watson needs to be formatted appropriately based on the input received in the appropriate form (for e.g. simplesync.jade)

question.js
// Get the values from the form
var syncTimeout = req.body.timeout;
var query = req.body.query;
// create the Question text to ask Watson
var question = {question : {questionText :query }};
var evidence = {"evidenceRequest":{"items":1,"profile":"yes"}};
// Set the POST body and send to Watson
req.write(JSON.stringify(question));
req.write("\n\n");
req.end();

Now you POST the Question to Dr. Watson and receive the stream of response using Node.js’ .on(‘data’,) & .on(‘end’) shown below

question.js
…..
      var req = https.request(options, function(result) {
// Retrieve and return the result back to the client
result.on(“data”, function(chunk) {
output += chunk;
});

result.on('end', function(chunk) {
// Capture Watson's response in output. Parse Watson's answer for the fields
var results = JSON.parse(output);
res.render(
'answer', {
"results":results
});
});
});

The results are parsed and formatted displayed using Jade. For the Jade templates I have used a combination of Jade and inline HTML tags (Jade can occasionally be very stubborn and make you sweat quite a bit. So I took the easier route of inline HTML tagging. In a later post I will try out CSS stylesheets to format the response.)

Included below is the part of the jade template with inline HTML tagging

Answer.jade
o o o
<h2 style="color:blueviolet">  Question Details </style> </h2>
for result in results.question.qclasslist
p <font color="blueviolet">  Value   = <font color="black "> #{result.value} </font>
p <font color="blueviolet">  Focuslist  </font> = <font color="black "> #{results.question.focuslist[0].value} </font>
// The 'How' query's response does not include latlist. Hence conditional added.
if latlist
p <font color="blueviolet">  Latlist  </font> = <font color="black "> #{results.question.latlist[0].value} </font>

o o o

Now that the code is all set you can fire the Watson. To do this click on the route

3

Click the route whatsup.mybluemix.net and ‘Lo and behold’ you should see Watson ready and raring to go.

4

As the display shows there are 4 different Question-Answer options that there is for Watson QAAPI

Simple Synchronous Question-Answer
This option is the simplest option. Here we need to just include the text of the question and the also a Sync Timeout. The question can be any medical related question as Watson in its current Bluemix avatar has a medical corpus

For e.g.1) What is carotid artery disease?

2) What is the difference between hepatitis A and hepatitis B etc.

The Sync Timeout parameter specifies the number of seconds the QAAPI client will wait for the streaming response from Watson. An example question and Watson’s response are included below
5
;

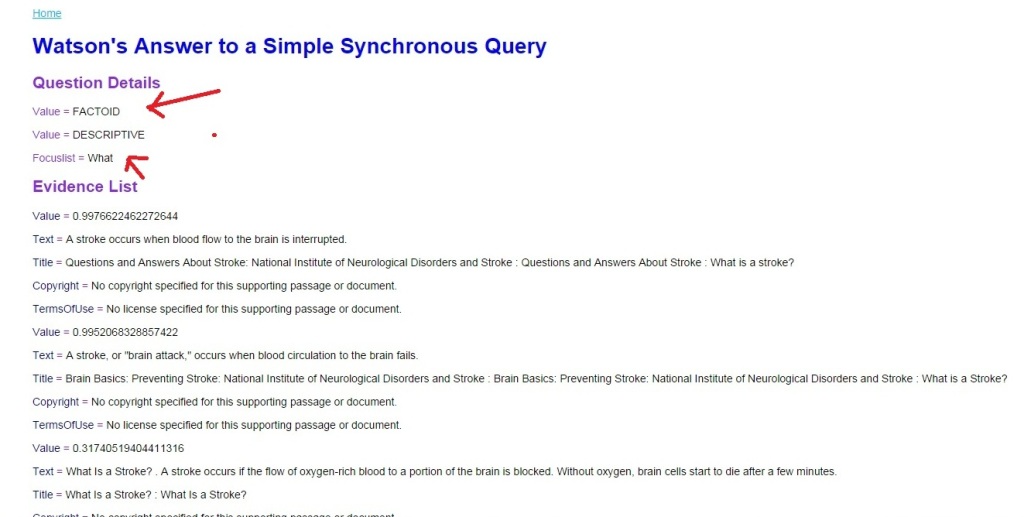
When we click Submit Watson spews out the following response

6

Evidence based response:

In this mode of operation, questions can be posed to Watson based on observed evidence. Watson will output all relevant information based on the evidence provided. As seen in the output Watson provides a “confidence factor” for each of its response

7

Watson gives response with appropriate confidence values based on the given evidence

8

Question with specified number of responses
In this option we can ask Watson to provide us with at least ‘n’ items in its response. If it cannot provide as many items it will give an error notification

11

This will bring up the following screen where the question asked is “What is the treatment for Down’s syndrome?” and Items as 3.
9

Watson gives 3 items in the response as shown below
10

Formatted Response: Here Watson gives a formatted response to question asked. Since I had already formatted the response using Jade it does not do extra formatting as seen in the screen shot.
12

Updated synonym based response. In this response we can change the synonym list based on which Watson will search its medical corpus and modify its response. The synonym list for the the question “What is fever?” is shown below. We can turn off synonyms by setting to ‘false’ and possibly adding other synonyms for the search
13

This part of the code has not been included in this post and is left as an exercise to the reader 🙂

As mentioned before you can fork and clone the code from IBM devops at whatsup or clone from GitHub at whatsup

There are many sections to Watson’s answer which cannot be included in this post as the amount of information is large and really needs to be pared to pick out important details. I am including small sections from each part of Watson’s response below to the question “How is carotid artery disease treated/”

I will follow up this post with another post where I will take a closer look at Watson’s response which has many parts to it
namely

– Question Details
14

– Evidence list
15

– Synonym list
16

– Answers

17

– Error notifications
18

There you have it.  Go ahead and get all your medical questions answered by Watson.

Disclaimer: This article represents the author’s viewpoint only and doesn’t necessarily represent IBM’s positions, strategies or opinions

Other posts on Bluemix

1. Brewing a potion with Bluemix, PostgreSQL & Node.js in the cloud
2. A Bluemix recipe with MongoDB and Node.js
3. A Cloud Medley with IBM’s Bluemix, Cloudant and Node.js
4.  Bend it like Bluemix, MongoDB with autoscaling – Part 1

You may also find the following interesting
1. Informed choices through Machine Learning : Analyzing Kohli, Tendulkar and Dravid
2. Informed choices through Machine Learning-2: Pitting together Kumble, Kapil,
3. A crime map of India in R: Crimes against women
4. Analyzing cricket’s batting legends – Through the mirage with R


Find me on Google+

Rock N’ Roll with Bluemix, Cloudant & NodeExpress

Published as a tutorial in IBM Cloudant – Bluemix tutorial and demos

In this post I create a  cloud application that is based on Bluemix, Cloudant DB and NodeExpress.  NodeExpress is used to perform DB operations on  CloudantDB

The code can be forked from Devops from bluemix-cloudant-exp. You can also clone the code from Github from bluemix-cloudant-exp

The following NodeExpress routes are created for performing the basic database operations

  1. a) Displaying the list of books
  2. b) Adding a book
  3. c) Updating a book and
  4. d) Deleting a book

1


Push the app to Bluemix

a) Push the app to Bluemix using
cf push bluemix-cloudant -p . -m 512M

b) In the Bluemix dashboard add the Cloudant service.

c) Double click the CloudantNoSQLDB

9

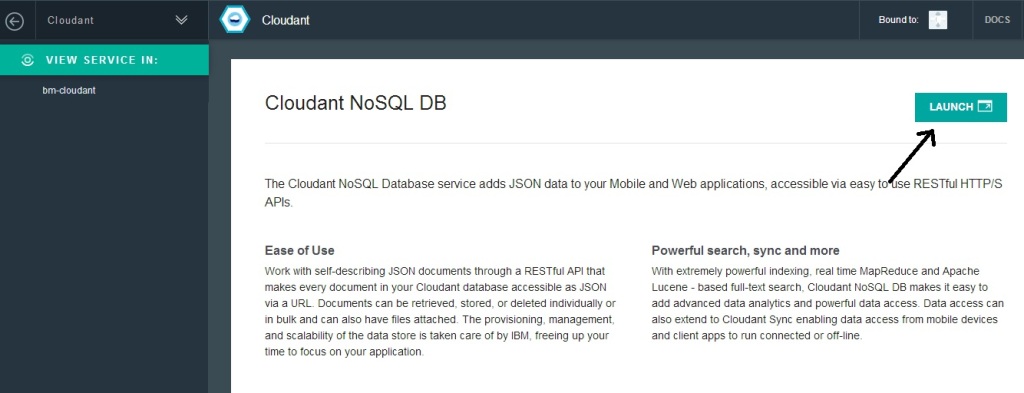
and then click the ‘Launch’ button. This will bring the WebSQL based version of Cloudant DB

10

c) Next click the link bluemix-cloudant.mybluemix.net

11

This will start the Webserver and also populate the database.

e) This can be seen in the Cloudant Dashboard for the ‘test’ database which has 3 records shown below
12
The setup for these routes in the NodeExpress are as follows

app.get('/', routes.index);
app.get('/booklist', booklist.list);
app.get('/newbook', newbook.list);
app.post('/addbook',addbook.list);
app.get('/changebook', changebook.list);
app.post('/updatebook', updatebook.list);
app.get('/rembook', rembook.list);
app.post('/deletebook',deletebook.list);

Setting up the environment for Cloudant’s PouchDB

The first thing is to setup the environment for Cloudant’s Pouch DB by parsing the process.env environment variables as shown below

//Parse the process.env for the port and host that we've been assigned
if (process.env.VCAP_SERVICES) {
// Running on Bluemix. Parse the port and host that we've been assigned.
var env = JSON.parse(process.env.VCAP_SERVICES);
var host = process.env.VCAP_APP_HOST;
var port = process.env.VCAP_APP_PORT;
console.log('VCAP_SERVICES: %s', process.env.VCAP_SERVICES);
// Also parse Cloudant settings.
var cloudant = env['cloudantNoSQLDB'][0]['credentials'];
}
var db = new pouchdb('books'),
remote =cloudant.url + '/books';
opts = {
continuous: true
};
// Replicate the DB to remote
console.log(remote);
db.replicate.to(remote, opts);
db.replicate.from(remote, opts);

Displaying the list of books

Cloudant responds to DB queries as JSON messages. Hence to display the list of books the fields of each document is stored as an array and then displayed using the Jade table in booklist.jade  This is shown below

  1. a) booklist.js

var docs = db.allDocs(function(err, response) {
val = response.total_rows;
var details = "";
j=0;
var booklist = new Array(val);
for(i=0; i < val; i++) {
db.get(response.rows[i].id, function (err,doc){
j++;
booklist[j] = new Array(3);
booklist[j][0] = doc._id;
booklist[j][1] = doc.Title;
booklist[j][2] = doc.author;
details= details + JSON.stringify(doc.Title) + "  " +  JSON.stringify(doc.author) + "\n";
// Kludge because of Node.js asynchronous handling. To be fixed - T V Ganesh
if(j == val) {
res.render('booklist', {
"booklist" : booklist
});
}
}); // End db.get
} //End for
}); // End db.allDocs

  1. b) booklist.jade

The jade template simply displays the each booklist as a row in a table

block content
h1= "Display the list of books"
p
strong DocId  Title   Author
table
each book, i in booklist
tr
td #{book}
p
p
a(href='/') Home

2

Adding a book
To add a book the book details are obtained using the newbook.jade which display a form
block content
h1= "Add a book"
form#formAddBook(name="addbook",method="post",action="/addbook")
input#inputBookTitle(type="text", placeholder="Title", name="title")
input#inputBookAuthor(type="text", placeholder="Author", name="author")
button#btnSubmit(type="submit") submit
a(href='/') Home

With the values obtained from the form above a document is inserted into the books database as follows

// Get our form values. These rely on the "name" attributes
var Title = req.body.title;
var Author = req.body.author;
db.put({
author: Author,
Title : Title,
}, Title, function (err, response) {
console.log(err || response);
if (err) {
// If it failed, return error
res.send("There was a problem adding the information to the database.");
}
else {
// Redirect to booklist - Display booklist
res.location("booklist");
// And forward to success page
res.redirect("booklist");
}
});

Note: When inserting a document into the books database the docid for the document is set to be the same as the book Title itself

7

4

Updating a book

To update a document we need to input the document id. Also the document to be updated should use the “_rev” field which is obtained when we get the document. The values to be input are taken with the changeuser form

block content

h1= "Update a book"
form#formUpdateBook(name="addbook",method="post",action="/updatebook")
input#inputDocId(type="text", placeholder="DocId", name="docid")
input#inputBookTitle(type="text", placeholder="Title", name="title")
input#inputBookAuthor(type="text", placeholder="Author", name="author")
button#btnSubmit(type="submit") submit
a(href='/') Home

The values obtained are used to populate the document as follows

db.get(DocId, function(err, response) {
db.put({
_id: DocId,
_rev: response._rev,
author: Author,
Title : Title,
}, function(err, response) {
if (err) {
// If it failed, return error
res.send("There was a problem updating the information to the database.");
}
else {
// If it worked, redirect to display books
res.location("booklist");
// And forward to success page
res.redirect("booklist");
}
});
});

6

5

Deleting a document

To delete a document we need the document id which is taken with the rembook.jade form

block content
h1= "Delete a book"
form#formDeleteBook(name="addbook",method="post",action="/deletebook")
input#DocId(type="text", placeholder="DocId", name="docid")
button#btnSubmit(type="submit") submit
a(href='/') Home

//Deleting document book1
db.get(DocId, function(err, doc) {
db.remove(doc, function(err, response) {
if (err) {
// If it failed, return error
res.send("There was a problem removing the information to the database.");
}
else {
// Redirect to booklist
res.location("booklist");
// And forward to success page
res.redirect("booklist");
}
console.log(err || response);
});
});

In the diagram below docid ‘book3’ is deleted

13

8

Important tips

  1. If you run into issues while create a Jade template then do the following

npm install jade --g

You can check your jade template for correctness using

jade <name of jade template>

If the response is ‘rendered <name of jade template>.html’ then the template is fine.

  1. If there are problems with deploying the application or if the application crashes you check the cf logs as follows for the issue

cf logs <name of application> --recent

As mentioned the  code can be forked from Devops from bluemix-cloudant-exp. You can also clone the code from Github from bluemix-cloudant-exp

Disclaimer: This article represents the author’s viewpoint only and doesn’t necessarily represent IBM’s positions, strategies or opinions

See also

1. Brewing a potion with Bluemix, PostgreSQL & Node.js in the cloud
2. A Bluemix recipe with MongoDB and Node.js
3. Spicing up IBM Bluemix with MongoDB and NodeExpress
4. A Cloud Medley with IBM’s Bluemix, Cloudant and Node.js
Find me on Google+

A Cloud medley with IBM Bluemix, Cloudant DB and Node.js

Published as a tutorial in IBM Cloudant – Bluemix tutorial and demos

Here is an interesting Cloud medley based on IBM’s Bluemix PaaS platform, Cloudant DB and Node.js. This application  creates a Webserver using Node.js and uses REST APIs to perform CRUD operations on a Cloudant DB. Cloudant DB is a NoSQL Database as a service (DBaaS) that can handle a wide variety of data types like JSON, full text and geo-spatial data. The documents  are stored, indexed and distributed across a elastic datastore spanning racks, datacenters and perform replication of data across datacenters.Cloudant  allows one to work with self-describing JSON documents through  RESTful APIs making every document in the Cloudant database accessible as JSON via a URL.

This application on Bluemix uses REST APIs to perform the operations of inserting, updating, deleting and listing documents on the Cloudant DB.  The code can be forked from Devops at bluemix-cloudant. The code can also be clone from GitHub at bluemix-cloudant.

1) Once the code is forked the application can be deployed on to Bluemix using

cf login -a https://api.ng.bluemix.net
cf push bm-cloudant -p . -m 512M

2) After this is successful go to the Bluemix dashboard and add the Cloudant DB service.  The CRUD operations can be performed by invoking REST API calls using an appropriate REST client like SureUtils ot Postman in the browser of your choice.

Here are the details of the Bluemix-Cloudant application

3) Once the Cloudant DB service has been added to the Web started Node.js application we need to parse the process.env variable to obtain the URL of the Cloudant DB and the port and host to be used for the Web server.

The Node.js Webserver is started based on the port and host values obtained from process.env

require('http').createServer(function(req, res) {
//Set up the DB connection
if (process.env.VCAP_SERVICES) {
// Running on Bluemix. Parse for  the port and host that we've been assigned.
var env = JSON.parse(process.env.VCAP_SERVICES);
var host = process.env.VCAP_APP_HOST;
var port = process.env.VCAP_APP_PORT;
....
}
....
// Perform CRUD operations through REST APIs
// Insert document
if(req.method == 'POST') {
insert_records(req,res);
}
// List documents
else if(req.method == 'GET') {
list_records(req,res);
}
// Update a document
else if(req.method == 'PUT') {
update_records(req,res);
}
// Delete a document
else if(req.method == 'DELETE') {
delete_record(req,res);
}
}).listen(port, host);

2) Access to the Cloudant DB Access to Cloudant DB is obtained as follows

if (process.env.VCAP_SERVICES) {
// Running on Bluemix. Parse the port and host that we've been assigned.
var env = JSON.parse(process.env.VCAP_SERVICES);
var host = process.env.VCAP_APP_HOST;
var port = process.env.VCAP_APP_PORT;
console.log('VCAP_SERVICES: %s', process.env.VCAP_SERVICES);
// Also parse Cloudant settings.
var cloudant = env['cloudantNoSQLDB'][0]['credentials'];
}
var db = new pouchdb('books'),
remote =cloudant.url + '/books';
opts = {
continuous: true
};
// Replicate the DB to remote
console.log(remote);
db.replicate.to(remote, opts);
db.replicate.from(remote, opts);

Access to the Cloudant DB is through the cloudant.url shown above

3)  Once the access to the DB is setup we can perform CRUD operations. There are many options for the backend DB. In this application I have PouchDB.

4) Inserting a document: To insert documents into the Cloudant DB based on Pouch DB we need to do the following

var insert_records = function(req, res) {
//Parse the process.env for the port and host that we've been assigned
if (process.env.VCAP_SERVICES) {
// Running on Bluemix. Parse the port and host that we've been assigned.
var env = JSON.parse(process.env.VCAP_SERVICES);
var host = process.env.VCAP_APP_HOST;
var port = process.env.VCAP_APP_PORT;
console.log('VCAP_SERVICES: %s', process.env.VCAP_SERVICES);
// Also parse Cloudant settings.
var cloudant = env['cloudantNoSQLDB'][0]['credentials'];
}
var db = new pouchdb('books'),
remote =cloudant.url + '/books';
opts = {
continuous: true
};
// Replicate the DB to remote
console.log(remote);
db.replicate.to(remote, opts);
db.replicate.from(remote, opts);
// Put 3 documents into the DB
db.put({
author: 'John Grisham',
Title : 'The Firm'
}, 'book1', function (err, response) {
console.log(err || response);
});
...
...
res.writeHead(200, {'Content-Type': 'text/plain'});
res.write("3 documents is inserted");
res.end();
}; // End insert_records

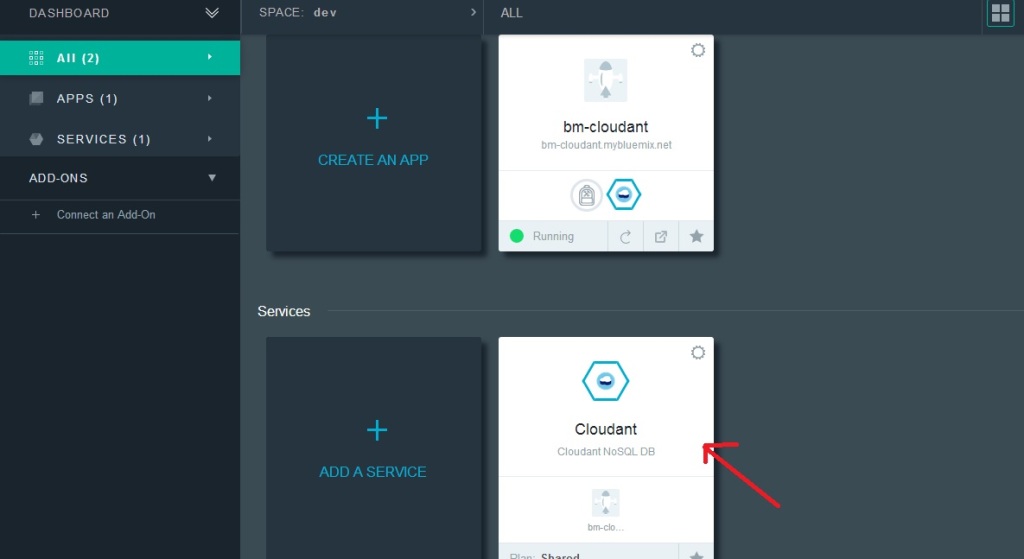
The nice part about Cloudant DB is that you can access your database through the URL. The steps are shown below. Once your application is running. Click on your application. You should see the screen as below.

1

Click on Cloudant as shown by the arrow.

Next click on the “Launch’ icon

2

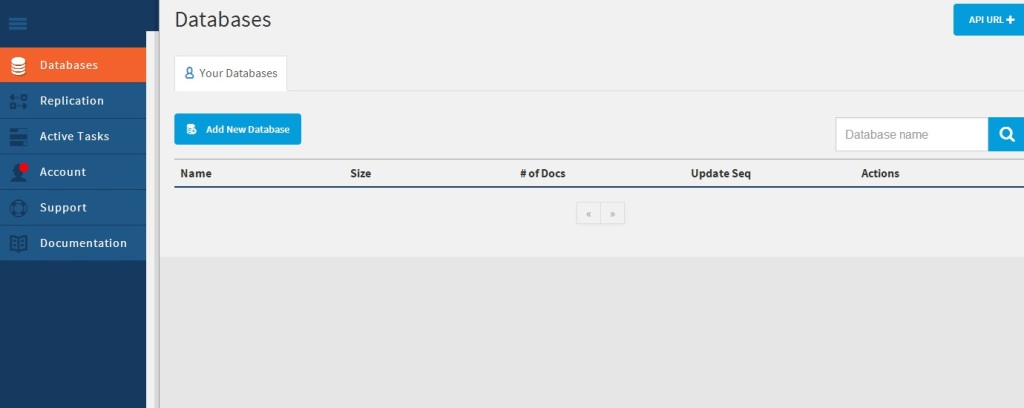
This should bring up the Cloudant dashboard. The database will be empty.

3

If you use a REST API Client to send a POST API call then the Application will insert 3 documents.

4

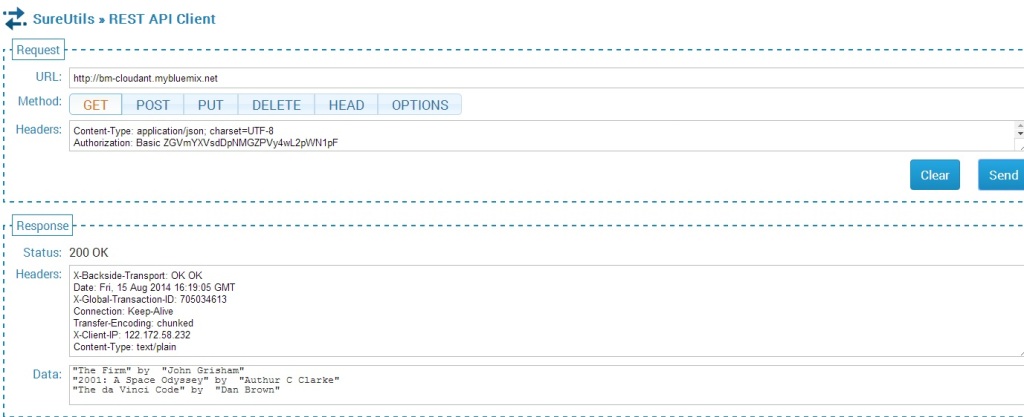
The documents inserted can be seen by sending the GET REST API call.

5

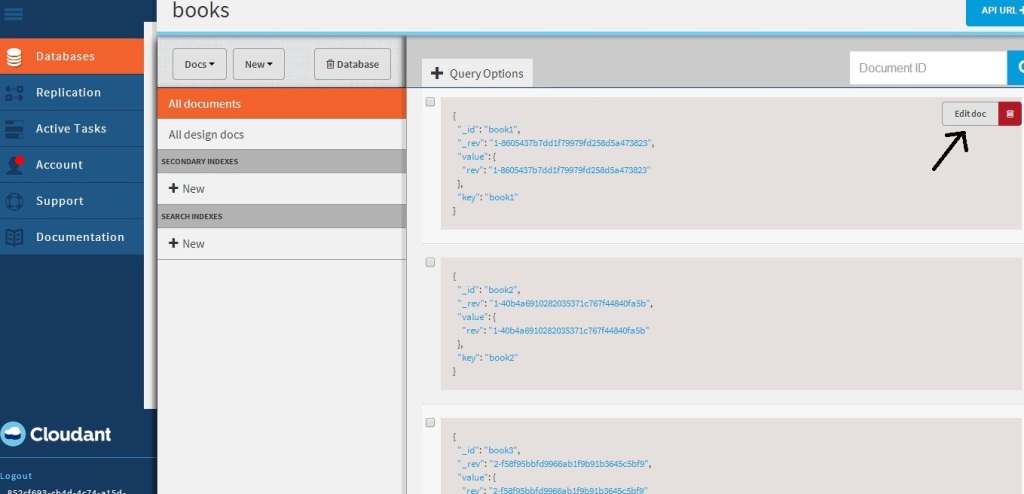
The nice part of Cloudant DB is that you can use the URL to see your database. If you refresh your screen you should see the “books” database added. Clicking this database you should see the 3 documents that have been added

6

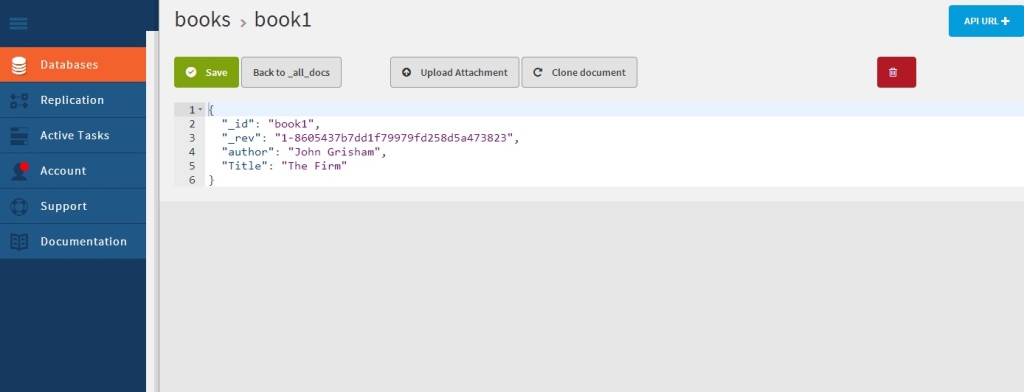
If you click “Edit doc” you should see the details of the document

7

5) Updating a document

The process to update a document in the database is shown below

// Update book3
db.get('book3', function(err, response) {
console.log(response);
return db.put({
_id: 'book3',
_rev: response._rev,
author: response.author,
Title : 'The da Vinci Code',
});
}, function(err, response) {
if (err) {
console.log("error " + err);
} else {
console.log("Success " + response);
}
});

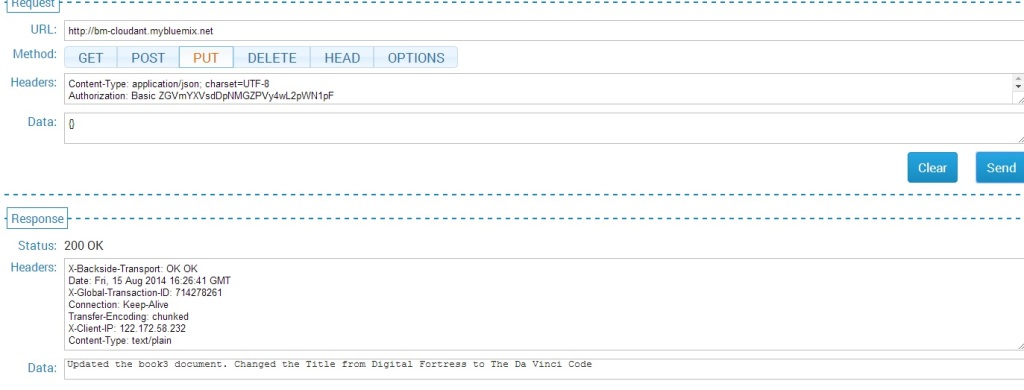
This is performed with a PUT REST API call

8

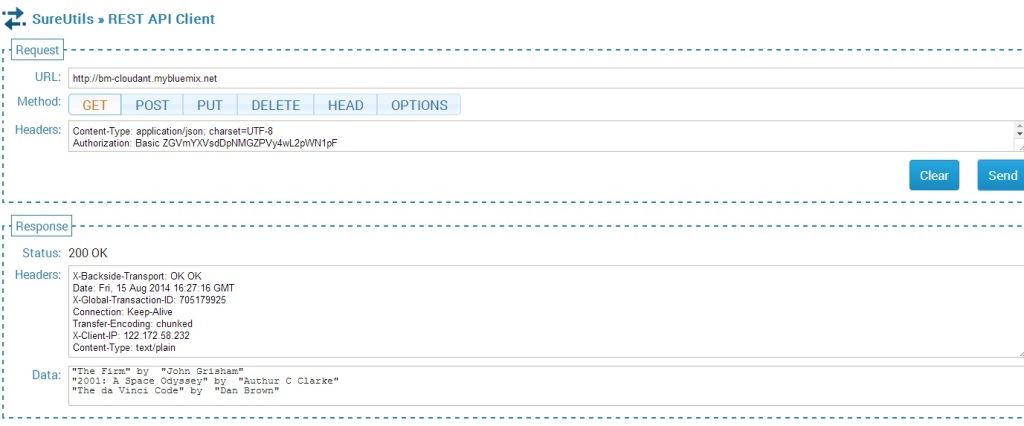
The updated list is shown below

9

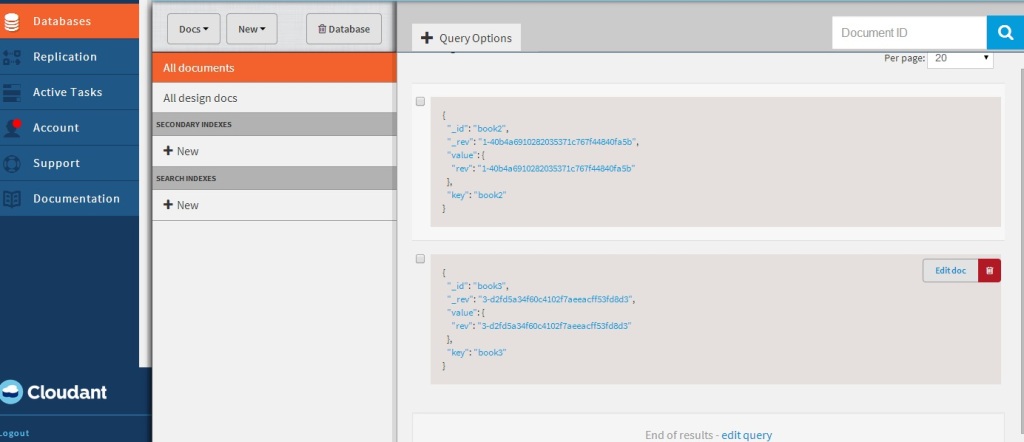
This can be further verified in the Cloudant DB dashboard for book3.

10

6) Deleting a document

The code to delete a document in PouchDB is shown below

//Deleting document book1
db.get('book1', function(err, doc) {
db.remove(doc, function(err, response) {
console.log(err || response);
});
});

The REST calls to delete a document and the result  are shown below

11

12

Checking the Cloudant dashboard we see that only book2 & book3 are present and book1 has been deleted

13

7) Displaying documents in the database

The code for displaying the list of documents is shown below

var docs = db.allDocs(function(err, response) {
val = response.total_rows;
var details = "";
j=0;
for(i=0; i < val; i++) {
db.get(response.rows[i].id, function (err,doc){
j++;
details= details + JSON.stringify(doc.Title) + " by  " +  JSON.stringify(doc.author) + "\n";
// Kludge because of Node.js asynchronous handling. To be fixed - T V Ganesh
if(j == val) {
res.writeHead(200, {'Content-Type': 'text/plain'});
res.write(details);
res.end();
console.log(details);
}
}); // End db.get
} //End for
}); // End db.allDocs

If you happened to notice, I had to use a kludge to work around Node.js’ idiosyncracy of handling asynchronous calls. I was fooled by the remarkable similarity of Node.js & hence  javascript to C language that I thought functions within functions would work sequentially. However I had undergo much grief  trying to get Node.js to work sequentially. I wanted to avoid the ‘async’ module but was unsuccessful with trying to code callbacks. So the kludge! I will work this out eventually but this workaround will have to do for now!

As always you can use the “Files and Logs” in the Bluemix dashboard to get any output that are written to stdout.

Note: As always I can’t tell how useful the command
'cf  logs <application name> -- recent is for debugging.

Hope you enjoyed this Cloud Medley of Bluemix, Cloudant and Node.js!

Disclaimer: This article represents the author’s viewpoint only and doesn’t necessarily represent IBM’s positions, strategies or opinions

You may also like
1. Brewing a potion with Bluemix, PostgreSQL & Node.js in the cloud
2.  A Bluemix recipe with MongoDB and Node.js
3.  Spicing up IBM Bluemix with MongoDB and NodeExpress
4.  Rock N’ Roll with Bluemix, Cloudant & NodeExpress


Find me on Google+

Spicing up a IBM Bluemix cloud app with MongoDB and NodeExpress

In this post I highlight the rudiments for a creating a cloud application on IBM’s PaaS offering Bluemix, using MongoDB and NodeExpress.   Clearly Bluemix allows one to fire up a cloud application with a NoSQL database in a matter of  a few hours which makes it really attractive. The NodeExpress  application was initially created using Enide Studio for Node.js  with a local Mongodb server running on my desktop. (Please see my post Elements of CRUD with Node Express and MongoDB) Once you have ironed out the issues in this local application you are ready to deploy on IBM Bluemix.

The code for this Bluemix application can be forked from bluemix-mongo from IBM Devops.

You can also clone the code from GitHub at bluemix-mongo

Here are the key changes that need to be made for running the NodeExpress Webserver with MongoDB as the backend DB

1) Webserver : Setup the port and host for the Webserver.

  1. app.js

var port = (process.env.VCAP_APP_PORT || 1337);
var host = (process.env.VCAP_APP_HOST || '0.0.0.0');
var app = express();
app.configure(function(){
app.set('port', port);

As seen above the host & port for the Webserver are obtained from the process.env variable.
2) Routes and Middleware
Setup the routes and invoke them appropriately in app.js
var express = require('express')
, routes = require('./routes')
, user = require('./routes/user')
, userlist = require('./routes/userlist')
, newuser = require('./routes/newuser')
, adduser = require('./routes/adduser')
, changeuser = require('./routes/changeuser')
, updateuser = require('./routes/updateuser')
, remuser = require('./routes/remuser')
, deleteuser = require('./routes/deleteuser')

app.get('/users', user.list);
app.get('/helloworld', routes.index);
app.get('/userlist', userlist.list);
app.get('/newuser', newuser.list);
app.post('/adduser',adduser.list);
app.get('/changeuser', changeuser.list);
app.post('/updateuser', updateuser.list);
app.get('/remuser', remuser.list);
app.post('/deleteuser',deleteuser.list);

3) Initialize MongoDB database: Create a set of 3 records when the Webserver starts as follows

if (process.env.VCAP_SERVICES) {
var env = JSON.parse(process.env.VCAP_SERVICES);
if (env['mongodb-2.2']) {
var mongo = env['mongodb-2.2'][0]['credentials'];
}
} else {
var mongo = {
"username" : "user1",
"password" : "secret",
"url" : "mongodb://user1:secret@localhost:27017/test"
}
}
var MongoClient = mongodb.MongoClient;
var db= MongoClient.connect(mongo.url, function(err, db) {
if(err) {
log("failed to connect to the database");
} else {
log("connected to database");
}
var collection = db.collection('phonebook');
//Clear DB and insert 3 records
remove(mycallback);
var user1 = { "FirstName" : "Tinniam", "LastName" : "Ganesh","Mobile": "916732177728" };
var user2 = { "FirstName" : "Darth", "LastName" : "Vader","Mobile": "6666699999" };
var user3 = { "FirstName" : "Bill", "LastName" : "Shakespeare","Mobile": "8342189991" };

  1. insert(user1,function(err,result){});
  2. insert(user2,function(err,result){});
  3. insert(user3,function(err,result){});
  4. find().toArray(function(err, items) {

});
});

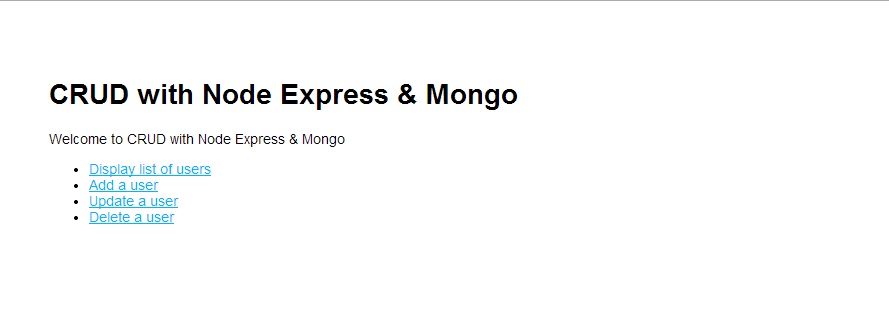
3) Home Page: Setup up a Home page with the CRUD operations when the Bluemix cloud application’s route  for e.g. http://bluemix-mongo.mybluemix.net is clicked. This is shown below.

1


2

4) Display Users: To display the list of users the route /userlist is invoked. This function gets all the records from the collection and stores them into a toArray element, which is then used for rendering the list of uses with a ‘userlist.jade’ template

userlist.js
var MongoClient = mongodb.MongoClient;
var db= MongoClient.connect(mongo.url, function(err, db) {
if(err) {

  1. log(“Failed to connect to the database”);

} else {

  1. log(“Connected to database”);

}
var collection = db.collection(‘phonebook’);
//Get all records and display them

  1. find().toArray(function(err, items) {
  2.    log(items);
  3. render(‘userlist’, {

“userlist” : items
});
});
});

  1. jade

This template displays the list of users as a table. The code is shown below

extends layout
block content
h1= "Display the list of Users"
p
strong Firstname Lastname   Mobile
table
each user, i in userlist
tr
td #{user.FirstName}
td #{user.LastName}
td #{user.Mobile}
p
p
a(href='/') Home

Note: A link back to the Home page is included in here at the bottom.

7


5) Adding a User
There are 2 parts to this
a) Invoking the /newuser route to display the input form through the newuser.jade
b) Invoking the /adduser route to insert the values entered in the form. The changes are shown below
a) app.js
..
newuser = require('./routes/newuser')
adduser = require('./routes/adduser')
..
app.get('/newuser', newuser.list);
app.post('/adduser',adduser.list);

b) newuser.js
exports.list = function(req, res){

  1. render(‘newuser’, { title: ‘Add User’});

};

The newuser jade displays the input form
c) newuser.jade
extends layout
block content
h1= "Add a User"
form#formAddUser(name="adduser",method="post",action="/adduser")
input#inputUserFirstName(type="text", placeholder="firstname", name="firstname")
input#inputUserLastName(type="text", placeholder="lastname", name="lastname")
input#inputUserLastName(type="text", placeholder="mobile", name="mobile")
button#btnSubmit(type="submit") submit
p
p
a(href='/') Home

3

d) adduser.js

The adduser.js gets the mongo url from the process.env.VCAP_SERVICES and  setups up the connection to the DB and inserts the values received in the ‘newuser.jade’ form into the database

exports.list = function(req, res) {
if (process.env.VCAP_SERVICES) {
var env = JSON.parse(process.env.VCAP_SERVICES);
if (env['mongodb-2.2']) {
var mongo = env['mongodb-2.2'][0]['credentials'];
}
} else {
var mongo = {
"username" : "user1",
"password" : "secret",
"url" : "mongodb://user1:secret@localhost:27017/test"
}
}
// Set up the DB connection
var MongoClient = mongodb.MongoClient;
var db= MongoClient.connect(mongo.url, function(err, db) {
if(err) {

  1. log(“Failed to connect to the database”);

} else {

  1. log(“Connected to database”);

}
// Get our form values. These rely on the “name” attributes
var FirstName = req.body.firstname;
var LastName = req.body.lastname;
var Mobile = req.body.mobile;
// Set our collection
var collection = db.collection(‘phonebook’);
// Insert the record into the DB

  1. insert({

“FirstName” : FirstName,
“LastName” : LastName,
“Mobile” : Mobile
}, function (err, doc) {
if (err) {
// If it failed, return error

  1. send(“There was a problem adding the information to the database.”);

}
else {
// Redirect to userlist – Display users

  1. location(“userlist”);

// And forward to success page

  1. redirect(“userlist”);

}
});
});

If the insert is successful the userlist page is displayed with the new user

4

6) Updating a User & Deleting a User: Updating and Deleting users follow the same format as Adding a user.

7) index.jade The Home page is built using index.jade with a hyperlink invoking the route for each database operation
extends layout
block content
h1= title
p Welcome to #{title}
ul
li
a(href='/userlist') Display list of users
li
a(href='/newuser') Add a user
li
a(href='/changeuser') Update a user
li
a(href='/remuser') Delete a user

Tip: “Return of the Jadei : Getting the jade template right is truly an art as Jade is extremely finicky about spaces, tabs, indents and outdents(???). Creating the Jade template had me run into circles. I found out that you can debug the jade template individually by executing

C:> npm install jade -g"
and then  running
C:> jade <template name>

from the command prompt. If the result of the command is “rendered <template name>.html” then you are in luck and you can incorporate this jade template into your views folder for e.g.

C: >jade index.jade
rendered index.html

8) Push changes to Bluemix: Once the changes have been made push the changes on to Bluemix with ‘cf’ as follows

cf login -a https://api.ng.bluemix.net
cf push bluemix-mongo -p . -m 512M
cf create-service mongodb 100 mongodb01
cf bind-service bluemix-mongo mongodb01


The last 2 commands can also be performed through the Bluemix dashboard in which you add the mongodb service to your Node.js app/

8) Files and Logs: In the Bluemix dashboard you can check your logs in the Files and Logs

5


6

Important tip: Finally if the application fails to start when you  push the application with ‘cf’ for e.g.

cf push <app name> -p . -m 512M
....
.....
----> Writing a custom .npmrc to circumvent npm bugs
----> Installing dependencies
----> Caching node_modules directory for future builds
----> Cleaning up node-gyp and npm artifacts
----> No Procfile found; Adding npm start to new Procfile
----> Building runtime environment
----> Checking and configuring service extensions
----> Uploading droplet (7.6M)
of 1 instances running, 1 down

or if  it crashes when you click a link then your debugging friend is

cf logs <app name > — recent
This will dump the error that was encountered either while the application was being started of why the application crashed.

You can fork this Bluemix application from bluemix-mongo at  IBM Devops or from GitHub at bluemix-mongo

Disclaimer: This article represents the author’s viewpoint only and doesn’t necessarily represent IBM’s positions, strategies or opinions

You may also like
1. Brewing a potion with Bluemix, PostgreSQL & Node.js in the cloud
2. A Bluemix recipe with MongoDB and Node.js
3. A Cloud Medley with IBM’s Bluemix, Cloudant and Node.js
4. Rock N’ Roll with Bluemix, Cloudant & NodeExpress


Find me on Google+

Elements of CRUD with NodeExpress and MongoDB using Enide Studio

In this post I perform basic CRUD operations using NodeExpress and MongoDB with Enide Studio. There is not a whole lot of information in the Web on using Node Express with Enide Studio so the task was kind of difficult. Anyway I managed to get basic CRUD operations to work. The complete code can be cloned from nodeexpress-mongo.

Here it is.

1) To get started create a new Node Express project with Enide Studio File->New->NodeExpress Project.

2) This should create the necessary files, routes and views.

3) Start the MongoDB as follows

mongod –dbpath <folder of project>

4) Start the mongo console. To get started I created 3 records as follows

mongo>
db.phonebook.insert({ "FirstName" : "Tinniam", "LastName" : "Ganesh","Mobile": "916732177728" })
db.phonebook.insert({ "FirstName" : "Darth", "Lastname" : "Vader","Mobile": "6666699999" })
db.phonebook.insert({ "FirstName" : "Bill", "Lastname" : "Shakespeare","Mobile": "8342189991" })

5) You can display the added records with

> db.phonebook.find().pretty()
{
"_id" : ObjectId("53de3f8e0e7f8abf82c0c850"),
"FirstName" : "Tinniam",
"LastName" : "Ganesh",
"Mobile" : "916732177728"
}
{
"_id" : ObjectId("53de3fed0e7f8abf82c0c851"),
"FirstName" : "Darth",
"Lastname" : "Vader",
"Mobile" : "6666699999"
}
{
"_id" : ObjectId("53de40200e7f8abf82c0c852"),
"FirstName" : "Bill",
"Lastname" : "Shakespeare",
"Mobile" : "8342189991"

6) For each of the CRUD operations there are 4 components

– Set the route
– Invoke app.get/app.post as approriate
– Call the necessary route Javascript file
– Use the appropriate Jade constructs for rendering the output

7) Here are the changes for the Display of the users

A) Displaying the User
a) app.js
..
userlist = require('./routes/userlist')
..
app.get('/userlist', userlist.list);
..

var mongodb = require(‘mongodb’);

b) userlist.js

/* GET Phone users page. */
exports.list =  function(req, res) {
// var db = req.db;
var MongoClient = mongodb.MongoClient;
var db= MongoClient.connect("mongodb://localhost:27017/test", function(err, db) {
if(err) {

  1. log(“Failed to connect to the database”);

} else {

  1. log(“Connected to database”);

}
var collection = db.collection(‘phonebook’);

  1. find().toArray(function(err, items) {
  2.    log(items);
  3. render(‘userlist’, {

“userlist” : items
});
});
});
};

c) userlist.jade
extends layout
block content
h1= "Display the list of Users"
p
strong Firstname Lastname   Mobile
table
each user, i in userlist
tr
td #{user.FirstName}
td #{user.LastName}
td #{user.Mobile}
p
p
a(href='http://localhost:3000') Home

This is shown below

2


B) Adding a User

There are 2 parts to this

a) Invoking the /newuser route to display the input form
b) Invoking the /adduser route to insert the values entered in the form. The changes are shown below

a) app.js
..
newuser = require('./routes/newuser')
adduser = require('./routes/adduser')
..
app.get('/newuser', newuser.list);
app.post('/adduser',adduser.list);

These require the following

b) newuser.js

exports.list = function(req, res){

  1. render(‘newuser’, { title: ‘Add User’});

};

The newuser jade displays the input form

c) newuser.jade

block content
h1= "Add a User"
form#formAddUser(name="adduser",method="post",action="/adduser")
input#inputUserFirstName(type="text", placeholder="firstname", name="firstname")
input#inputUserLastName(type="text", placeholder="lastname", name="lastname")
input#inputUserLastName(type="text", placeholder="mobile", name="mobile")
button#btnSubmit(type="submit") submit
p
p
a(href='http://localhost:3000') Home

3

The /adduser route inserts the record into the phonebook collection as shown

d) adduser.js

var FirstName = req.body.firstname;
var LastName = req.body.lastname;
var Mobile = req.body.mobile;
// Set our collection
var collection = db.collection('phonebook');
// Insert the record into the DB

  1. insert({

“FirstName” : FirstName,
“LastName” : LastName,
“Mobile” : Mobile
}, function (err, doc) {
if (err) {
// If it failed, return error

  1. send(“There was a problem adding the information to the database.”);

}
else {
// If it worked, redirect to userlist – Display users

  1. location(“userlist”);

// And forward to success page

  1. redirect(“userlist”);

}
});

This takes us  back to Display users if it successfully added the user

4

C) Updating a User and Deleting a User are similar to Adding a User

D) Index page

All the actions are included in the index.jade as shown below with hyperlinks

p Welcome to #{title}
ul
li
a(href='http://localhost:3000/userlist') Display list of users
li
a(href='http://localhost:3000/newuser') Add a user
li
a(href='http://localhost:3000/changeuser') Update a user
li
a(href='http://localhost:3000/remuser') Delete a user

5

Important tip:
Here is an important note. I found that getting the jade template right extremely frustrating. It is really unforgiving and is very picky up indents, outdents(whatever that is!), tabs and spaces. A quick way to check whether your jade template is fine or not is to install jade in your project directory.

npm install jade –global
You can debug your jade with
If there an error you will get

c:> jade userlist.jade
throw e
^
TypeError: userlist.jade:6
4|   h1= title
5|   ul
> 6|      each user, i in userlist
7|         li
8|           #{user.FirstName}
Cannot read property 'length' of undefined
at eval (eval at <anonymous>

If there are no errors you should see that the html is rendered as below

C: >jade index.jade
rendered index.html

You can clone the complete code from GitHub at nodeexpress-mongo

Take a look at
1. Brewing a potion with Bluemix, PostgreSQL & Node.js in the cloud
2. A Bluemix recipe with MongoDB and Node.js
3. Spicing up IBM Bluemix with MongoDB and NodeExpress
4. A Cloud Medley with IBM’s Bluemix, Cloudant and Node.js
5. Rock N’ Roll with Bluemix, Cloudant & NodeExpress


Find me on Google+