A Bluemix recipe with MongoDB and Node.js

Here is a tasty IBM Bluemix recipe with a dash of MongoDB and a pinch of Node.js. This posts shows the steps needed to perform basic CRUD (Create, Remove, Update & Delete) operations on the MongoDB database using REST APIs of PUT,GET, UPDATE & DELETE.

You can fork the code for the below app from Devops at mymongodb

The code can also be cloned from GitHub at mymongodb

For this,  the first  thing we need to do is to create a Webserver using Node.js as shown below

Webserver

require('http').createServer(function(req, res) {
if ( typeof mongodb !== 'undefined' && mongodb ) {
// Perform CRUD operations through REST APIs
if(req.method == 'POST') {
insert_records(req,res);
}
else if(req.method == 'GET') {
list_records(req,res);
}
else if(req.method == 'PUT') {
update_records(req,res);
}
else if(req.method == 'DELETE') {
delete_record(req,res);
}
} else {
res.writeHead(200, {'Content-Type': 'text/plain'});
res.write("No MongoDB service instance is bound.\n");
res.end();
}
}).listen(port, host);

The Webserver users the port and host values obtained as shown above to wait for  HTTP requests.

The REST API calls are handled by individual  Node.js functions to perform the operations of insert, update, delete and select.

Insertions

The code for insertions is shown below. For this a set of 5 documents are created and then inserted using Node.js

var insert_records = function(req, res) {
var MongoClient = require('mongodb').MongoClient;
// Connect to the db
MongoClient.connect (mongo.url, function(err, db) {
//Create a collection test
var collection = db.collection('books', function(err, collection) {
//Create a set of documents to insert
var book1 = { book: "The Firm", author: "John Grisham", qty: 3 };
var book2 = { book: "Foundation", author: "Isaac Asimov", qty: 5 };
collection.remove(mycallback);
//Insert the books
console.log("Insert the books");
collection.insert(book1,function(err,result){});
collection.insert(book2, {w:1}, function(err, result) {
});
collection.insert(book5, {w:1}, function(err, result) {});
console.log('Inserted 5 books');
}); //var collection
}); // End MongoClient.connect
}; // End insert_records

Updating documents in Mongodb

For update 2 documents are changed as shown below

var update_records = function(req, res) {
var MongoClient = require('mongodb').MongoClient;
MongoClient.connect (mongo.url, function(err, db) {
// Update
var collection = db.collection('books', function(err, collection) {
collection.update({book:"Fountainhead"},{$set:{qty:2}}, {w:1},function(err,result) {});
collection.update({book:"Animal Farm"},{$set:{author:"George Orwell"}}, {w:1},function(err,result) {});
console.log("Updated 2 books");

}); // var collection
}); //End MongoClient.connect

}; //End update-records

Deletions

The delete functions requires a callback method which is included

var delete_record = function(req, res) {
var MongoClient = require('mongodb').MongoClient;
MongoClient.connect (mongo.url, function(err, db) {

//Deleting documents
var collection = db.collection(‘books’, function(err, collection) {

collection.remove({book:”Foundation”},mycallback);
collection.remove({book:”The Da Vinci Code”},{w:1},mycallback);
console.log(‘Deleted 2 books’);

});
}); //End MongoClient.connect
}; //End delete-records

Retrieving documents

To retrieve documents the collection.find.stream() method is used as below

var list_records = function(req, res) {
var MongoClient = require('mongodb').MongoClient;
MongoClient.connect (mongo.url, function(err, db) {
//Retrieve documents
var collection = db.collection('books', function(err, collection) {
var stream = collection.find().stream();
console.log("Printing values...");
res.writeHead(200, {'Content-Type': 'text/plain'});
stream.on('error', function (err) {
console.error(err.stack)
});

stream.on(“data”, function(item) {
console.log(item);
res.write(JSON.stringify(item) + “\n”);
});

stream.on(“end”, function() {
console.log(“End”);
res.end();
});
}); //var collection
}); //End MongoClient.connect

The connection between the Node.js & Webserver and the MongoDB is setup using the VCAP_SERVICES as follows

if (process.env.VCAP_SERVICES) {
var env = JSON.parse(process.env.VCAP_SERVICES);
if (env['mongodb-2.2']) {
var mongo = env['mongodb-2.2'][0]['credentials'];
}
} else {
var mongo = {
"username" : "user1",
"password" : "secret",
"url" : "mongodb://user1:secret@localhost:27017/test"
}
}

To get started you can fork the code for the above Bluemix- MongoDB app from Devops from mymongodb

The code can also be cloned from GitHub at mymongodb

After you have forked the code you can clone the code into a local directory on your machine.

Now use the ‘cf’ command to push the code onto IBM Bluemix as shown. In my case I named the app as mymongodb01

cf login -a https://api.ng.bluemix.net
cf push mymongodb01 -p . -m 512M
cf create-service mongodb 100 mongodb
cf bind-service mymongodb01 mongodb

Instead of the last 2 steps you can also use the Add-service in Bluemix dashboard to add the MongoDB service. (Note: You will have to check Experimental at the top and you will see the service under Data Management.) After the MongoDB service is added check if your app is running in the Bluemix dashboard

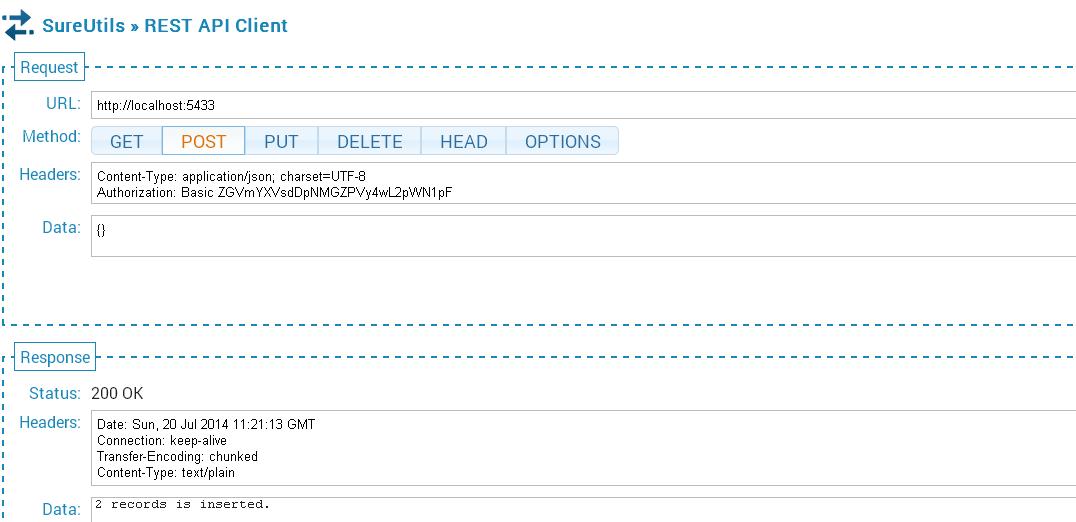
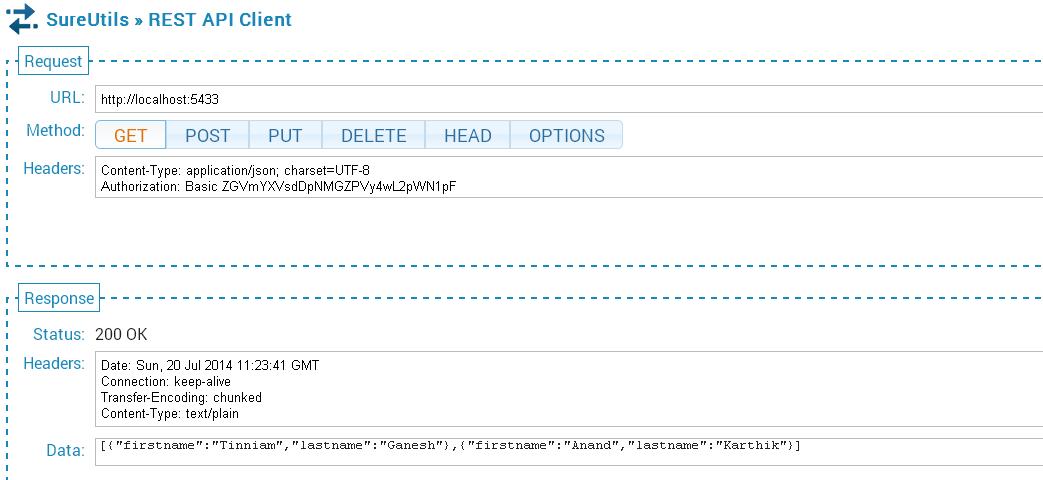
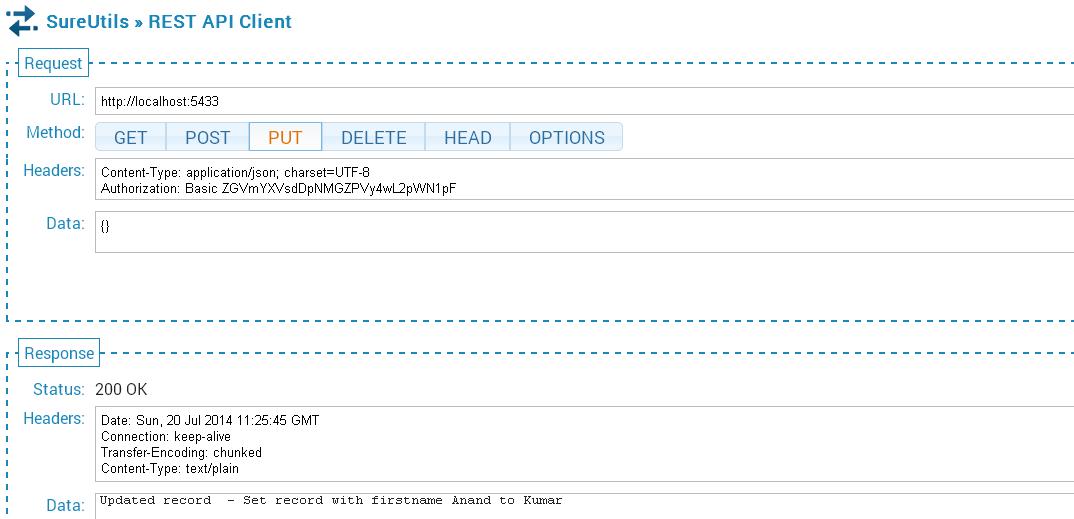
If the app is running you can check the CRUD operations on MongoDB using the SureUtils-REST API client extension to Chrome.

The CRUD operations performed are shown below

1.POST + GET

Here 5 documents are inserted in the MongoDB and then displayed subsequently

1

2

2.UPDATE + GET

Here 2 records are updated – The quantity of the book ‘Fountainhead’ is set to 2 and the author of ‘Animal Farm’ is set to George Orwell
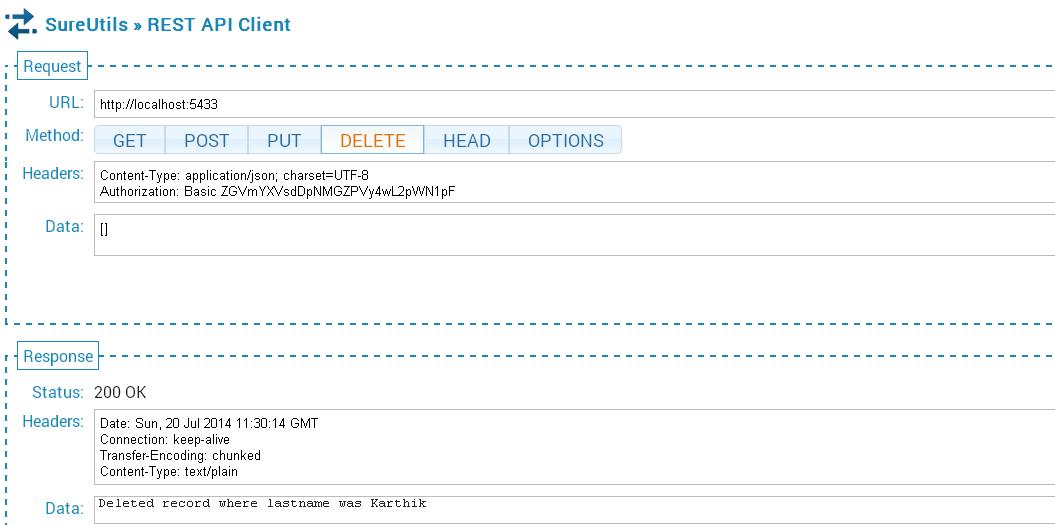
3

4

3.DELETE + GET

In this set 2 book are deleted and the result is displayed

5

6

If all things went well you should be able to see the app running.

7

You can also get the output o the console.login Files and Logs in the Bluemix dashboard.

8

Important tip:  While executing the Buemix app if you run into problems and you app crashes with the “Health decreased” for your app and its colour turning red you can use the recent history of ‘cf” command to debug your problem

PS C:\Users\IBM_ADMIN\git\mymongodb> cf logs mymongodb01 –recent

Connected, dumping recent logs for app mymongodb01 in org tvganesh.85@gmail.com / space dev as tvganesh.85@gmail.com…

…….

…….

2014-07-27T11:34:26.45+0530 [App/0]   OUT We are connected to DB
2014-07-27T11:34:26.46+0530 [App/0]   OUT Updated 2 books
2014-07-27T11:34:31.17+0530 [App/0]   OUT We are connected to DB
2014-07-27T11:34:31.17+0530 [App/0]   OUT Updated 2 books
2014-07-27T11:34:31.18+0530 [RTR]     OUT mymongodb01.mybluemix.net - [27/07/2014:06:04:31 +0000] "PUT / HTTP/1.1" 200 1
7 "-" "Mozilla/5.0 (Windows NT 6.1; WOW64) AppleWebKit/537.36 (KHTML, like Gecko) Chrome/35.0.1916.153 Safari/537.36" 75
.126.70.43:19986 vcap_request_id:4fa831610b6e79455d0257581a51014e response_time:0.009122768 app_id:ed49744f-1a29-4e3f-9e
1c-8b45e85c3310
2014-07-27T11:35:02.75+0530 [App/0]   ERR
2014-07-27T11:35:02.75+0530 [App/0]   ERR /home/vcap/app/app.js:95
2014-07-27T11:35:02.75+0530 [App/0]   ERR       MongoClient.connect (mongo.url, function(err, db)   {
2014-07-27T11:35:02.75+0530 [App/0]   ERR       ^
2014-07-27T11:35:02.75+0530 [App/0]   ERR ReferenceError: MongoClient is not defined
2014-07-27T11:35:02.75+0530 [App/0]   ERR     at delete_record (/home/vcap/app/app.js:95:2)
2014-07-27T11:35:02.75+0530 [App/0]   ERR     at Server.<anonymous> (/home/vcap/app/app.js:165:12)
2014-07-27T11:35:02.75+0530 [App/0]   ERR     at Server.emit (events.js:98:17)
2014-07-27T11:35:02.75+0530 [App/0]   ERR     at HTTPParser.parser.onIncoming (http.js:2108:12)
2014-07-27T11:35:02.75+0530 [App/0]   ERR     at HTTPParser.parserOnHeadersComplete [as onHeadersComplete] (http.js:121:
23)
2014-07-27T11:35:02.75+0530 [App/0]   ERR     at Socket.socket.ondata (http.js:1966:22)
2014-07-27T11:35:02.75+0530 [App/0]   ERR     at TCP.onread (net.js:527:27)
2014-07-27T11:35:02.80+0530 [RTR]     OUT mymongodb01.mybluemix.net - [27/07/2014:06:05:02 +0000] "DELETE / HTTP/1.1" Mi
ssingResponseStatusCode 0 "-" "Mozilla/5.0 (Windows NT 6.1; WOW64) AppleWebKit/537.36 (KHTML, like Gecko) Chrome/35.0.19


Happy cooking with Bluemix, MongoDB & Node.js!

Disclaimer: This article represents the author’s viewpoint only and doesn’t necessarily represent IBM’s positions, strategies or opinions

See also
1. Brewing a potion with Bluemix, PostgreSQL & Node.js in the cloud
2. Spicing up IBM Bluemix with MongoDB and NodeExpress
3. A Cloud Medley with IBM’s Bluemix, Cloudant and Node.js
4. Rock N’ Roll with Bluemix, Cloudant & NodeExpress


Find me on Google+

Brewing a potion with Bluemix, PostgreSQL, Node.js in the cloud

Here is a heady potion made with the key ingredients of IBM’s Bluemix, PostgreSQL & Node.js. In this post I instantiate an app ‘mypgdb01’ on IBM’s Bluemix which uses the services of PostgreSQL in the cloud. This is shown in the picture below.

8

The mypgdb01 is a Webserver running on Node.js in Bluemix and uses the services of PostgreSQL DB. The app mypgdb01 performs basic CRUD (Create, Remove, Update & Delete) on the PostgreSQL.

The code for this can be forked from Devops  from my link mypgdb

The code can also be cloned from GitHub at mypgdb

1) This app uses the Node.js Webstarter kit and the PostgreSQL service.  The Node.js Webserver is created by parsing the VCAP services variable as usual

if (process.env.VCAP_SERVICES) {
var env = JSON.parse(process.env.VCAP_SERVICES);
var credentials = env['postgresql-9.1'][0]['credentials'];
} else {
var credentials = {"uri":"postgre://user:secret1@localhost:5433/db"}
}
var port = (process.env.VCAP_APP_PORT || 1337);
var host = (process.env.VCAP_APP_HOST || '0.0.0.0');
http.createServer(function(req, res) {
console.log("Inside Webserver");
....
....
}).listen(port, host);

The details of VCAP_SERVICES can be see by clicking Runtime for you application and is shown below

9

Note: From above it can be seen that the PostgreSQL DB’s host & port is

"host": "192.155.243.14",
"hostname": "192.155.243.14",
"port": 5433

This different from the host & port of the Node.js Webserver which  can be see in Logs & Files tab (included below) and is

Webserver: host: 0.0.0.0
port:62733

2) Once the Webserver is started the server waits for REST calls of GET,PUT, UPDATE & DELETE as shown below.

// Perform CRUD operations through REST APIs
if(req.method == 'POST') {
insert_records(req,res);
}
else if(req.method == 'GET') {
list_records(req,res);
}
else if(req.method == 'PUT') {
update_record(req,res);
}
else if(req.method == 'DELETE') {
delete_record(req,res);
}

3)  The REST API call  are implements as follows

a) POST:

var insert_records = function(req, res) {
// Connect to DB
var client = new pg.Client(credentials.uri);
client.connect(function(err) {
if (err) {
res.end("Could not connect to postgre: " + err);
}

//Drop table if it exists
client.query("DROP TABLE IF EXISTS emps");
// Creat table and insert 2 records into it
client.query("CREATE TABLE IF NOT EXISTS emps(firstname varchar(64), lastname varchar(64))");
client.query("INSERT INTO emps(firstname, lastname) values($1, $2)", ['Tinniam', 'Ganesh']);
client.query("INSERT INTO emps(firstname, lastname) values($1, $2)", ['Anand', 'Karthik']);

b) GET:

// Select all rows in the table<
var query = client.query("SELECT firstname, lastname FROM emps ORDER BY lastname, firstname");
query.on("row", function (row, result) {
result.addRow(row);
});
query.on("end", function (result) {
// On end JSONify and write the results to console and to HTML output
console.log(JSON.stringify(result.rows, null, "    "));
res.writeHead(200, {'Content-Type': 'text/plain'});
res.write(JSON.stringify(result.rows) + "\n");
res.end();
});

c) UPDATE:

query = client.query("UPDATE emps set firstname = 'Kumar' WHERE firstname='Anand' AND lastname='Karthik'");
res.writeHead(200, {'Content-Type': 'text/plain'});
res.write("Updated record  - Set record with firstname Anand to Kumar\n");

d)DELETE

// Delete the record where the lastname is Karthik
client.query("DELETE FROM  emps WHERE lastname = 'Karthik'");
res.writeHead(200, {'Content-Type': 'text/plain'});
res.write("Deleted record where lastname was Karthik\n");

4) Once the changes are made you can  push the changes to Bluemix using ‘cf’ commands.

The commands are

cf login -a https://api.ng.bluemix.net
cf push mypgdb01-p . -m 512M
cf create-service postgresql 100 pgdb01
cf bind-service mypgdb01 pgdb01

5) In the Bluemix dashboard the app ‘mypgdb01’ should be up and running.

6) To invoke the different database operations we need to make REST API calls to the app.

7) To make the REST API calls you can install Sure Utils -> REST API Chrome extension.  I installed the SureUtils-.REST API Client. This is a Chrome extension and can be installed from Chrome Web Store (search for REST API client). You could choose any REST API client of your choice for the browser you intend to use (Chrome, Firefox)

8) Now we can test the Nodejs-PostgreSQL app with the Sure Utils – Chrome extension

8) The following REST API calls can be made to test the PostgreSQL operations on the database

POST- insert

1

GET – select

2

UPDATE + GET – update + select

The PUT API updates Anand Karthik to Kumar Karthik. This is shown in the GET API call

3

4

.DELETE + GET – delete  + select

5

6


Here the DELETE API call deletes the Kumar Karthik record. The GET API call now displays only 1 record.

The console.log output in Bluemix can be see in Files and logs -> stdout.log as shown below

7

The above post shows some basic operations done on a cloud based application that is composed of a Webserver with a PostgreSQL as a backend. The code can be enhanced by adding  front end using Node express.

As mentioned above the code for this can be forked from Devops at mypgdb. The code can also be cloned from GitHub at mypgdb

Disclaimer: This article represents the author’s viewpoint only and doesn’t necessarily represent IBM’s positions, strategies or opinions

You may also like
1. A Bluemix recipe with MongoDB and Node.js
2. Spicing up IBM Bluemix with MongoDB and NodeExpress
3. A Cloud Medley with IBM’s Bluemix, Cloudant and Node.js
4. Rock N’ Roll with Bluemix, Cloudant & NodeExpress


Find me on Google+

Working with Node.js and PostgreSQL

In this post I create a simple Webserver with Node.js which uses PostgreSQL database in the backend. This post shows how to perform simple database operations of insert, select, update and delete using REST APIs (POST, GET, PUT & DELETE).

Assuming that you already have Node.js installed here are the steps to create this CRUD (Create, Remove Update & Delete) Webserver.

1.Install Node.js if you already haven’t from Nodejs.org
2. Create a test directory pg for this PostgreSQL based Node.js Webserver
3. Open a command prompt and run
npm install pg
4.You will also need to install the PostgreSQL Enterprise DB with installer. Choose the appropriate OS and CPU
5.For this example I create a simple Employee Database.
6. In Windows Click Start->All Programs->PostgreSQL 9.3->pgAdmin III
7. Right click Databases-> New Database and Enter employees
1
8. The next step is to create Node.js Webserver and connect to this Database. PostgreSQL accepts DB connections through port 5432.
9.In this post The Webserver accepts connections from port 5433. Here is the shell of the Node.js Webserver
var pg = require("pg")
var http = require("http")
var port = 5433;
var host = '127.0.0.1';

http.createServer(function(req, res) {
if(req.method == 'POST') {
insert_records(req,res);
}
else if(req.method == 'GET') {
list_records(req,res);
}
else if(req.method == 'PUT') {
update_record(req,res);
}
else if(req.method == 'DELETE') {
delete_record(req,res);
}
}).listen(port,host);
console.log("Connected to " + port + "   " + host);

The Webserver accepts the usual 4 REST API calls – POST, GET, UPDATE, and DELETE for which there are 4 separate function calls.  The REST API calls correspond to the database operations insert, select, update and delete respectively.

10. Prior to performing each operation the  a client connects to the database as follows

var conString = "pg://postgres:postgres@localhost:5432/employees";
var client = new pg.Client(conString);
client.connect();

11. The POST operation is performed as follows

var insert_records = function(req, res) {


//Drop table if it exists
client.query("DROP TABLE IF EXISTS emps");
// Creat table and insert 2 records into it
client.query("CREATE TABLE IF NOT EXISTS emps(firstname varchar(64), lastname varchar(64))");
client.query("INSERT INTO emps(firstname, lastname) values($1, $2)", ['Tinniam', 'Ganesh']);
client.query("INSERT INTO emps(firstname, lastname) values($1, $2)", ['Anand', 'Karthik']);

12. To display the contents of the database the list_records function is used as follows

var list_records = function(req, res) {
console.log("In listing records");
// Select all rows in the table
var query = client.query("SELECT firstname, lastname FROM emps ORDER BY lastname, firstname");
query.on("row", function (row, result) {
result.addRow(row);
});
query.on("end", function (result) {

13. The REST API Update is performed as below

var update_record = function(req, res) {
// Update the record where the firstname is Anand
query = client.query("UPDATE emps set firstname = 'Kumar' WHERE firstname='Anand' AND lastname='Karthik'");

14.Finally a delete is performed using a delete_record method

var delete_record = function(req, res) {
// Delete the record where the lastname is Karthik
client.query("DELETE FROM  emps WHERE lastname = 'Karthik'");

15.The output of each operation is sent back as HTML  as

query.on("row", function (row, result) {
result.addRow(row);
});
query.on("end", function (result) {
// On end JSONify and write the results to console and to HTML output
console.log(JSON.stringify(result.rows, null, "    "));
res.writeHead(200, {'Content-Type': 'text/plain'});
res.write(JSON.stringify(result.rows) + "\n");
res.end();
});

16.To test the Webserver you need to install a REST API client for the browser you use. I installed the SureUtils-.REST API Client. his is a Chrome extension nand can be installed from Chrome Web Store (search for REST API client). You could choose any REST API client of your choice for the browser you intend to use (Chrome, Firefox)

17.Here are the tests I performed

18.The POST API call
2

19. The GET API call

3
20.The PUT  call followed by GET call
4
5
The PUT API updates Anand Karthik to Kumar Karthik. This is shown in the GET API call.
21. The DELETE call followed by the GET call

Here the DELETE API call deletes the Kumar Karthik record. The GET API call now displays only 1 record.

6

7

22. The console.log output for the operations above  is shown below

8

The code for the Node.js- PostgreSQL can be cloned from GitHub at node-pg

Checkout my book ‘Deep Learning from first principles Second Edition- In vectorized Python, R and Octave’.  My book is available on Amazon  as paperback ($18.99) and in kindle version($9.99/Rs449).

You may also like my companion book “Practical Machine Learning with R and Python:Second Edition- Machine Learning in stereo” available in Amazon in paperback($12.99) and Kindle($9.99/Rs449) versions.

Also see
1. My book ‘Practical Machine Learning in R and Python: Third edition’ on Amazon
2.My book ‘Deep Learning from first principles:Second Edition’ now on Amazon
3.The Clash of the Titans in Test and ODI cricket
4. Introducing QCSimulator: A 5-qubit quantum computing simulator in R
5.Latency, throughput implications for the Cloud
6. Simulating a Web Joint in Android
5. Pitching yorkpy … short of good length to IPL – Part 1

Also see
Introducing cricketr: An R package for analyzing performances of cricketers
– A crime map of India in R: Crimes against women
– What’s up Watson? Using IBM Watson’s QAAPI with Bluemix, NodeExpress – Part 1
– Bend it like Bluemix, MongoDB with autoscaling – Part 1
– Analyzing cricket’s batting legends – Through the mirage with R
– Masters of spin: Unraveling the web with R

Find me on Google+

Getting started with Node.js and Mongodb

Here is a post in which I try to get my arms around Node.js & MongoDB. This is first encounter with Web programming. There is a veritable universe of frameworks, languages, libraries and modules out there.

There are a gazillion blogs already on this topic so here is one more. When I came across Node.js recently,  I have been  impressed mightily with its ability to quickly cook up Webservers, TCP based server side programming and the like with really brief code. Another alluring fact was that it is based on Javascript which itself smacks of plain C, added to its charm. The experience with Node.js is difficult for a beginner. Also I must add that the Node.js’es callback functions takes a bit of getting used and I have had my share of pain with it.

MongoDB is an open-source document database, and one of the  leading NoSQL databases out there.

First things first – Install Node.js from Nodejs.org. Next install MongoDB for your OS and machine type. You will also need to install the mongodb module for use with Node.js. You can this by opening a command prompt and typing

npm install mongodb -g

This will allow you to access the mongodb module for use within your program. Now you should be good to go and create some basic code to manipulate MongoDB through Node.js.  This code is based on the commands from the following MongoDB wiki

Here are the steps for a basic CRUD (Create,Remove,Update & Delete) operations on MongoDB with Node.js

1. Create a folder c:\node\mongotest

2. Go to the directory where you have extracted the mongodb files and type in

mongod –dbpath c:\node\mongotest

This  will  start the database.

3. Here are the main functions of the code.

Connect to the mongodb database

var MongoClient = require('mongodb').MongoClient;
// Connect to the db
MongoClient.connect(“mongodb://localhost:27017/exampleDb”, function(err, db) {
if(!err) {
console.log(“We are connected”);
}

4. Create a collection of documents

//Create a collection test
console.log(“Creating a collection test”);
var collection = db.collection(‘test’);

5. Insert documents into the collection

//Create documents to insert
var doc1 = {‘hello’:’doc1′};
var doc2 = {‘hello’:’doc2′};
var lotsOfDocs = [{‘hello’:’doc3′}, {‘hello’:’doc4′}];
//Insert the docs
console.log(“Inserting the docs”);
collection.insert(doc1,function(err,result){});
collection.insert(doc2, {w:1}, function(err, result) {});

6. Update the inserted documents as follows

//Updating
var doc3 = {key:1,value:1};
collection.insert(doc3,{w:1},function(err,result) {
if(err) {
console.log(‘Could not insert’);
}
collection.update({key:1},{$set:{value:2}},{w:1},function(err,result) {});
});

7. Delete specific  documents from the database. Note: The remove() command requires a callback which I have included separately instead of the standard anonymous callback style

var mycallback = function(err,results) {
console.log(“mycallback”);
if(err) throw err;
}
//Deleting documents
console.log(“The delete operation”);
var doc4=[{key1:1},{key2:2},{key3:3}];
//Insert the document and then remove
collection.insert(doc4,{w:1},function(err,result) {
collection.remove({key1:1},mycallback);
collection.remove({key4:4},{w:1},mycallback);
});

8. Finally retrieve the inserted/updated records from the database

var stream = collection.find({mykey:{$ne:2}}).stream();
console.log(“Printing values…”);
stream.on(“data”, function(item) {
console.log(item);
});
stream.on(“end”, function() {});

The stream.on(“data”,) retrieves all the data till it encounters a stream.on(“end”).

So if I execute the above code I get the following output

C:\test \mongotest>node app3.js
We are connected
Creating a collection test
Inserting the docs
The delete operation
Printing values…
{ _id: 53c27ecbd5f4c59c1a2a5d39, hello: ‘doc1’ }
{ _id: 53c27ecbd5f4c59c1a2a5d3a, hello: ‘doc2’ }
{ _id: 53c27ecbd5f4c59c1a2a5d3b, key: 1, value: 1 }
{ _id: 53c27ecbd5f4c59c1a2a5d3c, key1: 1 }
{ _id: 53c27ecbd5f4c59c1a2a5d3d, key2: 2 }
{ _id: 53c27ecbd5f4c59c1a2a5d3e, key3: 3 }
mycallback
mycallback

The code can be cloned from Github at node-mongo

Also see
1. A Bluemix recipe with MongoDB and Node.js
2. Spicing up IBM Bluemix with MongoDB and NodeExpress
3. A Cloud Medley with IBM’s Bluemix, Cloudant and Node.js
4. Rock N’ Roll with Bluemix, Cloudant & NodeExpress


Find me on Google+