A Cloud medley with IBM Bluemix, Cloudant DB and Node.js

Published as a tutorial in IBM Cloudant – Bluemix tutorial and demos

Here is an interesting Cloud medley based on IBM’s Bluemix PaaS platform, Cloudant DB and Node.js. This application  creates a Webserver using Node.js and uses REST APIs to perform CRUD operations on a Cloudant DB. Cloudant DB is a NoSQL Database as a service (DBaaS) that can handle a wide variety of data types like JSON, full text and geo-spatial data. The documents  are stored, indexed and distributed across a elastic datastore spanning racks, datacenters and perform replication of data across datacenters.Cloudant  allows one to work with self-describing JSON documents through  RESTful APIs making every document in the Cloudant database accessible as JSON via a URL.

This application on Bluemix uses REST APIs to perform the operations of inserting, updating, deleting and listing documents on the Cloudant DB.  The code can be forked from Devops at bluemix-cloudant. The code can also be clone from GitHub at bluemix-cloudant.

1) Once the code is forked the application can be deployed on to Bluemix using

cf login -a https://api.ng.bluemix.net
cf push bm-cloudant -p . -m 512M

2) After this is successful go to the Bluemix dashboard and add the Cloudant DB service.  The CRUD operations can be performed by invoking REST API calls using an appropriate REST client like SureUtils ot Postman in the browser of your choice.

Here are the details of the Bluemix-Cloudant application

3) Once the Cloudant DB service has been added to the Web started Node.js application we need to parse the process.env variable to obtain the URL of the Cloudant DB and the port and host to be used for the Web server.

The Node.js Webserver is started based on the port and host values obtained from process.env

require('http').createServer(function(req, res) {
//Set up the DB connection
if (process.env.VCAP_SERVICES) {
// Running on Bluemix. Parse for  the port and host that we've been assigned.
var env = JSON.parse(process.env.VCAP_SERVICES);
var host = process.env.VCAP_APP_HOST;
var port = process.env.VCAP_APP_PORT;
....
}
....
// Perform CRUD operations through REST APIs
// Insert document
if(req.method == 'POST') {
insert_records(req,res);
}
// List documents
else if(req.method == 'GET') {
list_records(req,res);
}
// Update a document
else if(req.method == 'PUT') {
update_records(req,res);
}
// Delete a document
else if(req.method == 'DELETE') {
delete_record(req,res);
}
}).listen(port, host);

2) Access to the Cloudant DB Access to Cloudant DB is obtained as follows

if (process.env.VCAP_SERVICES) {
// Running on Bluemix. Parse the port and host that we've been assigned.
var env = JSON.parse(process.env.VCAP_SERVICES);
var host = process.env.VCAP_APP_HOST;
var port = process.env.VCAP_APP_PORT;
console.log('VCAP_SERVICES: %s', process.env.VCAP_SERVICES);
// Also parse Cloudant settings.
var cloudant = env['cloudantNoSQLDB'][0]['credentials'];
}
var db = new pouchdb('books'),
remote =cloudant.url + '/books';
opts = {
continuous: true
};
// Replicate the DB to remote
console.log(remote);
db.replicate.to(remote, opts);
db.replicate.from(remote, opts);

Access to the Cloudant DB is through the cloudant.url shown above

3)  Once the access to the DB is setup we can perform CRUD operations. There are many options for the backend DB. In this application I have PouchDB.

4) Inserting a document: To insert documents into the Cloudant DB based on Pouch DB we need to do the following

var insert_records = function(req, res) {
//Parse the process.env for the port and host that we've been assigned
if (process.env.VCAP_SERVICES) {
// Running on Bluemix. Parse the port and host that we've been assigned.
var env = JSON.parse(process.env.VCAP_SERVICES);
var host = process.env.VCAP_APP_HOST;
var port = process.env.VCAP_APP_PORT;
console.log('VCAP_SERVICES: %s', process.env.VCAP_SERVICES);
// Also parse Cloudant settings.
var cloudant = env['cloudantNoSQLDB'][0]['credentials'];
}
var db = new pouchdb('books'),
remote =cloudant.url + '/books';
opts = {
continuous: true
};
// Replicate the DB to remote
console.log(remote);
db.replicate.to(remote, opts);
db.replicate.from(remote, opts);
// Put 3 documents into the DB
db.put({
author: 'John Grisham',
Title : 'The Firm'
}, 'book1', function (err, response) {
console.log(err || response);
});
...
...
res.writeHead(200, {'Content-Type': 'text/plain'});
res.write("3 documents is inserted");
res.end();
}; // End insert_records

The nice part about Cloudant DB is that you can access your database through the URL. The steps are shown below. Once your application is running. Click on your application. You should see the screen as below.

1

Click on Cloudant as shown by the arrow.

Next click on the “Launch’ icon

2

This should bring up the Cloudant dashboard. The database will be empty.

3

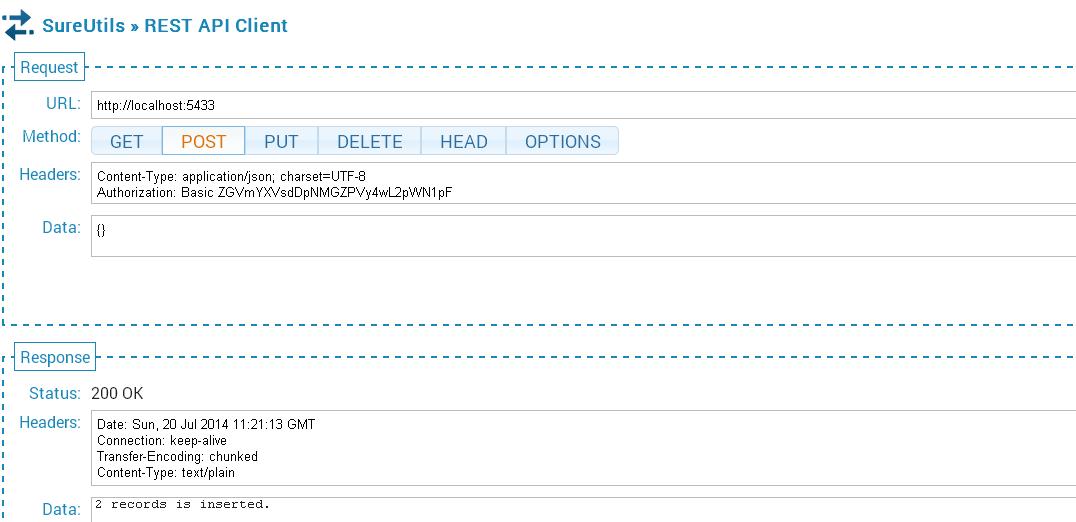
If you use a REST API Client to send a POST API call then the Application will insert 3 documents.

4

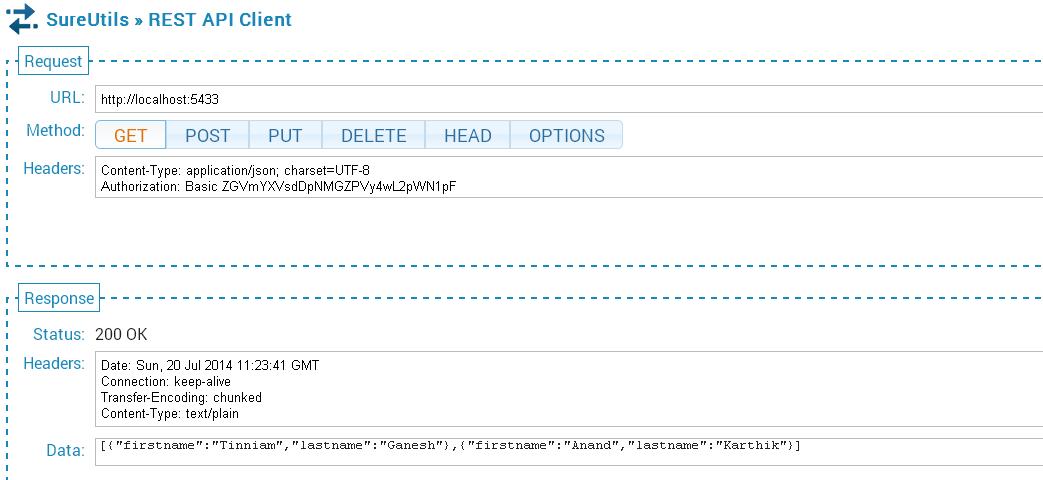
The documents inserted can be seen by sending the GET REST API call.

5

The nice part of Cloudant DB is that you can use the URL to see your database. If you refresh your screen you should see the “books” database added. Clicking this database you should see the 3 documents that have been added

6

If you click “Edit doc” you should see the details of the document

7

5) Updating a document

The process to update a document in the database is shown below

// Update book3
db.get('book3', function(err, response) {
console.log(response);
return db.put({
_id: 'book3',
_rev: response._rev,
author: response.author,
Title : 'The da Vinci Code',
});
}, function(err, response) {
if (err) {
console.log("error " + err);
} else {
console.log("Success " + response);
}
});

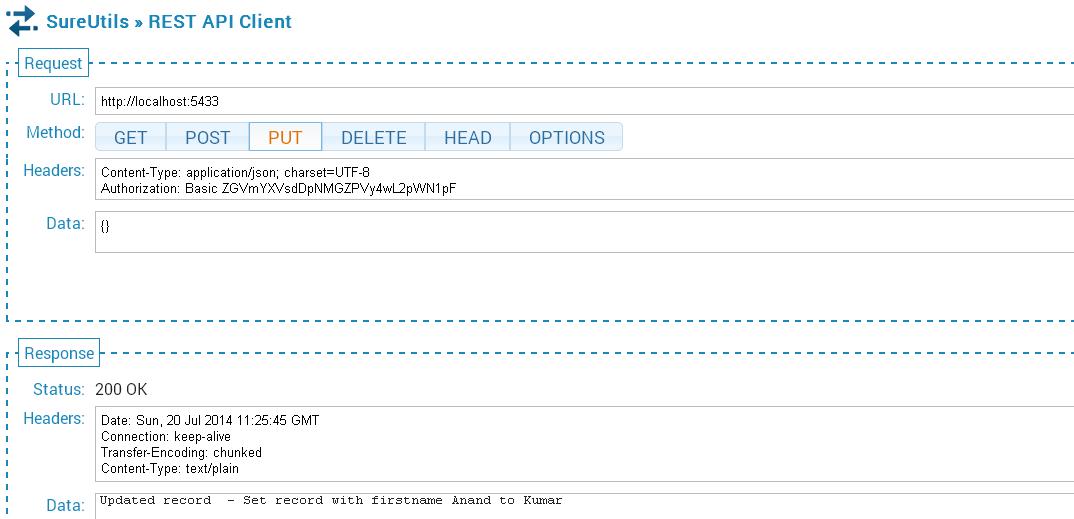
This is performed with a PUT REST API call

8

The updated list is shown below

9

This can be further verified in the Cloudant DB dashboard for book3.

10

6) Deleting a document

The code to delete a document in PouchDB is shown below

//Deleting document book1
db.get('book1', function(err, doc) {
db.remove(doc, function(err, response) {
console.log(err || response);
});
});

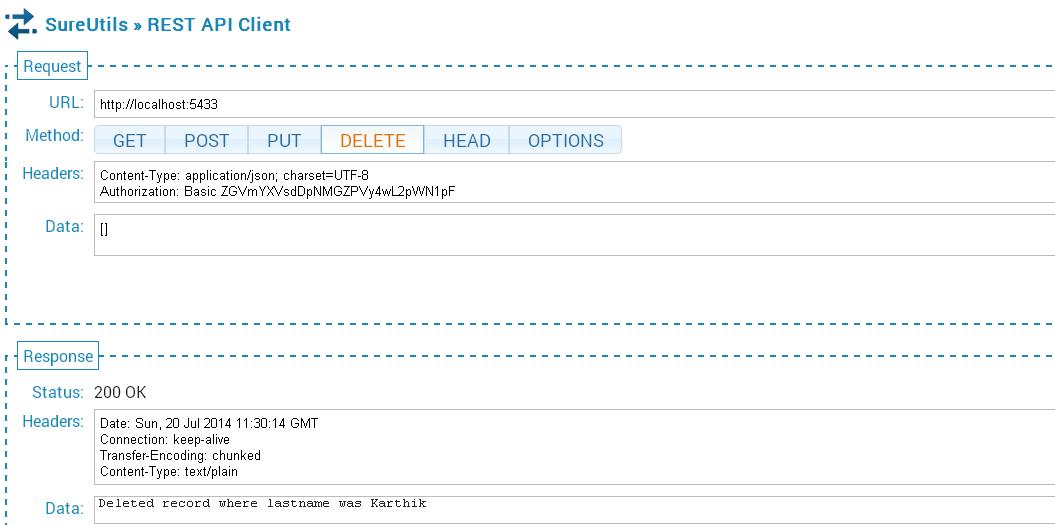
The REST calls to delete a document and the result  are shown below

11

12

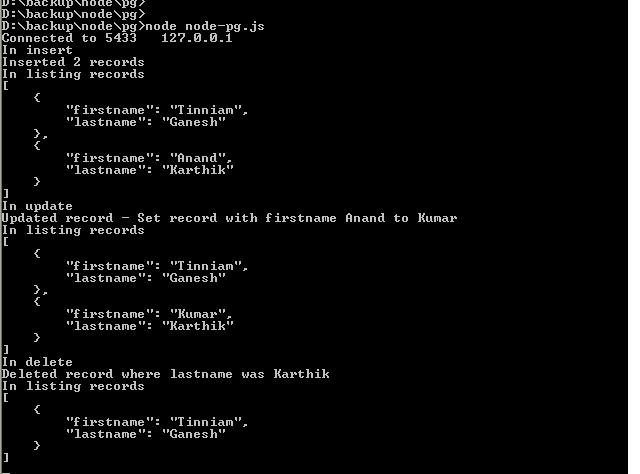
Checking the Cloudant dashboard we see that only book2 & book3 are present and book1 has been deleted

13

7) Displaying documents in the database

The code for displaying the list of documents is shown below

var docs = db.allDocs(function(err, response) {
val = response.total_rows;
var details = "";
j=0;
for(i=0; i < val; i++) {
db.get(response.rows[i].id, function (err,doc){
j++;
details= details + JSON.stringify(doc.Title) + " by  " +  JSON.stringify(doc.author) + "\n";
// Kludge because of Node.js asynchronous handling. To be fixed - T V Ganesh
if(j == val) {
res.writeHead(200, {'Content-Type': 'text/plain'});
res.write(details);
res.end();
console.log(details);
}
}); // End db.get
} //End for
}); // End db.allDocs

If you happened to notice, I had to use a kludge to work around Node.js’ idiosyncracy of handling asynchronous calls. I was fooled by the remarkable similarity of Node.js & hence  javascript to C language that I thought functions within functions would work sequentially. However I had undergo much grief  trying to get Node.js to work sequentially. I wanted to avoid the ‘async’ module but was unsuccessful with trying to code callbacks. So the kludge! I will work this out eventually but this workaround will have to do for now!

As always you can use the “Files and Logs” in the Bluemix dashboard to get any output that are written to stdout.

Note: As always I can’t tell how useful the command
'cf  logs <application name> -- recent is for debugging.

Hope you enjoyed this Cloud Medley of Bluemix, Cloudant and Node.js!

Disclaimer: This article represents the author’s viewpoint only and doesn’t necessarily represent IBM’s positions, strategies or opinions

You may also like
1. Brewing a potion with Bluemix, PostgreSQL & Node.js in the cloud
2.  A Bluemix recipe with MongoDB and Node.js
3.  Spicing up IBM Bluemix with MongoDB and NodeExpress
4.  Rock N’ Roll with Bluemix, Cloudant & NodeExpress


Find me on Google+

Brewing a potion with Bluemix, PostgreSQL, Node.js in the cloud

Here is a heady potion made with the key ingredients of IBM’s Bluemix, PostgreSQL & Node.js. In this post I instantiate an app ‘mypgdb01’ on IBM’s Bluemix which uses the services of PostgreSQL in the cloud. This is shown in the picture below.

8

The mypgdb01 is a Webserver running on Node.js in Bluemix and uses the services of PostgreSQL DB. The app mypgdb01 performs basic CRUD (Create, Remove, Update & Delete) on the PostgreSQL.

The code for this can be forked from Devops  from my link mypgdb

The code can also be cloned from GitHub at mypgdb

1) This app uses the Node.js Webstarter kit and the PostgreSQL service.  The Node.js Webserver is created by parsing the VCAP services variable as usual

if (process.env.VCAP_SERVICES) {
var env = JSON.parse(process.env.VCAP_SERVICES);
var credentials = env['postgresql-9.1'][0]['credentials'];
} else {
var credentials = {"uri":"postgre://user:secret1@localhost:5433/db"}
}
var port = (process.env.VCAP_APP_PORT || 1337);
var host = (process.env.VCAP_APP_HOST || '0.0.0.0');
http.createServer(function(req, res) {
console.log("Inside Webserver");
....
....
}).listen(port, host);

The details of VCAP_SERVICES can be see by clicking Runtime for you application and is shown below

9

Note: From above it can be seen that the PostgreSQL DB’s host & port is

"host": "192.155.243.14",
"hostname": "192.155.243.14",
"port": 5433

This different from the host & port of the Node.js Webserver which  can be see in Logs & Files tab (included below) and is

Webserver: host: 0.0.0.0
port:62733

2) Once the Webserver is started the server waits for REST calls of GET,PUT, UPDATE & DELETE as shown below.

// Perform CRUD operations through REST APIs
if(req.method == 'POST') {
insert_records(req,res);
}
else if(req.method == 'GET') {
list_records(req,res);
}
else if(req.method == 'PUT') {
update_record(req,res);
}
else if(req.method == 'DELETE') {
delete_record(req,res);
}

3)  The REST API call  are implements as follows

a) POST:

var insert_records = function(req, res) {
// Connect to DB
var client = new pg.Client(credentials.uri);
client.connect(function(err) {
if (err) {
res.end("Could not connect to postgre: " + err);
}

//Drop table if it exists
client.query("DROP TABLE IF EXISTS emps");
// Creat table and insert 2 records into it
client.query("CREATE TABLE IF NOT EXISTS emps(firstname varchar(64), lastname varchar(64))");
client.query("INSERT INTO emps(firstname, lastname) values($1, $2)", ['Tinniam', 'Ganesh']);
client.query("INSERT INTO emps(firstname, lastname) values($1, $2)", ['Anand', 'Karthik']);

b) GET:

// Select all rows in the table<
var query = client.query("SELECT firstname, lastname FROM emps ORDER BY lastname, firstname");
query.on("row", function (row, result) {
result.addRow(row);
});
query.on("end", function (result) {
// On end JSONify and write the results to console and to HTML output
console.log(JSON.stringify(result.rows, null, "    "));
res.writeHead(200, {'Content-Type': 'text/plain'});
res.write(JSON.stringify(result.rows) + "\n");
res.end();
});

c) UPDATE:

query = client.query("UPDATE emps set firstname = 'Kumar' WHERE firstname='Anand' AND lastname='Karthik'");
res.writeHead(200, {'Content-Type': 'text/plain'});
res.write("Updated record  - Set record with firstname Anand to Kumar\n");

d)DELETE

// Delete the record where the lastname is Karthik
client.query("DELETE FROM  emps WHERE lastname = 'Karthik'");
res.writeHead(200, {'Content-Type': 'text/plain'});
res.write("Deleted record where lastname was Karthik\n");

4) Once the changes are made you can  push the changes to Bluemix using ‘cf’ commands.

The commands are

cf login -a https://api.ng.bluemix.net
cf push mypgdb01-p . -m 512M
cf create-service postgresql 100 pgdb01
cf bind-service mypgdb01 pgdb01

5) In the Bluemix dashboard the app ‘mypgdb01’ should be up and running.

6) To invoke the different database operations we need to make REST API calls to the app.

7) To make the REST API calls you can install Sure Utils -> REST API Chrome extension.  I installed the SureUtils-.REST API Client. This is a Chrome extension and can be installed from Chrome Web Store (search for REST API client). You could choose any REST API client of your choice for the browser you intend to use (Chrome, Firefox)

8) Now we can test the Nodejs-PostgreSQL app with the Sure Utils – Chrome extension

8) The following REST API calls can be made to test the PostgreSQL operations on the database

POST- insert

1

GET – select

2

UPDATE + GET – update + select

The PUT API updates Anand Karthik to Kumar Karthik. This is shown in the GET API call

3

4

.DELETE + GET – delete  + select

5

6


Here the DELETE API call deletes the Kumar Karthik record. The GET API call now displays only 1 record.

The console.log output in Bluemix can be see in Files and logs -> stdout.log as shown below

7

The above post shows some basic operations done on a cloud based application that is composed of a Webserver with a PostgreSQL as a backend. The code can be enhanced by adding  front end using Node express.

As mentioned above the code for this can be forked from Devops at mypgdb. The code can also be cloned from GitHub at mypgdb

Disclaimer: This article represents the author’s viewpoint only and doesn’t necessarily represent IBM’s positions, strategies or opinions

You may also like
1. A Bluemix recipe with MongoDB and Node.js
2. Spicing up IBM Bluemix with MongoDB and NodeExpress
3. A Cloud Medley with IBM’s Bluemix, Cloudant and Node.js
4. Rock N’ Roll with Bluemix, Cloudant & NodeExpress


Find me on Google+

Working with Node.js and PostgreSQL

In this post I create a simple Webserver with Node.js which uses PostgreSQL database in the backend. This post shows how to perform simple database operations of insert, select, update and delete using REST APIs (POST, GET, PUT & DELETE).

Assuming that you already have Node.js installed here are the steps to create this CRUD (Create, Remove Update & Delete) Webserver.

1.Install Node.js if you already haven’t from Nodejs.org
2. Create a test directory pg for this PostgreSQL based Node.js Webserver
3. Open a command prompt and run
npm install pg
4.You will also need to install the PostgreSQL Enterprise DB with installer. Choose the appropriate OS and CPU
5.For this example I create a simple Employee Database.
6. In Windows Click Start->All Programs->PostgreSQL 9.3->pgAdmin III
7. Right click Databases-> New Database and Enter employees
1
8. The next step is to create Node.js Webserver and connect to this Database. PostgreSQL accepts DB connections through port 5432.
9.In this post The Webserver accepts connections from port 5433. Here is the shell of the Node.js Webserver
var pg = require("pg")
var http = require("http")
var port = 5433;
var host = '127.0.0.1';

http.createServer(function(req, res) {
if(req.method == 'POST') {
insert_records(req,res);
}
else if(req.method == 'GET') {
list_records(req,res);
}
else if(req.method == 'PUT') {
update_record(req,res);
}
else if(req.method == 'DELETE') {
delete_record(req,res);
}
}).listen(port,host);
console.log("Connected to " + port + "   " + host);

The Webserver accepts the usual 4 REST API calls – POST, GET, UPDATE, and DELETE for which there are 4 separate function calls.  The REST API calls correspond to the database operations insert, select, update and delete respectively.

10. Prior to performing each operation the  a client connects to the database as follows

var conString = "pg://postgres:postgres@localhost:5432/employees";
var client = new pg.Client(conString);
client.connect();

11. The POST operation is performed as follows

var insert_records = function(req, res) {


//Drop table if it exists
client.query("DROP TABLE IF EXISTS emps");
// Creat table and insert 2 records into it
client.query("CREATE TABLE IF NOT EXISTS emps(firstname varchar(64), lastname varchar(64))");
client.query("INSERT INTO emps(firstname, lastname) values($1, $2)", ['Tinniam', 'Ganesh']);
client.query("INSERT INTO emps(firstname, lastname) values($1, $2)", ['Anand', 'Karthik']);

12. To display the contents of the database the list_records function is used as follows

var list_records = function(req, res) {
console.log("In listing records");
// Select all rows in the table
var query = client.query("SELECT firstname, lastname FROM emps ORDER BY lastname, firstname");
query.on("row", function (row, result) {
result.addRow(row);
});
query.on("end", function (result) {

13. The REST API Update is performed as below

var update_record = function(req, res) {
// Update the record where the firstname is Anand
query = client.query("UPDATE emps set firstname = 'Kumar' WHERE firstname='Anand' AND lastname='Karthik'");

14.Finally a delete is performed using a delete_record method

var delete_record = function(req, res) {
// Delete the record where the lastname is Karthik
client.query("DELETE FROM  emps WHERE lastname = 'Karthik'");

15.The output of each operation is sent back as HTML  as

query.on("row", function (row, result) {
result.addRow(row);
});
query.on("end", function (result) {
// On end JSONify and write the results to console and to HTML output
console.log(JSON.stringify(result.rows, null, "    "));
res.writeHead(200, {'Content-Type': 'text/plain'});
res.write(JSON.stringify(result.rows) + "\n");
res.end();
});

16.To test the Webserver you need to install a REST API client for the browser you use. I installed the SureUtils-.REST API Client. his is a Chrome extension nand can be installed from Chrome Web Store (search for REST API client). You could choose any REST API client of your choice for the browser you intend to use (Chrome, Firefox)

17.Here are the tests I performed

18.The POST API call
2

19. The GET API call

3
20.The PUT  call followed by GET call
4
5
The PUT API updates Anand Karthik to Kumar Karthik. This is shown in the GET API call.
21. The DELETE call followed by the GET call

Here the DELETE API call deletes the Kumar Karthik record. The GET API call now displays only 1 record.

6

7

22. The console.log output for the operations above  is shown below

8

The code for the Node.js- PostgreSQL can be cloned from GitHub at node-pg

Checkout my book ‘Deep Learning from first principles Second Edition- In vectorized Python, R and Octave’.  My book is available on Amazon  as paperback ($18.99) and in kindle version($9.99/Rs449).

You may also like my companion book “Practical Machine Learning with R and Python:Second Edition- Machine Learning in stereo” available in Amazon in paperback($12.99) and Kindle($9.99/Rs449) versions.

Also see
1. My book ‘Practical Machine Learning in R and Python: Third edition’ on Amazon
2.My book ‘Deep Learning from first principles:Second Edition’ now on Amazon
3.The Clash of the Titans in Test and ODI cricket
4. Introducing QCSimulator: A 5-qubit quantum computing simulator in R
5.Latency, throughput implications for the Cloud
6. Simulating a Web Joint in Android
5. Pitching yorkpy … short of good length to IPL – Part 1

Also see
Introducing cricketr: An R package for analyzing performances of cricketers
– A crime map of India in R: Crimes against women
– What’s up Watson? Using IBM Watson’s QAAPI with Bluemix, NodeExpress – Part 1
– Bend it like Bluemix, MongoDB with autoscaling – Part 1
– Analyzing cricket’s batting legends – Through the mirage with R
– Masters of spin: Unraveling the web with R

Find me on Google+