Bend it like Bluemix, MongoDB with auto-scaling – Part 3

In this last post of this series, I test the performance of Bluemix & MongoDB against  concurrent queries and deletes to the cloud based app with Mongo DB, with auto-scaling on. Before I started these series of tests I moved the Overload policy a couple of notches higher and made it scale out if  memory utilization > 75% for 120 secs and < 30% for 120 secs (from the earlier 55% memory utilization) as shown below.

27

The code for bluemixMongo app can be forked from Devops at bluemixMongo or can be cloned from GitHub at  bluemix-mongo-autoscale. The multi-mechanize scripts can be downloaded from GitHub at multi-mechanize     Before starting the testing I checked the current number of documents inserted by the concurrent inserts (see Bend it like Bluemix., MongoDB using Auto-scaling – Part 2). The total number as determined by checking the logs was 1380 17   Sure enough with the scaling policy change after 2 minutes the number of instanced dropped from 3 to 2

18

1. Querying the bluemixMongo app with Multi-mechanize

The Multi-mechanize Python script used for querying the bluemixMongo app simply invokes the app’s userlist URL (resp=br.open(“http://bluemixmongo.mybluemix.net/userlist/&#8221;)

v_user.py

def run(self):
# create a Browser instance
br = mechanize.Browser()
# don"t bother with robots.txt
br.set_handle_robots(False)
# start the timer
start_timer = time.time()
#print("Display userlist")
# Display 5 random documents
resp=br.open("http://bluemixmongo.mybluemix.net/userlist/")
assert("Example Mongo Page" in resp.get_data())
# stop the timer
latency = time.time() - start_timer
self.custom_timers["Userlist"] = latency
r = random.uniform(1, 2)
time.sleep(r)
self.custom_timers['Example_Timer'] = r

The configuration setup for this script creates 2 sets of 10 concurrent threads

config.cfg
run_time = 300
rampup = 0
results_ts_interval = 10
progress_bar = on
console_logging = off
xml_report = off
[user_group-1]
threads = 10
script = v_user.py
[user_group-2]
threads = 10
script = v_user.py

The corresponding userlist.js for querying the app is shown below. Here the query is constructed by creating a ‘RegularExpression’ with  a random Firstname, consisting of a random letter and a random number. Also the query is also limited to 5 documents.

function(callback)
{
// Display a random set of 5 records based on a regular expression made with random letter, number
var randnum = Math.floor((Math.random() * 10) + 1);
var alpha = ['A','B','C','D','E','F','G','H','I','J','K','L','M','N','O','P','Q','R','S','T','U','V','X','Y','Z'];
var randletter = alpha[Math.floor(Math.random() * alpha.length)];
var val =  randletter + ".*" + randnum + ".*";
// Limit the display to 5 documents
var results = collection.find({"FirstName": new RegExp(val)}).limit(5).toArray(function(err, items){
if(err) {
console.log(err + " Error getting items for display");
}
else {
res.render('userlist',
{ "userlist" : items
}); // end res.render
} //end else
db.close(); // Ensure that the open connection is closed
}); // end toArray function
callback(null, 'two');
}

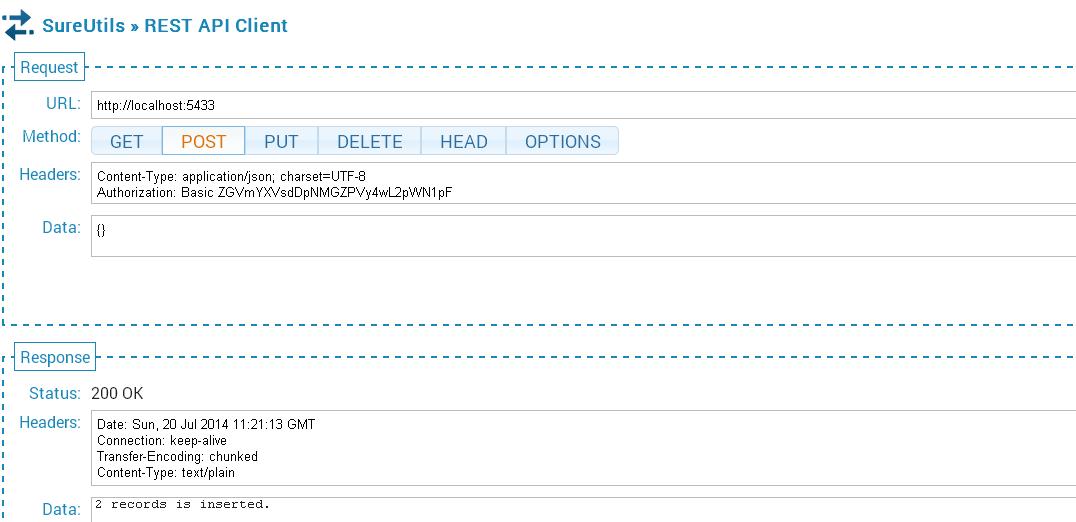
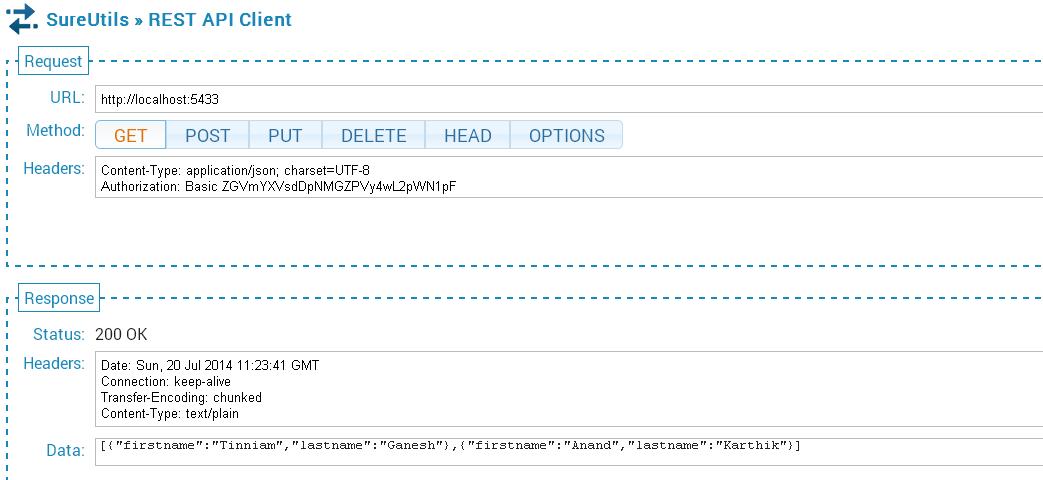
2. Running the userlist query

The following screenshot shows the userlist query being executed concurrently with Multi-mechanize. Note that the number of  instances also drops down to 1

18

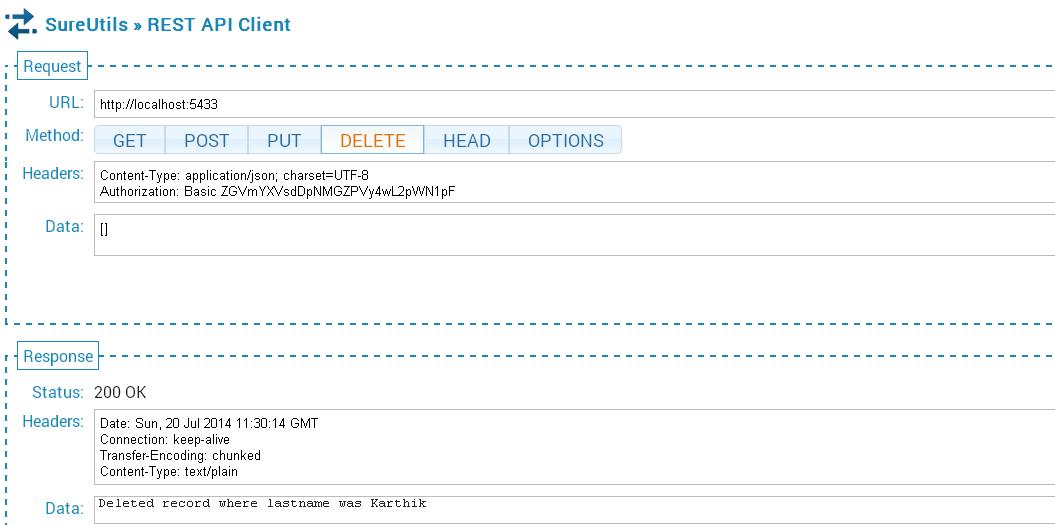
3. Deleting documents with Multi-mechanize

The multi-mechanize script for deleting a document is shown below. This script calls the URL with resp = br.open(“http://bluemixmongo.mybluemix.net/remuser&#8221;). No values are required to be entered into the form and the ‘submit’ is simulated.

v_user.py
def run(self):
# create a Browser instance
br = mechanize.Browser()
# don"t bother with robots.txt
br.set_handle_robots(False)
br.addheaders = [("User-agent", "Mozilla/5.0Compatible")]
# start the timer
start_timer = time.time()
# submit the request
resp = br.open("http://bluemixmongo.mybluemix.net/remuser")
#resp = br.open("http://localhost:3000/remuser")
resp.read()
# stop the timer
latency = time.time() - start_timer
# store the custom timer
self.custom_timers["Load_Front_Page"] = latency
# think-time
time.sleep(2)
# select first (zero-based) form on page
br.select_form(nr=0)
# set form field
br.form["firstname"] = ""
br.form["lastname"] = ""
br.form["mobile"] = ""
# start the timer
start_timer = time.time()
# submit the form
resp = br.submit()
resp.read()
print("Removed")
# stop the timer
latency = time.time() - start_timer
# store the custom timer
self.custom_timers["Delete"] = latency
# think-time
time.sleep(2)

config.cfg

The config file is set to start 2 sets of 10 concurrent threads and execute for 300 secs

[global]
run_time = 300
rampup = 0
results_ts_interval = 10
progress_bar = on
console_logging = off
xml_report = off
[user_group-1]
threads = 10
script = v_user.py
[user_group-2]
threads = 10
script = v_user.py
;

deleteuser.js

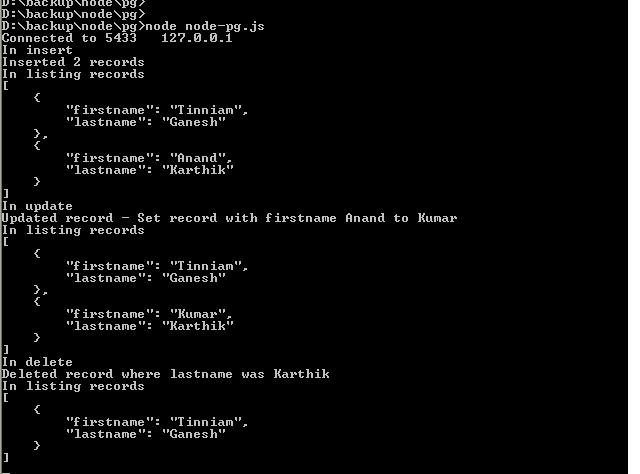
This Node.js script does a findOne() document and does a remove with the ‘justOne’ set to true

collection.findOne(function(err, item) {
// Delete just a single record
collection.remove(item, {justOne:true},(function (err, doc) {
if (err) {
// If it failed, return error
res.send("There was a problem removing the information to the database.");
}
else {
// If it worked redirect to userlist
res.location("userlist");
// And forward to success page
res.redirect("userlist");
}
}));
});
collection.find().toArray(function(err, items) {
console.log("Length =----------------" + items.length);
db.close();
});
callback(null, 'two');

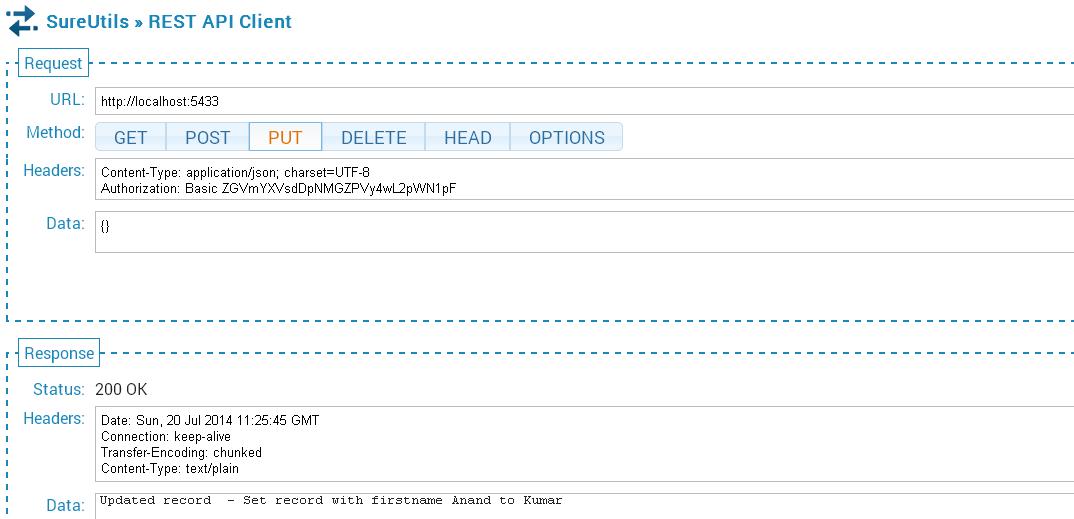
4. Running the deleteuser multimechanize script

The output of the script executing and the reduction of the number of instances because of the change in the memory utilization policy is shown

21

5. Multi-mechanize

As mentioned in the previous posts

The multi-mechanize commands are executed as follows
To create a new project
multimech-newproject.exe userlist
This will create 2 folders a) results b) test_scripts and the file c) config.cfg. The v_user.py needs to be updated as required

To run the script
multimech-run.exe userlist

The details of the response times for the query is shown below .

All_Transactions_response_times_intervals


More details on latency and throughput for the queries and the deletes are included in the results folder of multi-mechanize    

6. Autoscaling The details of the auto-scaling service is shown below

a. Scaling Metric Statistics

22

b. Scaling history 23

7. Monitoring and Analytics (M & A) The output from M & A is shown  below


a. Performance Monitoring 24  

b. Log Analysis output The log analysis give a detailed report on the calls made to the app, the console log output and other useful information

25

The series of the 3 posts Bend it like Bluemix, MongoDB with auto-scaling demonstrated the ability of the cloud to expand and shrink based on the load on the cloud.An important requirement for Cloud Architects is design applications that can  scale horizontally without impacting the performance while keeping the costs optimum. The real challenge to auto-scaling is the need to make the application really distributed as opposed to the monolithic architectures we are generally used to.   I hope to write another post on creating simple distributed application later.

Hasta la Vista!

Also see
1.  Bend it like Bluemix, MongoDB with autoscaling – Part 1
2. Bend it like Bluemix, MongoDB with autoscaling – Part 2

You may like :
a) Latency, throughput implications for the cloud
b) The many faces of latency
c) Brewing a potion with Bluemix, PostgreSQL & Node.js in the cloud
d)  A Bluemix recipe with MongoDB and Node.js
e)Spicing up IBM Bluemix with MongoDB and NodeExpress
f) Rock N’ Roll with Bluemix, Cloudant & NodeExpress

Disclaimer: This article represents the author’s viewpoint only and doesn’t necessarily represent IBM’s positions, strategies or opinions

Bend it like Bluemix, MongoDB using Auto-scaling – Part 2!

This post takes off from my previous post Bend it like Bluemix, MongoDB using Auto-scale –  Part 1! In this post I generate traffic using Multi-Mechanize a performance test framework and check out the auto-scaling on Bluemix, besides also doing some rudimentary check on the latency and throughput for this test application. In this particular post I generate concurrent threads which insert documents into MongoDB.

Note: As mentioned in my earlier post this is more of a prototype and the typical situation when architecting cloud applications. Clearly I have not optimized my cloud app (bluemixMongo) for maximum efficiency. Also this a simple 2 tier application with a rudimentary Web interface and a NoSQL DB at This is more of a Proof of Concept (PoC) for the auto-scaling service on Bluemix.

As earlier mentioned the bluemixMongo app is a modification of my earlier post Spicing up a IBM Bluemix cloud app with MongoDB and NodeExpress. The bluemixMongo cloud app that was used for this auto-scaling test can be forked from Devops at bluemixMongo or from GitHib at bluemix-mongo-autoscale. The Multi-mechanize config file, scripts and results can be found at GitHub in multi-mechanize

The document to be inserted into MongoDB consists of 3 fields – Firstname, Lastname and Mobile. To simulate the insertion of records into MongoDB I created a Multi-Mechanize script that will generate random combination of letters and numbers for the First and Last names and a random 9 digit number for the mobile. The code for this script is shown below

1. The snippet below measure the latency for loading the ‘New User’ page

v_user.py
def run(self):
# create a Browser instance
br = mechanize.Browser()
# don"t bother with robots.txt
br.set_handle_robots(False)
print("Rendering new user")
br.addheaders = [("User-agent", "Mozilla/5.0Compatible")]
# start the timer
start_timer = time.time()
# submit the request
resp = br.open("http://bluemixmongo.mybluemix.net/newuser")
#resp = br.open("http://localhost:3000/newuser")
resp.read()
# stop the timer
latency = time.time() - start_timer
# store the custom timer
self.custom_timers["Load Add User Page"] = latency
# think-time
time.sleep(2)

The script also measures the time taken to submit the form containing the Firstname, Lastname and Mobile

# select first (zero-based) form on page
br.select_form(nr=0)
# Create random Firstname
a = (''.join(random.choice(string.ascii_uppercase) for i in range(5)))
b = (''.join(random.choice(string.digits) for i in range(5)))
firstname = a + b
# Create random Lastname
a = (''.join(random.choice(string.ascii_uppercase) for i in range(5)))
b = (''.join(random.choice(string.digits) for i in range(5)))
lastname = a + b
# Create a random mobile number
mobile = (''.join(random.choice(string.digits) for i in range(9)))
# set form field
br.form["firstname"] = firstname
br.form["lastname"] = lastname
br.form["mobile"] = mobile
# start the timer
start_timer = time.time()
# submit the form
resp = br.submit()
print("Submitted.")
resp.read()
# stop the timer
latency = time.time() - start_timer
# store the custom timer
self.custom_timers["Add User"] = latency

2. The config.cfg file is setup to generate 2 asynchronous thread pools of 10 threads for about 400 seconds

config.cfg
run_time = 400
rampup = 0
results_ts_interval = 10
progress_bar = on
console_logging = off
xml_report = off
[user_group-1]
threads = 10
script = v_user.py
[user_group-2]
threads = 10
script = v_user.py

3. The code to add a new user in the app (adduser.js) uses the ‘async’ Node module to enforce sequential processing.

adduser.js
async.series([
function(callback)
{
collection = db.collection('phonebook', function(error, response) {
if( error ) {
return; // Return immediately
}
else {
console.log("Connected to phonebook");
}
});
callback(null, 'one');
},
function(callback)
// Insert the record into the DB
collection.insert({
"FirstName" : FirstName,
"LastName" : LastName,
"Mobile" : Mobile
}, function (err, doc) {
if (err) {
// If it failed, return error
res.send("There was a problem adding the information to the database.");
}
else {
// If it worked, redirect to userlist - Display users
res.location("userlist");
// And forward to success page
res.redirect("userlist")
}
});
collection.find().toArray(function(err, items) {
console.log("**************************>>>>>>>Length =" + items.length);
db.close(); // Make sure that the open DB connection is close
});
callback(null, 'two');
}
]);

4. To checkout auto-scaling the instance memory was kept at 128 MB. Also the scale-up policy was memory based and based on the memory of the instance exceeding 55% of 128 MB for 120 secs. The scale up based on CPU utilization was to happen when the utilization exceed 80% for 300 secs.

6

5. Check the auto-scaling policy

7

6. Initially as seen there is just a single instance

9

7. At around 48% of the script with around 623 transactions the instance is increased by 1. Note that the available memory is decreased by 640 MB – 128 MB = 512 MB.

10

8. At around 1324 transactions another instance is added

Note: Bear in mind

a) The memory threshold was artificially brought down to 55% of 128 MB.b) The app itself is not optimized for maximum efficiency

12

9. The Metric Statistics tab for the Autoscaling service shows this memory breach and the trigger for autoscaling

13

10. The Scaling history Tab for the Auto-scaling service displays the scale-up and scale-down and the policy rules based on which the scaling happened

14

11. If you go to the results folder for the Multi-mechanize tool the response and throughput are captured.

The multi-mechanize commands are executed as follows
To create a new project
multimech-newproject.exe adduser
This will create 2 folders a) results b) test_scripts and the file c) config.cfg. The v_user.py needs to be updated as required

To run the script
multimech-run.exe adduser

12.The results are shown below

a) Load Add User page (Latency)

Load Add User Page_response_times_intervals

b) Load Add User (Throughput)

Load Add User Page_throughput

c)Load Add User (Latency)

Add User_response_times_intervals

d) Load Add User (Throughput)

Add User_throughput

The detailed results can be seen at GitHub at multi-mechanize

13. Check the Monitoring and Analytics Page

a) Availability

16

b) Performance monitoring

15

So once the auto-scaling happens the application can be fine-tuned and for performance. Obviously one could do it the other way around too.

As can be seen adding NoSQL Databases like MongoDB, Redis, Cloudant DB etc. Setting up the auto-scaling policy is also painless as seen above.

Of course the real challenge in cloud applications is to make them distributed and scalable while keeping the applications themselves lean and mean!

See also

Also see
1.  Bend it like Bluemix, MongoDB with autoscaling – Part 1
3. Bend it like Bluemix, MongoDB with autoscaling – Part 3

You may like :
a) Latency, throughput implications for the cloud
b) The many faces of latency
c) Brewing a potion with Bluemix, PostgreSQL & Node.js in the cloud
d)  A Bluemix recipe with MongoDB and Node.js
e)Spicing up IBM Bluemix with MongoDB and NodeExpress
f) Rock N’ Roll with Bluemix, Cloudant & NodeExpress

a) Latency, throughput implications for the cloud

b) The many faces of latency

c) Design principles of scalable, distributed systems

Disclaimer: This article represents the author’s viewpoint only and doesn’t necessarily represent IBM’s positions, strategies or opinions

Bend it like Bluemix, MongoDB using Auto-scale – Part 1!

In the next series of posts I turn on the heat on my cloud deployment in IBM Bluemix and check out the elastic nature of this PaaS offering. Handling traffic load and elastically expanding and contracting is what the cloud does best. This is  where the ‘rubber really meets the road”. In this series of posts I generate the traffic load using Multi –Mechanize a performance test framework created by Corey Goldberg.

This post is based on an earlier cloud app that I created on Bluemix namely Spicing up a IBM Bluemix Cloud app with MongoDB and NodeExpress. I had to make changes to this code to iron out issues while handling concurrent  inserts, displays and deletes issued from the multi-mechanize tool and also to manage the asynchronous nightmare of Nodejs.

The code for this Bluemix, MongoDB with Auto-scaling can be forked  from Devops at bluemixMongo. The code can also be cloned from GitHub at bluemix-mongo-autoscale

1.  To get started, fork the code from Devops at bluemixMongo. Then change the host name in manifest.yml to something unique and click the Build and Deploy button on the top right in the page.

26

1a.  Alternatively the code can be cloned from GitHub at bluemix-mongo-autoscale. From the directory where the code is cloned push the code using Cloud Foundry’s cf command as follows

cf login -a https://api.ng.bluemix.net

cf push bluemixMongo –p . –m 128M

2. Now add the MongoDB service and click ‘OK’ to restage the server.

3

3. Add the Monitoring and Analytics (M & A) and also the Auto-scaling service. The M& A gives a good report on the Availability, Performance logging, and also provides Logging Analysis. The Auto-scaling service is the service that allows the app to expand elastically to changing traffic loads.

4

4. You should see the bluemixMongo app running with 3 services MongoDB, Autoscaling and M&A

5

5. You should now be able click the bluemixMongo.mybluemix.net and check the application out.

6.Now you configure the Overload Policy (auto scaling) policy. This is a slightly contrived example and the scaling policy is set to scale up if the Memory exceeds 55%. (Typically the scale up would be configured for > 80% memory usage)

6

7. Now check the configured Auto-scaling policy

7

8. Change the Memory Quota as appropriate. In my case I have kept the memory quota as 128 MB. Note the available memory is 640 MB and hence allows up to 5 instances. (By the way it is also possible to set any other value like 100 MB).

5

9. Click the Monitoring and Analytics service and take a look at the output in the different tabs

8

10. Next you need to set up the Performance test tool – Multi mechanize. Multi-mechanize creates concurrent threads to generate the load on a Web site or service. It is based on Python which  makes it easy to modify the scripts for hitting a website, making a REST call or submitting a form.

To setup Multi-mechanize you also need additional packages like numpy  matplotlib etc as the tool generates traffic based on a user provided script, measures latency and throughput besides also generating graphs for these.

For a detailed steps for setup of Multi mechanize please follow the steps in Trying out multi-mechanize web performance and load testing framework. Note: I would suggest that you install Python 2.7.2 and not the later 3.x version as some of the packages are based on the 2.7 version which has a slightly different syntax for certain Python statements

In the next post I will run a traffic test on the bluemixMongo application using Multi-mechanize and observe how the cloud app responds to the load.

Watch this space!
Also see
Bend it like Bluemix, MongoDB with autoscaling – Part 2!
Bend it like Bluemix, MongoDB with autoscaling – Part 3

You may like :
a) Latency, throughput implications for the cloud
b) The many faces of latency
c) Brewing a potion with Bluemix, PostgreSQL & Node.js in the cloud
d)  A Bluemix recipe with MongoDB and Node.js
e)Spicing up IBM Bluemix with MongoDB and NodeExpress
f) Rock N’ Roll with Bluemix, Cloudant & NodeExpress

Disclaimer: This article represents the author’s viewpoint only and doesn’t necessarily represent IBM’s positions, strategies or opinions

Revisiting Bluemix with Twilio

This post walks you through the steps to use Twilio with IBM’s Bluemix to send an SMS and also make a  voice call when you click a URL.  Twilio, is a cloud communications SaaS organization which allows you to use standard web languages to build voice, SMS and VOIP applications via a Web API.

Twilio provides the ability to build VOIP applications using APIs. Twilio itself resides in the cloud and is always available. It also provides SIP integration which means that it can be integrated with Soft switches. Twilio looks really interesting with its ability to combine the cloud, Web and VOIP, SMS and the like.

The steps given below allow you to use your app to perform 2 things by clicking the app’s URL namely websmstest.bluemix.net

a) Send a SMS to your mobile phone

b) Make a voice call to your mobile phone

The code can be forked from Devops at websmstest

Connecting Twilio with Bluemix

  1. Fire-up a Node.js Webstarter application from the Bluemix dashboard. In my case I have named the application websmstest. Once this is up and running

fig1

2) Click Add a Service and under ‘Web and Application’ and choose Twilio.

3) Enter a name for the Twilio service. You will also need the Account SID and Authorization token

  1. For this go to http://www.twilio.com and sign up

5) Once you have registered, go to your Twilio Dashboard for the Account SID and Auth Token. If the Auth token is encrypted, you can click the ‘lock’ symbol to display the Auth token in plain text.

  1. Enter the Account SID and Auth Token in the Twilio service in Bluemix in the right hand panel shown in the picture below

fig2

  1. To get started click the link websmstest code from Devops.

  2. Next click the ‘Edit Code’ button at the top

  3. Then click ‘Fork’ and provide a suitable name for your project

fig6

  1. Check the option for a) Deploy to Bluemix. Uncheck the other options a) Make it private b) Add features for Scrum development

  2. On the left hand side navigate to the file you need to edit and make the changes with the Devops GUI editor. You will need to make the following changes

Setup the application

12) You will need to modify the following files

  1. manifest.yml
  2. app.js

13) In the manifest.yml make sure you enter the name of your application and the host

applications:

- host: websmstest
  disk: 1024M
  name: websmstest
  command: node app.js
  path: .
  domain: mybluemix.net
  mem: 128M
  instances: 1

14) Lastly make changes to your app.js.

var app = require('gopher'),
    twilio = require('twilio');

 
var config = JSON.parse(process.env.VCAP_SERVICES);
 
var twilioSid, twilioToken;
config['user-provided'].forEach(function(service) {
    if (service.name == 'Twilio') {
        twilioSid = service.credentials.accountSID;
        twilioToken = service.credentials.authToken;
    }
});
 

// URL 
app.get('/', function(request, response) {
    var client = new twilio.RestClient(twilioSid, twilioToken);
 
    /* To make a voice call to your mobile phone uncomment the next 2 lines */
   //client.calls.create({
   //url: "http://twimlets.com/message?Message%5B0%5D=Hello",
   
    
     //  to: Enter your mobile phone  for e.g.98765 43210
     // from: Enter the number Twilio alloted to your account
     // body: The message you would like to send
     client.sendMessage({
    	  to: '+919876543210',
         from: '+16305476427',
         body:'Twilio notification through Bluemix!'
        }, function(err, message) {
        response.send('Message sent! ID:'+message.sid);
    });
});
  1. Enter your mobile number in the ‘to:’ line.

  2. Enter the number provided to you in your Twilio account see below

fig3

  1. In the app.js code above in step 14) use the green highlighted line to send a SMS to your mobile phone

  2. If you uncomment the blue highlighted lines a voice call will be made to your mobile

  3. Finally ‘Deploy’ the application on to Bluemix (more details on Deploying to Bluemix) can be found at Getting started with IBM Bluemix and IBM Devops services using Node.js

Test the application

19) Now click on your application to open the details and then click the link adjacent to the Routes.

fig8

20) You should see that an SMS has been sent as shown

fig4

21) Your mobile should now display the message that was sent as shown below

Screenshot_2014-06-22-13-41-44

22) Uncomment the lines which deal with making voice call and you should receive a voice announcement (see below) (Remember to comment the green highlighted line client.sendMessage!)

1

23) Check the analytics in your Twilio dashboard

fig5

Disclaimer: This article represents the author’s viewpoint only and doesn’t necessarily represent IBM’s positions, strategies or opinions


Find me on Google+

Rock N’ Roll with Bluemix, Cloudant & NodeExpress

Published as a tutorial in IBM Cloudant – Bluemix tutorial and demos

In this post I create a  cloud application that is based on Bluemix, Cloudant DB and NodeExpress.  NodeExpress is used to perform DB operations on  CloudantDB

The code can be forked from Devops from bluemix-cloudant-exp. You can also clone the code from Github from bluemix-cloudant-exp

The following NodeExpress routes are created for performing the basic database operations

  1. a) Displaying the list of books
  2. b) Adding a book
  3. c) Updating a book and
  4. d) Deleting a book

1


Push the app to Bluemix

a) Push the app to Bluemix using
cf push bluemix-cloudant -p . -m 512M

b) In the Bluemix dashboard add the Cloudant service.

c) Double click the CloudantNoSQLDB

9

and then click the ‘Launch’ button. This will bring the WebSQL based version of Cloudant DB

10

c) Next click the link bluemix-cloudant.mybluemix.net

11

This will start the Webserver and also populate the database.

e) This can be seen in the Cloudant Dashboard for the ‘test’ database which has 3 records shown below
12
The setup for these routes in the NodeExpress are as follows

app.get('/', routes.index);
app.get('/booklist', booklist.list);
app.get('/newbook', newbook.list);
app.post('/addbook',addbook.list);
app.get('/changebook', changebook.list);
app.post('/updatebook', updatebook.list);
app.get('/rembook', rembook.list);
app.post('/deletebook',deletebook.list);

Setting up the environment for Cloudant’s PouchDB

The first thing is to setup the environment for Cloudant’s Pouch DB by parsing the process.env environment variables as shown below

//Parse the process.env for the port and host that we've been assigned
if (process.env.VCAP_SERVICES) {
// Running on Bluemix. Parse the port and host that we've been assigned.
var env = JSON.parse(process.env.VCAP_SERVICES);
var host = process.env.VCAP_APP_HOST;
var port = process.env.VCAP_APP_PORT;
console.log('VCAP_SERVICES: %s', process.env.VCAP_SERVICES);
// Also parse Cloudant settings.
var cloudant = env['cloudantNoSQLDB'][0]['credentials'];
}
var db = new pouchdb('books'),
remote =cloudant.url + '/books';
opts = {
continuous: true
};
// Replicate the DB to remote
console.log(remote);
db.replicate.to(remote, opts);
db.replicate.from(remote, opts);

Displaying the list of books

Cloudant responds to DB queries as JSON messages. Hence to display the list of books the fields of each document is stored as an array and then displayed using the Jade table in booklist.jade  This is shown below

  1. a) booklist.js

var docs = db.allDocs(function(err, response) {
val = response.total_rows;
var details = "";
j=0;
var booklist = new Array(val);
for(i=0; i < val; i++) {
db.get(response.rows[i].id, function (err,doc){
j++;
booklist[j] = new Array(3);
booklist[j][0] = doc._id;
booklist[j][1] = doc.Title;
booklist[j][2] = doc.author;
details= details + JSON.stringify(doc.Title) + "  " +  JSON.stringify(doc.author) + "\n";
// Kludge because of Node.js asynchronous handling. To be fixed - T V Ganesh
if(j == val) {
res.render('booklist', {
"booklist" : booklist
});
}
}); // End db.get
} //End for
}); // End db.allDocs

  1. b) booklist.jade

The jade template simply displays the each booklist as a row in a table

block content
h1= "Display the list of books"
p
strong DocId  Title   Author
table
each book, i in booklist
tr
td #{book}
p
p
a(href='/') Home

2

Adding a book
To add a book the book details are obtained using the newbook.jade which display a form
block content
h1= "Add a book"
form#formAddBook(name="addbook",method="post",action="/addbook")
input#inputBookTitle(type="text", placeholder="Title", name="title")
input#inputBookAuthor(type="text", placeholder="Author", name="author")
button#btnSubmit(type="submit") submit
a(href='/') Home

With the values obtained from the form above a document is inserted into the books database as follows

// Get our form values. These rely on the "name" attributes
var Title = req.body.title;
var Author = req.body.author;
db.put({
author: Author,
Title : Title,
}, Title, function (err, response) {
console.log(err || response);
if (err) {
// If it failed, return error
res.send("There was a problem adding the information to the database.");
}
else {
// Redirect to booklist - Display booklist
res.location("booklist");
// And forward to success page
res.redirect("booklist");
}
});

Note: When inserting a document into the books database the docid for the document is set to be the same as the book Title itself

7

4

Updating a book

To update a document we need to input the document id. Also the document to be updated should use the “_rev” field which is obtained when we get the document. The values to be input are taken with the changeuser form

block content

h1= "Update a book"
form#formUpdateBook(name="addbook",method="post",action="/updatebook")
input#inputDocId(type="text", placeholder="DocId", name="docid")
input#inputBookTitle(type="text", placeholder="Title", name="title")
input#inputBookAuthor(type="text", placeholder="Author", name="author")
button#btnSubmit(type="submit") submit
a(href='/') Home

The values obtained are used to populate the document as follows

db.get(DocId, function(err, response) {
db.put({
_id: DocId,
_rev: response._rev,
author: Author,
Title : Title,
}, function(err, response) {
if (err) {
// If it failed, return error
res.send("There was a problem updating the information to the database.");
}
else {
// If it worked, redirect to display books
res.location("booklist");
// And forward to success page
res.redirect("booklist");
}
});
});

6

5

Deleting a document

To delete a document we need the document id which is taken with the rembook.jade form

block content
h1= "Delete a book"
form#formDeleteBook(name="addbook",method="post",action="/deletebook")
input#DocId(type="text", placeholder="DocId", name="docid")
button#btnSubmit(type="submit") submit
a(href='/') Home

//Deleting document book1
db.get(DocId, function(err, doc) {
db.remove(doc, function(err, response) {
if (err) {
// If it failed, return error
res.send("There was a problem removing the information to the database.");
}
else {
// Redirect to booklist
res.location("booklist");
// And forward to success page
res.redirect("booklist");
}
console.log(err || response);
});
});

In the diagram below docid ‘book3’ is deleted

13

8

Important tips

  1. If you run into issues while create a Jade template then do the following

npm install jade --g

You can check your jade template for correctness using

jade <name of jade template>

If the response is ‘rendered <name of jade template>.html’ then the template is fine.

  1. If there are problems with deploying the application or if the application crashes you check the cf logs as follows for the issue

cf logs <name of application> --recent

As mentioned the  code can be forked from Devops from bluemix-cloudant-exp. You can also clone the code from Github from bluemix-cloudant-exp

Disclaimer: This article represents the author’s viewpoint only and doesn’t necessarily represent IBM’s positions, strategies or opinions

See also

1. Brewing a potion with Bluemix, PostgreSQL & Node.js in the cloud
2. A Bluemix recipe with MongoDB and Node.js
3. Spicing up IBM Bluemix with MongoDB and NodeExpress
4. A Cloud Medley with IBM’s Bluemix, Cloudant and Node.js
Find me on Google+

A Cloud medley with IBM Bluemix, Cloudant DB and Node.js

Published as a tutorial in IBM Cloudant – Bluemix tutorial and demos

Here is an interesting Cloud medley based on IBM’s Bluemix PaaS platform, Cloudant DB and Node.js. This application  creates a Webserver using Node.js and uses REST APIs to perform CRUD operations on a Cloudant DB. Cloudant DB is a NoSQL Database as a service (DBaaS) that can handle a wide variety of data types like JSON, full text and geo-spatial data. The documents  are stored, indexed and distributed across a elastic datastore spanning racks, datacenters and perform replication of data across datacenters.Cloudant  allows one to work with self-describing JSON documents through  RESTful APIs making every document in the Cloudant database accessible as JSON via a URL.

This application on Bluemix uses REST APIs to perform the operations of inserting, updating, deleting and listing documents on the Cloudant DB.  The code can be forked from Devops at bluemix-cloudant. The code can also be clone from GitHub at bluemix-cloudant.

1) Once the code is forked the application can be deployed on to Bluemix using

cf login -a https://api.ng.bluemix.net
cf push bm-cloudant -p . -m 512M

2) After this is successful go to the Bluemix dashboard and add the Cloudant DB service.  The CRUD operations can be performed by invoking REST API calls using an appropriate REST client like SureUtils ot Postman in the browser of your choice.

Here are the details of the Bluemix-Cloudant application

3) Once the Cloudant DB service has been added to the Web started Node.js application we need to parse the process.env variable to obtain the URL of the Cloudant DB and the port and host to be used for the Web server.

The Node.js Webserver is started based on the port and host values obtained from process.env

require('http').createServer(function(req, res) {
//Set up the DB connection
if (process.env.VCAP_SERVICES) {
// Running on Bluemix. Parse for  the port and host that we've been assigned.
var env = JSON.parse(process.env.VCAP_SERVICES);
var host = process.env.VCAP_APP_HOST;
var port = process.env.VCAP_APP_PORT;
....
}
....
// Perform CRUD operations through REST APIs
// Insert document
if(req.method == 'POST') {
insert_records(req,res);
}
// List documents
else if(req.method == 'GET') {
list_records(req,res);
}
// Update a document
else if(req.method == 'PUT') {
update_records(req,res);
}
// Delete a document
else if(req.method == 'DELETE') {
delete_record(req,res);
}
}).listen(port, host);

2) Access to the Cloudant DB Access to Cloudant DB is obtained as follows

if (process.env.VCAP_SERVICES) {
// Running on Bluemix. Parse the port and host that we've been assigned.
var env = JSON.parse(process.env.VCAP_SERVICES);
var host = process.env.VCAP_APP_HOST;
var port = process.env.VCAP_APP_PORT;
console.log('VCAP_SERVICES: %s', process.env.VCAP_SERVICES);
// Also parse Cloudant settings.
var cloudant = env['cloudantNoSQLDB'][0]['credentials'];
}
var db = new pouchdb('books'),
remote =cloudant.url + '/books';
opts = {
continuous: true
};
// Replicate the DB to remote
console.log(remote);
db.replicate.to(remote, opts);
db.replicate.from(remote, opts);

Access to the Cloudant DB is through the cloudant.url shown above

3)  Once the access to the DB is setup we can perform CRUD operations. There are many options for the backend DB. In this application I have PouchDB.

4) Inserting a document: To insert documents into the Cloudant DB based on Pouch DB we need to do the following

var insert_records = function(req, res) {
//Parse the process.env for the port and host that we've been assigned
if (process.env.VCAP_SERVICES) {
// Running on Bluemix. Parse the port and host that we've been assigned.
var env = JSON.parse(process.env.VCAP_SERVICES);
var host = process.env.VCAP_APP_HOST;
var port = process.env.VCAP_APP_PORT;
console.log('VCAP_SERVICES: %s', process.env.VCAP_SERVICES);
// Also parse Cloudant settings.
var cloudant = env['cloudantNoSQLDB'][0]['credentials'];
}
var db = new pouchdb('books'),
remote =cloudant.url + '/books';
opts = {
continuous: true
};
// Replicate the DB to remote
console.log(remote);
db.replicate.to(remote, opts);
db.replicate.from(remote, opts);
// Put 3 documents into the DB
db.put({
author: 'John Grisham',
Title : 'The Firm'
}, 'book1', function (err, response) {
console.log(err || response);
});
...
...
res.writeHead(200, {'Content-Type': 'text/plain'});
res.write("3 documents is inserted");
res.end();
}; // End insert_records

The nice part about Cloudant DB is that you can access your database through the URL. The steps are shown below. Once your application is running. Click on your application. You should see the screen as below.

1

Click on Cloudant as shown by the arrow.

Next click on the “Launch’ icon

2

This should bring up the Cloudant dashboard. The database will be empty.

3

If you use a REST API Client to send a POST API call then the Application will insert 3 documents.

4

The documents inserted can be seen by sending the GET REST API call.

5

The nice part of Cloudant DB is that you can use the URL to see your database. If you refresh your screen you should see the “books” database added. Clicking this database you should see the 3 documents that have been added

6

If you click “Edit doc” you should see the details of the document

7

5) Updating a document

The process to update a document in the database is shown below

// Update book3
db.get('book3', function(err, response) {
console.log(response);
return db.put({
_id: 'book3',
_rev: response._rev,
author: response.author,
Title : 'The da Vinci Code',
});
}, function(err, response) {
if (err) {
console.log("error " + err);
} else {
console.log("Success " + response);
}
});

This is performed with a PUT REST API call

8

The updated list is shown below

9

This can be further verified in the Cloudant DB dashboard for book3.

10

6) Deleting a document

The code to delete a document in PouchDB is shown below

//Deleting document book1
db.get('book1', function(err, doc) {
db.remove(doc, function(err, response) {
console.log(err || response);
});
});

The REST calls to delete a document and the result  are shown below

11

12

Checking the Cloudant dashboard we see that only book2 & book3 are present and book1 has been deleted

13

7) Displaying documents in the database

The code for displaying the list of documents is shown below

var docs = db.allDocs(function(err, response) {
val = response.total_rows;
var details = "";
j=0;
for(i=0; i < val; i++) {
db.get(response.rows[i].id, function (err,doc){
j++;
details= details + JSON.stringify(doc.Title) + " by  " +  JSON.stringify(doc.author) + "\n";
// Kludge because of Node.js asynchronous handling. To be fixed - T V Ganesh
if(j == val) {
res.writeHead(200, {'Content-Type': 'text/plain'});
res.write(details);
res.end();
console.log(details);
}
}); // End db.get
} //End for
}); // End db.allDocs

If you happened to notice, I had to use a kludge to work around Node.js’ idiosyncracy of handling asynchronous calls. I was fooled by the remarkable similarity of Node.js & hence  javascript to C language that I thought functions within functions would work sequentially. However I had undergo much grief  trying to get Node.js to work sequentially. I wanted to avoid the ‘async’ module but was unsuccessful with trying to code callbacks. So the kludge! I will work this out eventually but this workaround will have to do for now!

As always you can use the “Files and Logs” in the Bluemix dashboard to get any output that are written to stdout.

Note: As always I can’t tell how useful the command
'cf  logs <application name> -- recent is for debugging.

Hope you enjoyed this Cloud Medley of Bluemix, Cloudant and Node.js!

Disclaimer: This article represents the author’s viewpoint only and doesn’t necessarily represent IBM’s positions, strategies or opinions

You may also like
1. Brewing a potion with Bluemix, PostgreSQL & Node.js in the cloud
2.  A Bluemix recipe with MongoDB and Node.js
3.  Spicing up IBM Bluemix with MongoDB and NodeExpress
4.  Rock N’ Roll with Bluemix, Cloudant & NodeExpress


Find me on Google+

Spicing up a IBM Bluemix cloud app with MongoDB and NodeExpress

In this post I highlight the rudiments for a creating a cloud application on IBM’s PaaS offering Bluemix, using MongoDB and NodeExpress.   Clearly Bluemix allows one to fire up a cloud application with a NoSQL database in a matter of  a few hours which makes it really attractive. The NodeExpress  application was initially created using Enide Studio for Node.js  with a local Mongodb server running on my desktop. (Please see my post Elements of CRUD with Node Express and MongoDB) Once you have ironed out the issues in this local application you are ready to deploy on IBM Bluemix.

The code for this Bluemix application can be forked from bluemix-mongo from IBM Devops.

You can also clone the code from GitHub at bluemix-mongo

Here are the key changes that need to be made for running the NodeExpress Webserver with MongoDB as the backend DB

1) Webserver : Setup the port and host for the Webserver.

  1. app.js

var port = (process.env.VCAP_APP_PORT || 1337);
var host = (process.env.VCAP_APP_HOST || '0.0.0.0');
var app = express();
app.configure(function(){
app.set('port', port);

As seen above the host & port for the Webserver are obtained from the process.env variable.
2) Routes and Middleware
Setup the routes and invoke them appropriately in app.js
var express = require('express')
, routes = require('./routes')
, user = require('./routes/user')
, userlist = require('./routes/userlist')
, newuser = require('./routes/newuser')
, adduser = require('./routes/adduser')
, changeuser = require('./routes/changeuser')
, updateuser = require('./routes/updateuser')
, remuser = require('./routes/remuser')
, deleteuser = require('./routes/deleteuser')

app.get('/users', user.list);
app.get('/helloworld', routes.index);
app.get('/userlist', userlist.list);
app.get('/newuser', newuser.list);
app.post('/adduser',adduser.list);
app.get('/changeuser', changeuser.list);
app.post('/updateuser', updateuser.list);
app.get('/remuser', remuser.list);
app.post('/deleteuser',deleteuser.list);

3) Initialize MongoDB database: Create a set of 3 records when the Webserver starts as follows

if (process.env.VCAP_SERVICES) {
var env = JSON.parse(process.env.VCAP_SERVICES);
if (env['mongodb-2.2']) {
var mongo = env['mongodb-2.2'][0]['credentials'];
}
} else {
var mongo = {
"username" : "user1",
"password" : "secret",
"url" : "mongodb://user1:secret@localhost:27017/test"
}
}
var MongoClient = mongodb.MongoClient;
var db= MongoClient.connect(mongo.url, function(err, db) {
if(err) {
log("failed to connect to the database");
} else {
log("connected to database");
}
var collection = db.collection('phonebook');
//Clear DB and insert 3 records
remove(mycallback);
var user1 = { "FirstName" : "Tinniam", "LastName" : "Ganesh","Mobile": "916732177728" };
var user2 = { "FirstName" : "Darth", "LastName" : "Vader","Mobile": "6666699999" };
var user3 = { "FirstName" : "Bill", "LastName" : "Shakespeare","Mobile": "8342189991" };

  1. insert(user1,function(err,result){});
  2. insert(user2,function(err,result){});
  3. insert(user3,function(err,result){});
  4. find().toArray(function(err, items) {

});
});

3) Home Page: Setup up a Home page with the CRUD operations when the Bluemix cloud application’s route  for e.g. http://bluemix-mongo.mybluemix.net is clicked. This is shown below.

1


2

4) Display Users: To display the list of users the route /userlist is invoked. This function gets all the records from the collection and stores them into a toArray element, which is then used for rendering the list of uses with a ‘userlist.jade’ template

userlist.js
var MongoClient = mongodb.MongoClient;
var db= MongoClient.connect(mongo.url, function(err, db) {
if(err) {

  1. log(“Failed to connect to the database”);

} else {

  1. log(“Connected to database”);

}
var collection = db.collection(‘phonebook’);
//Get all records and display them

  1. find().toArray(function(err, items) {
  2.    log(items);
  3. render(‘userlist’, {

“userlist” : items
});
});
});

  1. jade

This template displays the list of users as a table. The code is shown below

extends layout
block content
h1= "Display the list of Users"
p
strong Firstname Lastname   Mobile
table
each user, i in userlist
tr
td #{user.FirstName}
td #{user.LastName}
td #{user.Mobile}
p
p
a(href='/') Home

Note: A link back to the Home page is included in here at the bottom.

7


5) Adding a User
There are 2 parts to this
a) Invoking the /newuser route to display the input form through the newuser.jade
b) Invoking the /adduser route to insert the values entered in the form. The changes are shown below
a) app.js
..
newuser = require('./routes/newuser')
adduser = require('./routes/adduser')
..
app.get('/newuser', newuser.list);
app.post('/adduser',adduser.list);

b) newuser.js
exports.list = function(req, res){

  1. render(‘newuser’, { title: ‘Add User’});

};

The newuser jade displays the input form
c) newuser.jade
extends layout
block content
h1= "Add a User"
form#formAddUser(name="adduser",method="post",action="/adduser")
input#inputUserFirstName(type="text", placeholder="firstname", name="firstname")
input#inputUserLastName(type="text", placeholder="lastname", name="lastname")
input#inputUserLastName(type="text", placeholder="mobile", name="mobile")
button#btnSubmit(type="submit") submit
p
p
a(href='/') Home

3

d) adduser.js

The adduser.js gets the mongo url from the process.env.VCAP_SERVICES and  setups up the connection to the DB and inserts the values received in the ‘newuser.jade’ form into the database

exports.list = function(req, res) {
if (process.env.VCAP_SERVICES) {
var env = JSON.parse(process.env.VCAP_SERVICES);
if (env['mongodb-2.2']) {
var mongo = env['mongodb-2.2'][0]['credentials'];
}
} else {
var mongo = {
"username" : "user1",
"password" : "secret",
"url" : "mongodb://user1:secret@localhost:27017/test"
}
}
// Set up the DB connection
var MongoClient = mongodb.MongoClient;
var db= MongoClient.connect(mongo.url, function(err, db) {
if(err) {

  1. log(“Failed to connect to the database”);

} else {

  1. log(“Connected to database”);

}
// Get our form values. These rely on the “name” attributes
var FirstName = req.body.firstname;
var LastName = req.body.lastname;
var Mobile = req.body.mobile;
// Set our collection
var collection = db.collection(‘phonebook’);
// Insert the record into the DB

  1. insert({

“FirstName” : FirstName,
“LastName” : LastName,
“Mobile” : Mobile
}, function (err, doc) {
if (err) {
// If it failed, return error

  1. send(“There was a problem adding the information to the database.”);

}
else {
// Redirect to userlist – Display users

  1. location(“userlist”);

// And forward to success page

  1. redirect(“userlist”);

}
});
});

If the insert is successful the userlist page is displayed with the new user

4

6) Updating a User & Deleting a User: Updating and Deleting users follow the same format as Adding a user.

7) index.jade The Home page is built using index.jade with a hyperlink invoking the route for each database operation
extends layout
block content
h1= title
p Welcome to #{title}
ul
li
a(href='/userlist') Display list of users
li
a(href='/newuser') Add a user
li
a(href='/changeuser') Update a user
li
a(href='/remuser') Delete a user

Tip: “Return of the Jadei : Getting the jade template right is truly an art as Jade is extremely finicky about spaces, tabs, indents and outdents(???). Creating the Jade template had me run into circles. I found out that you can debug the jade template individually by executing

C:> npm install jade -g"
and then  running
C:> jade <template name>

from the command prompt. If the result of the command is “rendered <template name>.html” then you are in luck and you can incorporate this jade template into your views folder for e.g.

C: >jade index.jade
rendered index.html

8) Push changes to Bluemix: Once the changes have been made push the changes on to Bluemix with ‘cf’ as follows

cf login -a https://api.ng.bluemix.net
cf push bluemix-mongo -p . -m 512M
cf create-service mongodb 100 mongodb01
cf bind-service bluemix-mongo mongodb01


The last 2 commands can also be performed through the Bluemix dashboard in which you add the mongodb service to your Node.js app/

8) Files and Logs: In the Bluemix dashboard you can check your logs in the Files and Logs

5


6

Important tip: Finally if the application fails to start when you  push the application with ‘cf’ for e.g.

cf push <app name> -p . -m 512M
....
.....
----> Writing a custom .npmrc to circumvent npm bugs
----> Installing dependencies
----> Caching node_modules directory for future builds
----> Cleaning up node-gyp and npm artifacts
----> No Procfile found; Adding npm start to new Procfile
----> Building runtime environment
----> Checking and configuring service extensions
----> Uploading droplet (7.6M)
of 1 instances running, 1 down

or if  it crashes when you click a link then your debugging friend is

cf logs <app name > — recent
This will dump the error that was encountered either while the application was being started of why the application crashed.

You can fork this Bluemix application from bluemix-mongo at  IBM Devops or from GitHub at bluemix-mongo

Disclaimer: This article represents the author’s viewpoint only and doesn’t necessarily represent IBM’s positions, strategies or opinions

You may also like
1. Brewing a potion with Bluemix, PostgreSQL & Node.js in the cloud
2. A Bluemix recipe with MongoDB and Node.js
3. A Cloud Medley with IBM’s Bluemix, Cloudant and Node.js
4. Rock N’ Roll with Bluemix, Cloudant & NodeExpress


Find me on Google+

A Bluemix recipe with MongoDB and Node.js

Here is a tasty IBM Bluemix recipe with a dash of MongoDB and a pinch of Node.js. This posts shows the steps needed to perform basic CRUD (Create, Remove, Update & Delete) operations on the MongoDB database using REST APIs of PUT,GET, UPDATE & DELETE.

You can fork the code for the below app from Devops at mymongodb

The code can also be cloned from GitHub at mymongodb

For this,  the first  thing we need to do is to create a Webserver using Node.js as shown below

Webserver

require('http').createServer(function(req, res) {
if ( typeof mongodb !== 'undefined' && mongodb ) {
// Perform CRUD operations through REST APIs
if(req.method == 'POST') {
insert_records(req,res);
}
else if(req.method == 'GET') {
list_records(req,res);
}
else if(req.method == 'PUT') {
update_records(req,res);
}
else if(req.method == 'DELETE') {
delete_record(req,res);
}
} else {
res.writeHead(200, {'Content-Type': 'text/plain'});
res.write("No MongoDB service instance is bound.\n");
res.end();
}
}).listen(port, host);

The Webserver users the port and host values obtained as shown above to wait for  HTTP requests.

The REST API calls are handled by individual  Node.js functions to perform the operations of insert, update, delete and select.

Insertions

The code for insertions is shown below. For this a set of 5 documents are created and then inserted using Node.js

var insert_records = function(req, res) {
var MongoClient = require('mongodb').MongoClient;
// Connect to the db
MongoClient.connect (mongo.url, function(err, db) {
//Create a collection test
var collection = db.collection('books', function(err, collection) {
//Create a set of documents to insert
var book1 = { book: "The Firm", author: "John Grisham", qty: 3 };
var book2 = { book: "Foundation", author: "Isaac Asimov", qty: 5 };
collection.remove(mycallback);
//Insert the books
console.log("Insert the books");
collection.insert(book1,function(err,result){});
collection.insert(book2, {w:1}, function(err, result) {
});
collection.insert(book5, {w:1}, function(err, result) {});
console.log('Inserted 5 books');
}); //var collection
}); // End MongoClient.connect
}; // End insert_records

Updating documents in Mongodb

For update 2 documents are changed as shown below

var update_records = function(req, res) {
var MongoClient = require('mongodb').MongoClient;
MongoClient.connect (mongo.url, function(err, db) {
// Update
var collection = db.collection('books', function(err, collection) {
collection.update({book:"Fountainhead"},{$set:{qty:2}}, {w:1},function(err,result) {});
collection.update({book:"Animal Farm"},{$set:{author:"George Orwell"}}, {w:1},function(err,result) {});
console.log("Updated 2 books");

}); // var collection
}); //End MongoClient.connect

}; //End update-records

Deletions

The delete functions requires a callback method which is included

var delete_record = function(req, res) {
var MongoClient = require('mongodb').MongoClient;
MongoClient.connect (mongo.url, function(err, db) {

//Deleting documents
var collection = db.collection(‘books’, function(err, collection) {

collection.remove({book:”Foundation”},mycallback);
collection.remove({book:”The Da Vinci Code”},{w:1},mycallback);
console.log(‘Deleted 2 books’);

});
}); //End MongoClient.connect
}; //End delete-records

Retrieving documents

To retrieve documents the collection.find.stream() method is used as below

var list_records = function(req, res) {
var MongoClient = require('mongodb').MongoClient;
MongoClient.connect (mongo.url, function(err, db) {
//Retrieve documents
var collection = db.collection('books', function(err, collection) {
var stream = collection.find().stream();
console.log("Printing values...");
res.writeHead(200, {'Content-Type': 'text/plain'});
stream.on('error', function (err) {
console.error(err.stack)
});

stream.on(“data”, function(item) {
console.log(item);
res.write(JSON.stringify(item) + “\n”);
});

stream.on(“end”, function() {
console.log(“End”);
res.end();
});
}); //var collection
}); //End MongoClient.connect

The connection between the Node.js & Webserver and the MongoDB is setup using the VCAP_SERVICES as follows

if (process.env.VCAP_SERVICES) {
var env = JSON.parse(process.env.VCAP_SERVICES);
if (env['mongodb-2.2']) {
var mongo = env['mongodb-2.2'][0]['credentials'];
}
} else {
var mongo = {
"username" : "user1",
"password" : "secret",
"url" : "mongodb://user1:secret@localhost:27017/test"
}
}

To get started you can fork the code for the above Bluemix- MongoDB app from Devops from mymongodb

The code can also be cloned from GitHub at mymongodb

After you have forked the code you can clone the code into a local directory on your machine.

Now use the ‘cf’ command to push the code onto IBM Bluemix as shown. In my case I named the app as mymongodb01

cf login -a https://api.ng.bluemix.net
cf push mymongodb01 -p . -m 512M
cf create-service mongodb 100 mongodb
cf bind-service mymongodb01 mongodb

Instead of the last 2 steps you can also use the Add-service in Bluemix dashboard to add the MongoDB service. (Note: You will have to check Experimental at the top and you will see the service under Data Management.) After the MongoDB service is added check if your app is running in the Bluemix dashboard

If the app is running you can check the CRUD operations on MongoDB using the SureUtils-REST API client extension to Chrome.

The CRUD operations performed are shown below

1.POST + GET

Here 5 documents are inserted in the MongoDB and then displayed subsequently

1

2

2.UPDATE + GET

Here 2 records are updated – The quantity of the book ‘Fountainhead’ is set to 2 and the author of ‘Animal Farm’ is set to George Orwell

3

4

3.DELETE + GET

In this set 2 book are deleted and the result is displayed

5

6

If all things went well you should be able to see the app running.

7

You can also get the output o the console.login Files and Logs in the Bluemix dashboard.

8

Important tip:  While executing the Buemix app if you run into problems and you app crashes with the “Health decreased” for your app and its colour turning red you can use the recent history of ‘cf” command to debug your problem

PS C:\Users\IBM_ADMIN\git\mymongodb> cf logs mymongodb01 –recent

Connected, dumping recent logs for app mymongodb01 in org tvganesh.85@gmail.com / space dev as tvganesh.85@gmail.com…

…….

…….

2014-07-27T11:34:26.45+0530 [App/0]   OUT We are connected to DB
2014-07-27T11:34:26.46+0530 [App/0]   OUT Updated 2 books
2014-07-27T11:34:31.17+0530 [App/0]   OUT We are connected to DB
2014-07-27T11:34:31.17+0530 [App/0]   OUT Updated 2 books
2014-07-27T11:34:31.18+0530 [RTR]     OUT mymongodb01.mybluemix.net - [27/07/2014:06:04:31 +0000] "PUT / HTTP/1.1" 200 1
7 "-" "Mozilla/5.0 (Windows NT 6.1; WOW64) AppleWebKit/537.36 (KHTML, like Gecko) Chrome/35.0.1916.153 Safari/537.36" 75
.126.70.43:19986 vcap_request_id:4fa831610b6e79455d0257581a51014e response_time:0.009122768 app_id:ed49744f-1a29-4e3f-9e
1c-8b45e85c3310
2014-07-27T11:35:02.75+0530 [App/0]   ERR
2014-07-27T11:35:02.75+0530 [App/0]   ERR /home/vcap/app/app.js:95
2014-07-27T11:35:02.75+0530 [App/0]   ERR       MongoClient.connect (mongo.url, function(err, db)   {
2014-07-27T11:35:02.75+0530 [App/0]   ERR       ^
2014-07-27T11:35:02.75+0530 [App/0]   ERR ReferenceError: MongoClient is not defined
2014-07-27T11:35:02.75+0530 [App/0]   ERR     at delete_record (/home/vcap/app/app.js:95:2)
2014-07-27T11:35:02.75+0530 [App/0]   ERR     at Server.<anonymous> (/home/vcap/app/app.js:165:12)
2014-07-27T11:35:02.75+0530 [App/0]   ERR     at Server.emit (events.js:98:17)
2014-07-27T11:35:02.75+0530 [App/0]   ERR     at HTTPParser.parser.onIncoming (http.js:2108:12)
2014-07-27T11:35:02.75+0530 [App/0]   ERR     at HTTPParser.parserOnHeadersComplete [as onHeadersComplete] (http.js:121:
23)
2014-07-27T11:35:02.75+0530 [App/0]   ERR     at Socket.socket.ondata (http.js:1966:22)
2014-07-27T11:35:02.75+0530 [App/0]   ERR     at TCP.onread (net.js:527:27)
2014-07-27T11:35:02.80+0530 [RTR]     OUT mymongodb01.mybluemix.net - [27/07/2014:06:05:02 +0000] "DELETE / HTTP/1.1" Mi
ssingResponseStatusCode 0 "-" "Mozilla/5.0 (Windows NT 6.1; WOW64) AppleWebKit/537.36 (KHTML, like Gecko) Chrome/35.0.19


Happy cooking with Bluemix, MongoDB & Node.js!

Disclaimer: This article represents the author’s viewpoint only and doesn’t necessarily represent IBM’s positions, strategies or opinions

See also
1. Brewing a potion with Bluemix, PostgreSQL & Node.js in the cloud
2. Spicing up IBM Bluemix with MongoDB and NodeExpress
3. A Cloud Medley with IBM’s Bluemix, Cloudant and Node.js
4. Rock N’ Roll with Bluemix, Cloudant & NodeExpress


Find me on Google+

Brewing a potion with Bluemix, PostgreSQL, Node.js in the cloud

Here is a heady potion made with the key ingredients of IBM’s Bluemix, PostgreSQL & Node.js. In this post I instantiate an app ‘mypgdb01’ on IBM’s Bluemix which uses the services of PostgreSQL in the cloud. This is shown in the picture below.

8

The mypgdb01 is a Webserver running on Node.js in Bluemix and uses the services of PostgreSQL DB. The app mypgdb01 performs basic CRUD (Create, Remove, Update & Delete) on the PostgreSQL.

The code for this can be forked from Devops  from my link mypgdb

The code can also be cloned from GitHub at mypgdb

1) This app uses the Node.js Webstarter kit and the PostgreSQL service.  The Node.js Webserver is created by parsing the VCAP services variable as usual

if (process.env.VCAP_SERVICES) {
var env = JSON.parse(process.env.VCAP_SERVICES);
var credentials = env['postgresql-9.1'][0]['credentials'];
} else {
var credentials = {"uri":"postgre://user:secret1@localhost:5433/db"}
}
var port = (process.env.VCAP_APP_PORT || 1337);
var host = (process.env.VCAP_APP_HOST || '0.0.0.0');
http.createServer(function(req, res) {
console.log("Inside Webserver");
....
....
}).listen(port, host);

The details of VCAP_SERVICES can be see by clicking Runtime for you application and is shown below

9

Note: From above it can be seen that the PostgreSQL DB’s host & port is

"host": "192.155.243.14",
"hostname": "192.155.243.14",
"port": 5433

This different from the host & port of the Node.js Webserver which  can be see in Logs & Files tab (included below) and is

Webserver: host: 0.0.0.0
port:62733

2) Once the Webserver is started the server waits for REST calls of GET,PUT, UPDATE & DELETE as shown below.

// Perform CRUD operations through REST APIs
if(req.method == 'POST') {
insert_records(req,res);
}
else if(req.method == 'GET') {
list_records(req,res);
}
else if(req.method == 'PUT') {
update_record(req,res);
}
else if(req.method == 'DELETE') {
delete_record(req,res);
}

3)  The REST API call  are implements as follows

a) POST:

var insert_records = function(req, res) {
// Connect to DB
var client = new pg.Client(credentials.uri);
client.connect(function(err) {
if (err) {
res.end("Could not connect to postgre: " + err);
}

//Drop table if it exists
client.query("DROP TABLE IF EXISTS emps");
// Creat table and insert 2 records into it
client.query("CREATE TABLE IF NOT EXISTS emps(firstname varchar(64), lastname varchar(64))");
client.query("INSERT INTO emps(firstname, lastname) values($1, $2)", ['Tinniam', 'Ganesh']);
client.query("INSERT INTO emps(firstname, lastname) values($1, $2)", ['Anand', 'Karthik']);

b) GET:

// Select all rows in the table<
var query = client.query("SELECT firstname, lastname FROM emps ORDER BY lastname, firstname");
query.on("row", function (row, result) {
result.addRow(row);
});
query.on("end", function (result) {
// On end JSONify and write the results to console and to HTML output
console.log(JSON.stringify(result.rows, null, "    "));
res.writeHead(200, {'Content-Type': 'text/plain'});
res.write(JSON.stringify(result.rows) + "\n");
res.end();
});

c) UPDATE:

query = client.query("UPDATE emps set firstname = 'Kumar' WHERE firstname='Anand' AND lastname='Karthik'");
res.writeHead(200, {'Content-Type': 'text/plain'});
res.write("Updated record  - Set record with firstname Anand to Kumar\n");

d)DELETE

// Delete the record where the lastname is Karthik
client.query("DELETE FROM  emps WHERE lastname = 'Karthik'");
res.writeHead(200, {'Content-Type': 'text/plain'});
res.write("Deleted record where lastname was Karthik\n");

4) Once the changes are made you can  push the changes to Bluemix using ‘cf’ commands.

The commands are

cf login -a https://api.ng.bluemix.net
cf push mypgdb01-p . -m 512M
cf create-service postgresql 100 pgdb01
cf bind-service mypgdb01 pgdb01

5) In the Bluemix dashboard the app ‘mypgdb01’ should be up and running.

6) To invoke the different database operations we need to make REST API calls to the app.

7) To make the REST API calls you can install Sure Utils -> REST API Chrome extension.  I installed the SureUtils-.REST API Client. This is a Chrome extension and can be installed from Chrome Web Store (search for REST API client). You could choose any REST API client of your choice for the browser you intend to use (Chrome, Firefox)

8) Now we can test the Nodejs-PostgreSQL app with the Sure Utils – Chrome extension

8) The following REST API calls can be made to test the PostgreSQL operations on the database

POST- insert

1

GET – select

2

UPDATE + GET – update + select

The PUT API updates Anand Karthik to Kumar Karthik. This is shown in the GET API call

3

4

.DELETE + GET – delete  + select

5

6


Here the DELETE API call deletes the Kumar Karthik record. The GET API call now displays only 1 record.

The console.log output in Bluemix can be see in Files and logs -> stdout.log as shown below

7

The above post shows some basic operations done on a cloud based application that is composed of a Webserver with a PostgreSQL as a backend. The code can be enhanced by adding  front end using Node express.

As mentioned above the code for this can be forked from Devops at mypgdb. The code can also be cloned from GitHub at mypgdb

Disclaimer: This article represents the author’s viewpoint only and doesn’t necessarily represent IBM’s positions, strategies or opinions

You may also like
1. A Bluemix recipe with MongoDB and Node.js
2. Spicing up IBM Bluemix with MongoDB and NodeExpress
3. A Cloud Medley with IBM’s Bluemix, Cloudant and Node.js
4. Rock N’ Roll with Bluemix, Cloudant & NodeExpress


Find me on Google+

Working with Node.js and PostgreSQL

In this post I create a simple Webserver with Node.js which uses PostgreSQL database in the backend. This post shows how to perform simple database operations of insert, select, update and delete using REST APIs (POST, GET, PUT & DELETE).

Assuming that you already have Node.js installed here are the steps to create this CRUD (Create, Remove Update & Delete) Webserver.

1.Install Node.js if you already haven’t from Nodejs.org
2. Create a test directory pg for this PostgreSQL based Node.js Webserver
3. Open a command prompt and run
npm install pg
4.You will also need to install the PostgreSQL Enterprise DB with installer. Choose the appropriate OS and CPU
5.For this example I create a simple Employee Database.
6. In Windows Click Start->All Programs->PostgreSQL 9.3->pgAdmin III
7. Right click Databases-> New Database and Enter employees
1
8. The next step is to create Node.js Webserver and connect to this Database. PostgreSQL accepts DB connections through port 5432.
9.In this post The Webserver accepts connections from port 5433. Here is the shell of the Node.js Webserver
var pg = require("pg")
var http = require("http")
var port = 5433;
var host = '127.0.0.1';

http.createServer(function(req, res) {
if(req.method == 'POST') {
insert_records(req,res);
}
else if(req.method == 'GET') {
list_records(req,res);
}
else if(req.method == 'PUT') {
update_record(req,res);
}
else if(req.method == 'DELETE') {
delete_record(req,res);
}
}).listen(port,host);
console.log("Connected to " + port + "   " + host);

The Webserver accepts the usual 4 REST API calls – POST, GET, UPDATE, and DELETE for which there are 4 separate function calls.  The REST API calls correspond to the database operations insert, select, update and delete respectively.

10. Prior to performing each operation the  a client connects to the database as follows

var conString = "pg://postgres:postgres@localhost:5432/employees";
var client = new pg.Client(conString);
client.connect();

11. The POST operation is performed as follows

var insert_records = function(req, res) {


//Drop table if it exists
client.query("DROP TABLE IF EXISTS emps");
// Creat table and insert 2 records into it
client.query("CREATE TABLE IF NOT EXISTS emps(firstname varchar(64), lastname varchar(64))");
client.query("INSERT INTO emps(firstname, lastname) values($1, $2)", ['Tinniam', 'Ganesh']);
client.query("INSERT INTO emps(firstname, lastname) values($1, $2)", ['Anand', 'Karthik']);

12. To display the contents of the database the list_records function is used as follows

var list_records = function(req, res) {
console.log("In listing records");
// Select all rows in the table
var query = client.query("SELECT firstname, lastname FROM emps ORDER BY lastname, firstname");
query.on("row", function (row, result) {
result.addRow(row);
});
query.on("end", function (result) {

13. The REST API Update is performed as below

var update_record = function(req, res) {
// Update the record where the firstname is Anand
query = client.query("UPDATE emps set firstname = 'Kumar' WHERE firstname='Anand' AND lastname='Karthik'");

14.Finally a delete is performed using a delete_record method

var delete_record = function(req, res) {
// Delete the record where the lastname is Karthik
client.query("DELETE FROM  emps WHERE lastname = 'Karthik'");

15.The output of each operation is sent back as HTML  as

query.on("row", function (row, result) {
result.addRow(row);
});
query.on("end", function (result) {
// On end JSONify and write the results to console and to HTML output
console.log(JSON.stringify(result.rows, null, "    "));
res.writeHead(200, {'Content-Type': 'text/plain'});
res.write(JSON.stringify(result.rows) + "\n");
res.end();
});

16.To test the Webserver you need to install a REST API client for the browser you use. I installed the SureUtils-.REST API Client. his is a Chrome extension nand can be installed from Chrome Web Store (search for REST API client). You could choose any REST API client of your choice for the browser you intend to use (Chrome, Firefox)

17.Here are the tests I performed

18.The POST API call
2

19. The GET API call

3
20.The PUT  call followed by GET call
4
5
The PUT API updates Anand Karthik to Kumar Karthik. This is shown in the GET API call.
21. The DELETE call followed by the GET call

Here the DELETE API call deletes the Kumar Karthik record. The GET API call now displays only 1 record.

6

7

22. The console.log output for the operations above  is shown below

8

The code for the Node.js- PostgreSQL can be cloned from GitHub at node-pg

Checkout my book ‘Deep Learning from first principles Second Edition- In vectorized Python, R and Octave’.  My book is available on Amazon  as paperback ($18.99) and in kindle version($9.99/Rs449).

You may also like my companion book “Practical Machine Learning with R and Python:Second Edition- Machine Learning in stereo” available in Amazon in paperback($12.99) and Kindle($9.99/Rs449) versions.

Also see
1. My book ‘Practical Machine Learning in R and Python: Third edition’ on Amazon
2.My book ‘Deep Learning from first principles:Second Edition’ now on Amazon
3.The Clash of the Titans in Test and ODI cricket
4. Introducing QCSimulator: A 5-qubit quantum computing simulator in R
5.Latency, throughput implications for the Cloud
6. Simulating a Web Joint in Android
5. Pitching yorkpy … short of good length to IPL – Part 1

Also see
Introducing cricketr: An R package for analyzing performances of cricketers
– A crime map of India in R: Crimes against women
– What’s up Watson? Using IBM Watson’s QAAPI with Bluemix, NodeExpress – Part 1
– Bend it like Bluemix, MongoDB with autoscaling – Part 1
– Analyzing cricket’s batting legends – Through the mirage with R
– Masters of spin: Unraveling the web with R

Find me on Google+