Revisiting Whats up, Watson – Using Watson’s Question and Answer with Bluemix – Part 2

In this I revisit the Bluemix app based on Watson’s Question and Answer service which I had posted in my earlier article “Whats up Watson? Using IBM Watson with Bluemix, NodeExpress – Part 1“. In this post I removed some redundant code and also added some additional checks to the Jade templates to handle responses to “focusless”  questions viz. Am I…? or “Is X contagious?”

You can run the app at Whatsup Watson?

The code can be forked and cloned from Devops at Whatsup

The code is also available at GitHub at Whatsup

The section below briefly describes the details of the implementation of the WhatsupWatson app

A) app.js

In the app.js module the VCAP environment is parsed to get the credentials to use the Watson Question and Answer service as shown below

if (process.env.VCAP_SERVICES) {
  var VCAP_SERVICES = JSON.parse(process.env.VCAP_SERVICES);
  // retrieve the credential information from VCAP_SERVICES for Watson QAAPI
  hostname   = VCAP_SERVICES["question_and_answer"][0].name;               
  passwd = VCAP_SERVICES["question_and_answer"][0].credentials.password; 
  username = VCAP_SERVICES["question_and_answer"][0].credentials.username; 
  watson_url = VCAP_SERVICES["question_and_answer"][0].credentials.url;
}

There different ways of asking Watson questions. Watson’s response will vary depending on the options and parameters that are used to POST the question to Watson. This app uses a route for each ‘question type’ and option. These are

a. Simple Synchronous Query: Post a simple synchronous query to Watson

This is the simplest query that we can pose to Watson. Here we need to just include the text of the question and the also a Sync Timeout. The Sync Timeout denotes the time client will wait for responses from the Watson service

// Ask Watson a simple synchronous query
app.get('/question',question.list);
app.post('/simplesync',simplesync.list);

b. Evidence based question: Ask Watson to respond to evidence given to it

Ask Watson for responses based on evidence given like medical conditions etc.

// Ask Watson for responses based on evidence provided
app.get('/evidence',evidence.list);
app.post('/evidencereq',evidencereq.list);

c. Request for a specified set of answers to a question: Ask Watson to give a specified number of responses to a question

// Ask Watson to provide specified number of responses to a query
app.get('/items',items.list);
app.post('/itemsreq',itemsreq.list);

d. Get a formatted response to a question: Ask Watson to format the response to the question

// Get a formatted response from Watson for a query
app.get('/format',format.list);
app.post('/formatreq',formatreq.list);

To get started with Watson we would need to connect the Bluemix app to the Watson’s QAAPI as a service by parsing the environment variable. This is shown below

B) simplesync.js


The code in simplesync.js, evidencereq.js, itemsreq.js,formatreq.js are similar. The modules construct the question in the format required. The details of the implementation of simplesync.js is included below a. The Watson’s corpus will be set to ‘healthcare’

parts = url.parse(watson_url +'/v1/question/healthcare');

b. The POST headers are set

// Set the required headers for posting the REST query to Watson
headers = {'Content-Type'  :'application/json',
                  'X-synctimeout' : syncTimeout,
                  'Authorization' : "Basic " + new Buffer(username+":"+passwd).toString("base64")};

c. The POST request options are set

// Create the request options to POST our question to Watson
var options = {host: parts.hostname,
port: 443,
path: parts.pathname,
method: 'POST',
headers: headers,
rejectUnauthorized: false, // ignore certificates
requestCert: true,
agent: false};

The question that is to be asked of Watson needs to be formatted appropriately based on the input received in the appropriate form (for e.g. simplesync.jade)

// Get the values from the form
var syncTimeout = req.body.timeout;
var query = req.body.query;
// create the Question text to ask Watson
var question = {question : {questionText :query }};
var evidence = {"evidenceRequest":{"items":1,"profile":"yes"}};
// Set the POST body and send to Watson
req.write(JSON.stringify(question));
req.write("\n\n");
req.end();

Now you POST the Question to Watson and receive the stream of response using Node.js’ .on(‘data’,) & .on(‘end’) shown below

var req = https.request(options, function(result) {
result.setEncoding('utf-8');
// Retrieve and return the result back to the client
result.on(“data”, function(chunk) {
output += chunk;
});

result.on('end', function(chunk) {		  
           var answers = JSON.parse(output);
			      results = answers[0];
			      res.render(
					 'answer', {
                      "results":results
                                        
			   });
			
});

The results are parsed and formatted displayed using Jade. For the Jade templates I have used a combination of Jade and in-line HTML tags.

Included below is the part of the jade template with in-line HTML tagging

c) answer.jade

mplementation details of WhatsupWatsonapp

The section below briefly describes the details of the implementation of the WhatsupWatson app

A) app.js

In the app.js module the VCAP environment is parsed to get the credentials to use the Watson Question and Answer service as shown below

if (process.env.VCAP_SERVICES) {
  var VCAP_SERVICES = JSON.parse(process.env.VCAP_SERVICES);
  // retrieve the credential information from VCAP_SERVICES for Watson QAAPI
  hostname   = VCAP_SERVICES["question_and_answer"][0].name;               
  passwd = VCAP_SERVICES["question_and_answer"][0].credentials.password; 
  username = VCAP_SERVICES["question_and_answer"][0].credentials.username; 
  watson_url = VCAP_SERVICES["question_and_answer"][0].credentials.url;
}

There different ways of asking Watson questions. Watson’s response will vary depending on the options and parameters that are used to POST the question to Watson. This app uses a route for each ‘question type’ and option. These are

a. Simple Synchronous Query: Post a simple synchronous query to Watson

This is the simplest query that we can pose to Watson. Here we need to just include the text of the question and the also a Sync Timeout. The Sync Timeout denotes the time client will wait for responses from the Watson service

// Ask Watson a simple synchronous query
app.get('/question',question.list);
app.post('/simplesync',simplesync.list);

b. Evidence based question: Ask Watson to respond to evidence given to it

Ask Watson for responses based on evidence given like medical conditions etc.

// Ask Watson for responses based on evidence provided
app.get('/evidence',evidence.list);
app.post('/evidencereq',evidencereq.list);

c. Request for a specified set of answers to a question: Ask Watson to give a specified number of responses to a question

// Ask Watson to provide specified number of responses to a query
app.get('/items',items.list);
app.post('/itemsreq',itemsreq.list);

d. Get a formatted response to a question: Ask Watson to format the response to the question

// Get a formatted response from Watson for a query
app.get('/format',format.list);
app.post('/formatreq',formatreq.list);

To get started with Watson we would need to connect the Bluemix app to the Watson’s QAAPI as a service by parsing the environment variable. This is shown below

B) simplesync.js


The code in simplesync.js, evidencereq.js, itemsreq.js,formatreq.js are similar. The modules construct the question in the format required. The details of the implementation of simplesync.js is included below a. The Watson’s corpus will be set to ‘healthcare’

parts = url.parse(watson_url +'/v1/question/healthcare');

b. The POST headers are set

// Set the required headers for posting the REST query to Watson
headers = {'Content-Type'  :'application/json',
                  'X-synctimeout' : syncTimeout,
                  'Authorization' : "Basic " + new Buffer(username+":"+passwd).toString("base64")};

c. The POST request options are set

// Create the request options to POST our question to Watson
var options = {host: parts.hostname,
port: 443,
path: parts.pathname,
method: 'POST',
headers: headers,
rejectUnauthorized: false, // ignore certificates
requestCert: true,
agent: false};

The question that is to be asked of Watson needs to be formatted appropriately based on the input received in the appropriate form (for e.g. simplesync.jade)

// Get the values from the form
var syncTimeout = req.body.timeout;
var query = req.body.query;
// create the Question text to ask Watson
var question = {question : {questionText :query }};
var evidence = {"evidenceRequest":{"items":1,"profile":"yes"}};
// Set the POST body and send to Watson
req.write(JSON.stringify(question));
req.write("\n\n");
req.end();

Now you POST the Question to Watson and receive the stream of response using Node.js’ .on(‘data’,) & .on(‘end’) shown below

var req = https.request(options, function(result) {
result.setEncoding('utf-8');
// Retrieve and return the result back to the client
result.on(“data”, function(chunk) {
output += chunk;
});

result.on('end', function(chunk) {		  
           var answers = JSON.parse(output);
			      results = answers[0];
			      res.render(
					 'answer', {
                      "results":results
                                        
			   });
			
});

The results are parsed and formatted displayed using Jade. For the Jade templates I have used a combination of Jade and in-line HTML tags.

Included below is the part of the jade template with in-line HTML tagging

c) answer.jade

if results.question.qclasslist
    for result in results.question.qclasslist
      p <font color="blueviolet">  Value   = <font color="black "> #{result.value} </font> 
  if results.question.focuslist
    p <font color="blueviolet">  Focuslist  </font> = <font color="black "> #{results.question.focuslist[0].value} </font>
  if latlist
    p <font color="blueviolet">  Latlist  </font> = <font color="black "> #{results.question.latlist[0].value} </font>

Disclaimer: This article represents the author’s viewpoint only and doesn’t necessarily represent IBM’s positions, strategies or opinions

Find me on Google+

Revisiting Bluemix with Twilio

This post walks you through the steps to use Twilio with IBM’s Bluemix to send an SMS and also make a  voice call when you click a URL.  Twilio, is a cloud communications SaaS organization which allows you to use standard web languages to build voice, SMS and VOIP applications via a Web API.

Twilio provides the ability to build VOIP applications using APIs. Twilio itself resides in the cloud and is always available. It also provides SIP integration which means that it can be integrated with Soft switches. Twilio looks really interesting with its ability to combine the cloud, Web and VOIP, SMS and the like.

The steps given below allow you to use your app to perform 2 things by clicking the app’s URL namely websmstest.bluemix.net

a) Send a SMS to your mobile phone

b) Make a voice call to your mobile phone

The code can be forked from Devops at websmstest

Connecting Twilio with Bluemix

  1. Fire-up a Node.js Webstarter application from the Bluemix dashboard. In my case I have named the application websmstest. Once this is up and running

fig1

2) Click Add a Service and under ‘Web and Application’ and choose Twilio.

3) Enter a name for the Twilio service. You will also need the Account SID and Authorization token

  1. For this go to http://www.twilio.com and sign up

5) Once you have registered, go to your Twilio Dashboard for the Account SID and Auth Token. If the Auth token is encrypted, you can click the ‘lock’ symbol to display the Auth token in plain text.

  1. Enter the Account SID and Auth Token in the Twilio service in Bluemix in the right hand panel shown in the picture below

fig2

  1. To get started click the link websmstest code from Devops.

  2. Next click the ‘Edit Code’ button at the top

  3. Then click ‘Fork’ and provide a suitable name for your project

fig6

  1. Check the option for a) Deploy to Bluemix. Uncheck the other options a) Make it private b) Add features for Scrum development

  2. On the left hand side navigate to the file you need to edit and make the changes with the Devops GUI editor. You will need to make the following changes

Setup the application

12) You will need to modify the following files

  1. manifest.yml
  2. app.js

13) In the manifest.yml make sure you enter the name of your application and the host

applications:

- host: websmstest
  disk: 1024M
  name: websmstest
  command: node app.js
  path: .
  domain: mybluemix.net
  mem: 128M
  instances: 1

14) Lastly make changes to your app.js.

var app = require('gopher'),
    twilio = require('twilio');

 
var config = JSON.parse(process.env.VCAP_SERVICES);
 
var twilioSid, twilioToken;
config['user-provided'].forEach(function(service) {
    if (service.name == 'Twilio') {
        twilioSid = service.credentials.accountSID;
        twilioToken = service.credentials.authToken;
    }
});
 

// URL 
app.get('/', function(request, response) {
    var client = new twilio.RestClient(twilioSid, twilioToken);
 
    /* To make a voice call to your mobile phone uncomment the next 2 lines */
   //client.calls.create({
   //url: "http://twimlets.com/message?Message%5B0%5D=Hello",
   
    
     //  to: Enter your mobile phone  for e.g.98765 43210
     // from: Enter the number Twilio alloted to your account
     // body: The message you would like to send
     client.sendMessage({
    	  to: '+919876543210',
         from: '+16305476427',
         body:'Twilio notification through Bluemix!'
        }, function(err, message) {
        response.send('Message sent! ID:'+message.sid);
    });
});
  1. Enter your mobile number in the ‘to:’ line.

  2. Enter the number provided to you in your Twilio account see below

fig3

  1. In the app.js code above in step 14) use the green highlighted line to send a SMS to your mobile phone

  2. If you uncomment the blue highlighted lines a voice call will be made to your mobile

  3. Finally ‘Deploy’ the application on to Bluemix (more details on Deploying to Bluemix) can be found at Getting started with IBM Bluemix and IBM Devops services using Node.js

Test the application

19) Now click on your application to open the details and then click the link adjacent to the Routes.

fig8

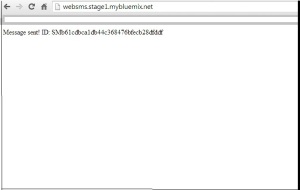
20) You should see that an SMS has been sent as shown

fig4

21) Your mobile should now display the message that was sent as shown below

Screenshot_2014-06-22-13-41-44

22) Uncomment the lines which deal with making voice call and you should receive a voice announcement (see below) (Remember to comment the green highlighted line client.sendMessage!)

1

23) Check the analytics in your Twilio dashboard

fig5

Disclaimer: This article represents the author’s viewpoint only and doesn’t necessarily represent IBM’s positions, strategies or opinions


Find me on Google+

A Cloud medley with IBM Bluemix, Cloudant DB and Node.js

Published as a tutorial in IBM Cloudant – Bluemix tutorial and demos

Here is an interesting Cloud medley based on IBM’s Bluemix PaaS platform, Cloudant DB and Node.js. This application  creates a Webserver using Node.js and uses REST APIs to perform CRUD operations on a Cloudant DB. Cloudant DB is a NoSQL Database as a service (DBaaS) that can handle a wide variety of data types like JSON, full text and geo-spatial data. The documents  are stored, indexed and distributed across a elastic datastore spanning racks, datacenters and perform replication of data across datacenters.Cloudant  allows one to work with self-describing JSON documents through  RESTful APIs making every document in the Cloudant database accessible as JSON via a URL.

This application on Bluemix uses REST APIs to perform the operations of inserting, updating, deleting and listing documents on the Cloudant DB.  The code can be forked from Devops at bluemix-cloudant. The code can also be clone from GitHub at bluemix-cloudant.

1) Once the code is forked the application can be deployed on to Bluemix using

cf login -a https://api.ng.bluemix.net
cf push bm-cloudant -p . -m 512M

2) After this is successful go to the Bluemix dashboard and add the Cloudant DB service.  The CRUD operations can be performed by invoking REST API calls using an appropriate REST client like SureUtils ot Postman in the browser of your choice.

Here are the details of the Bluemix-Cloudant application

3) Once the Cloudant DB service has been added to the Web started Node.js application we need to parse the process.env variable to obtain the URL of the Cloudant DB and the port and host to be used for the Web server.

The Node.js Webserver is started based on the port and host values obtained from process.env

require('http').createServer(function(req, res) {
//Set up the DB connection
if (process.env.VCAP_SERVICES) {
// Running on Bluemix. Parse for  the port and host that we've been assigned.
var env = JSON.parse(process.env.VCAP_SERVICES);
var host = process.env.VCAP_APP_HOST;
var port = process.env.VCAP_APP_PORT;
....
}
....
// Perform CRUD operations through REST APIs
// Insert document
if(req.method == 'POST') {
insert_records(req,res);
}
// List documents
else if(req.method == 'GET') {
list_records(req,res);
}
// Update a document
else if(req.method == 'PUT') {
update_records(req,res);
}
// Delete a document
else if(req.method == 'DELETE') {
delete_record(req,res);
}
}).listen(port, host);

2) Access to the Cloudant DB Access to Cloudant DB is obtained as follows

if (process.env.VCAP_SERVICES) {
// Running on Bluemix. Parse the port and host that we've been assigned.
var env = JSON.parse(process.env.VCAP_SERVICES);
var host = process.env.VCAP_APP_HOST;
var port = process.env.VCAP_APP_PORT;
console.log('VCAP_SERVICES: %s', process.env.VCAP_SERVICES);
// Also parse Cloudant settings.
var cloudant = env['cloudantNoSQLDB'][0]['credentials'];
}
var db = new pouchdb('books'),
remote =cloudant.url + '/books';
opts = {
continuous: true
};
// Replicate the DB to remote
console.log(remote);
db.replicate.to(remote, opts);
db.replicate.from(remote, opts);

Access to the Cloudant DB is through the cloudant.url shown above

3)  Once the access to the DB is setup we can perform CRUD operations. There are many options for the backend DB. In this application I have PouchDB.

4) Inserting a document: To insert documents into the Cloudant DB based on Pouch DB we need to do the following

var insert_records = function(req, res) {
//Parse the process.env for the port and host that we've been assigned
if (process.env.VCAP_SERVICES) {
// Running on Bluemix. Parse the port and host that we've been assigned.
var env = JSON.parse(process.env.VCAP_SERVICES);
var host = process.env.VCAP_APP_HOST;
var port = process.env.VCAP_APP_PORT;
console.log('VCAP_SERVICES: %s', process.env.VCAP_SERVICES);
// Also parse Cloudant settings.
var cloudant = env['cloudantNoSQLDB'][0]['credentials'];
}
var db = new pouchdb('books'),
remote =cloudant.url + '/books';
opts = {
continuous: true
};
// Replicate the DB to remote
console.log(remote);
db.replicate.to(remote, opts);
db.replicate.from(remote, opts);
// Put 3 documents into the DB
db.put({
author: 'John Grisham',
Title : 'The Firm'
}, 'book1', function (err, response) {
console.log(err || response);
});
...
...
res.writeHead(200, {'Content-Type': 'text/plain'});
res.write("3 documents is inserted");
res.end();
}; // End insert_records

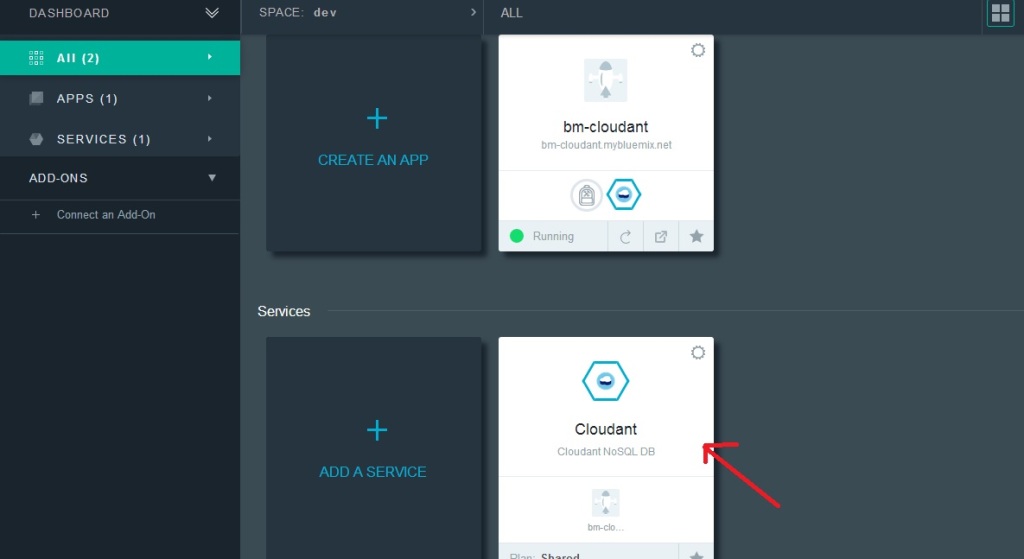
The nice part about Cloudant DB is that you can access your database through the URL. The steps are shown below. Once your application is running. Click on your application. You should see the screen as below.

1

Click on Cloudant as shown by the arrow.

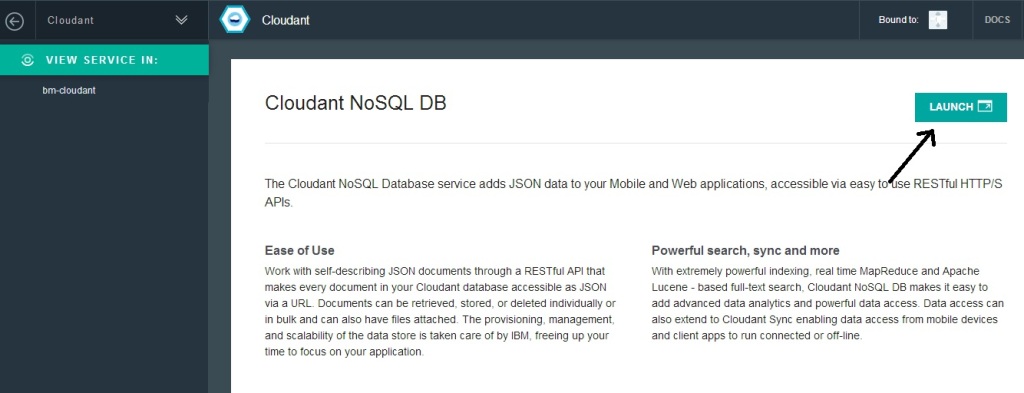
Next click on the “Launch’ icon

2

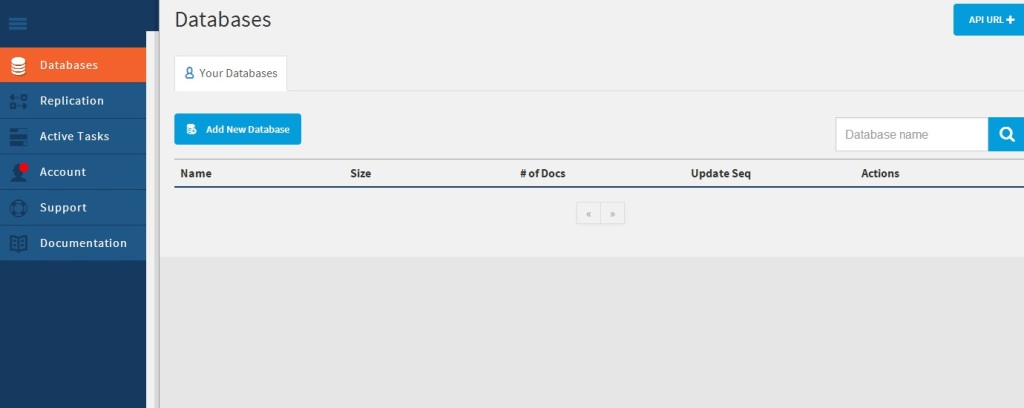
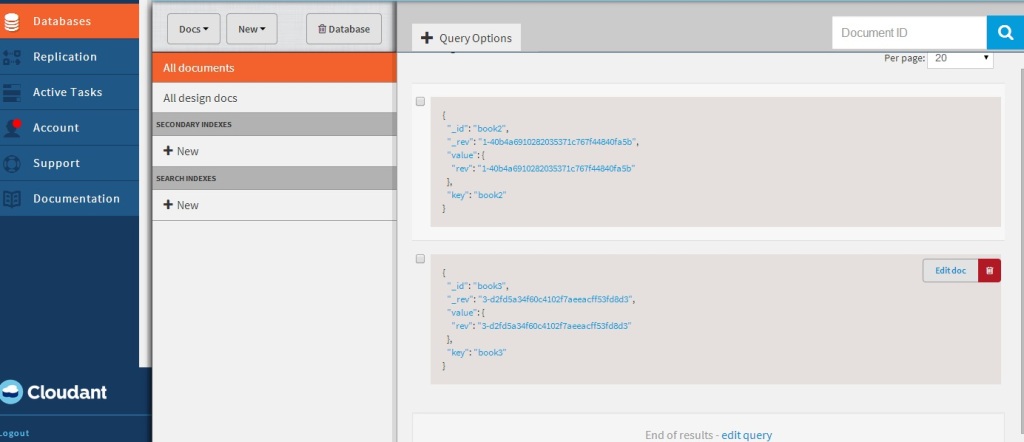
This should bring up the Cloudant dashboard. The database will be empty.

3

If you use a REST API Client to send a POST API call then the Application will insert 3 documents.

4

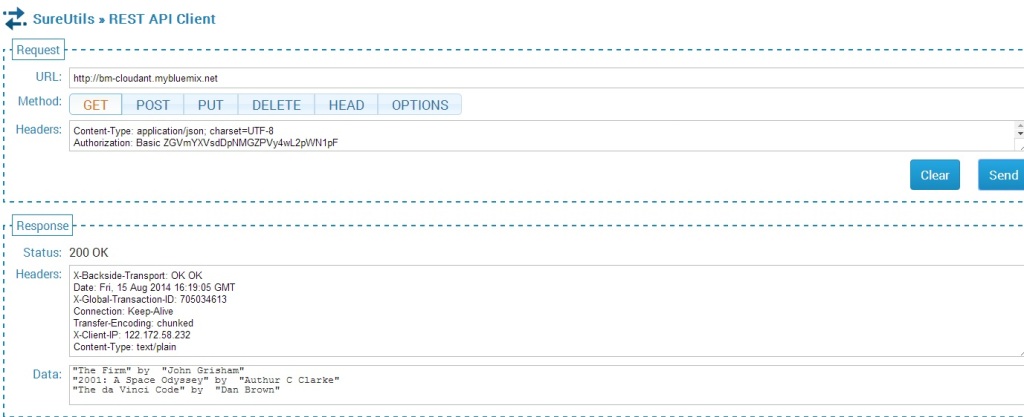
The documents inserted can be seen by sending the GET REST API call.

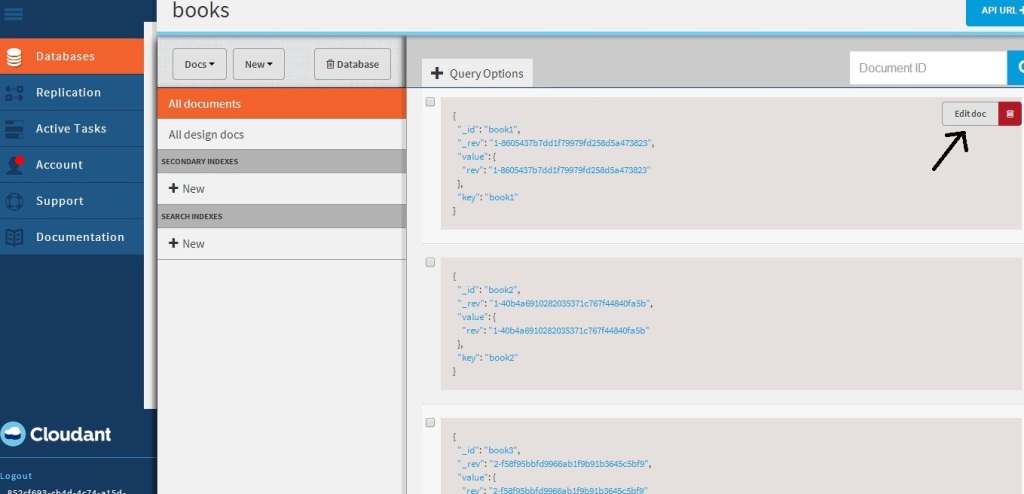
5

The nice part of Cloudant DB is that you can use the URL to see your database. If you refresh your screen you should see the “books” database added. Clicking this database you should see the 3 documents that have been added

6

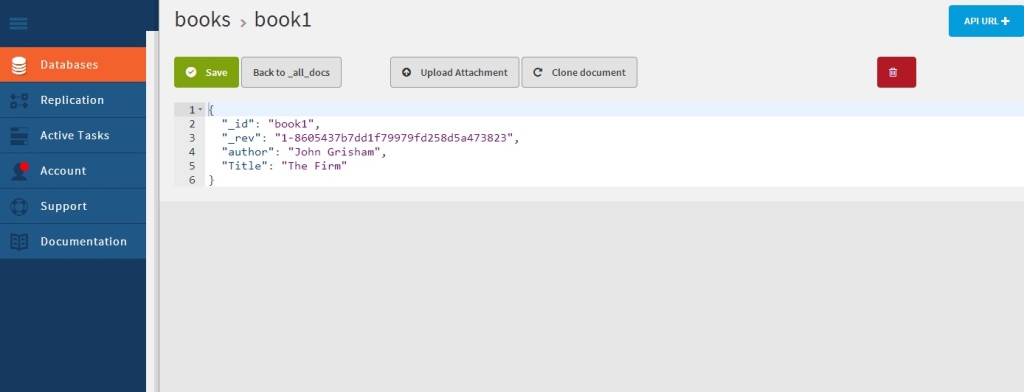
If you click “Edit doc” you should see the details of the document

7

5) Updating a document

The process to update a document in the database is shown below

// Update book3
db.get('book3', function(err, response) {
console.log(response);
return db.put({
_id: 'book3',
_rev: response._rev,
author: response.author,
Title : 'The da Vinci Code',
});
}, function(err, response) {
if (err) {
console.log("error " + err);
} else {
console.log("Success " + response);
}
});

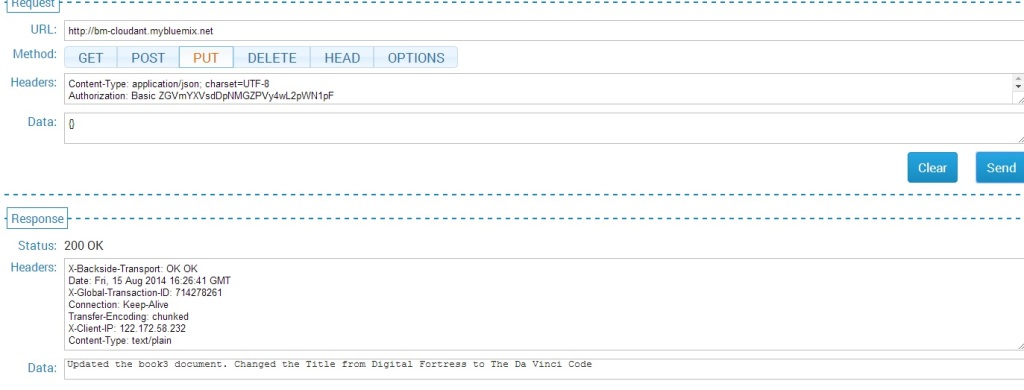
This is performed with a PUT REST API call

8

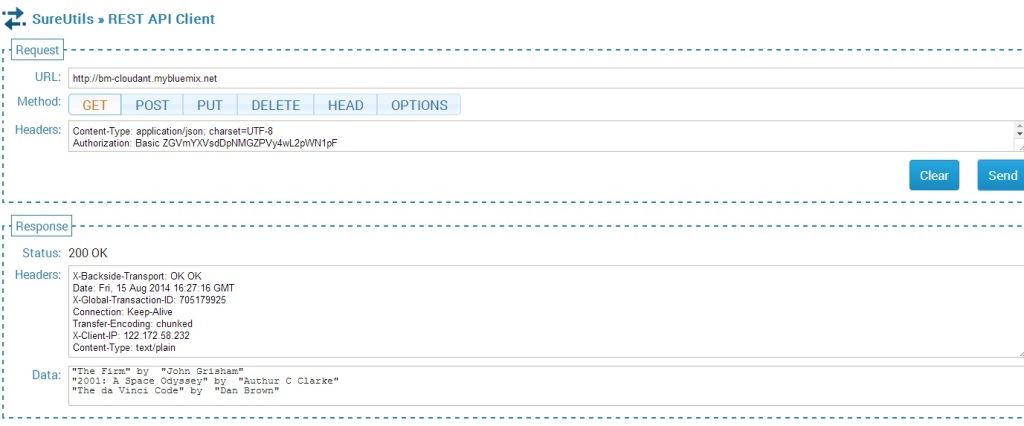
The updated list is shown below

9

This can be further verified in the Cloudant DB dashboard for book3.

10

6) Deleting a document

The code to delete a document in PouchDB is shown below

//Deleting document book1
db.get('book1', function(err, doc) {
db.remove(doc, function(err, response) {
console.log(err || response);
});
});

The REST calls to delete a document and the result  are shown below

11

12

Checking the Cloudant dashboard we see that only book2 & book3 are present and book1 has been deleted

13

7) Displaying documents in the database

The code for displaying the list of documents is shown below

var docs = db.allDocs(function(err, response) {
val = response.total_rows;
var details = "";
j=0;
for(i=0; i < val; i++) {
db.get(response.rows[i].id, function (err,doc){
j++;
details= details + JSON.stringify(doc.Title) + " by  " +  JSON.stringify(doc.author) + "\n";
// Kludge because of Node.js asynchronous handling. To be fixed - T V Ganesh
if(j == val) {
res.writeHead(200, {'Content-Type': 'text/plain'});
res.write(details);
res.end();
console.log(details);
}
}); // End db.get
} //End for
}); // End db.allDocs

If you happened to notice, I had to use a kludge to work around Node.js’ idiosyncracy of handling asynchronous calls. I was fooled by the remarkable similarity of Node.js & hence  javascript to C language that I thought functions within functions would work sequentially. However I had undergo much grief  trying to get Node.js to work sequentially. I wanted to avoid the ‘async’ module but was unsuccessful with trying to code callbacks. So the kludge! I will work this out eventually but this workaround will have to do for now!

As always you can use the “Files and Logs” in the Bluemix dashboard to get any output that are written to stdout.

Note: As always I can’t tell how useful the command
'cf  logs <application name> -- recent is for debugging.

Hope you enjoyed this Cloud Medley of Bluemix, Cloudant and Node.js!

Disclaimer: This article represents the author’s viewpoint only and doesn’t necessarily represent IBM’s positions, strategies or opinions

You may also like
1. Brewing a potion with Bluemix, PostgreSQL & Node.js in the cloud
2.  A Bluemix recipe with MongoDB and Node.js
3.  Spicing up IBM Bluemix with MongoDB and NodeExpress
4.  Rock N’ Roll with Bluemix, Cloudant & NodeExpress


Find me on Google+

Spicing up a IBM Bluemix cloud app with MongoDB and NodeExpress

In this post I highlight the rudiments for a creating a cloud application on IBM’s PaaS offering Bluemix, using MongoDB and NodeExpress.   Clearly Bluemix allows one to fire up a cloud application with a NoSQL database in a matter of  a few hours which makes it really attractive. The NodeExpress  application was initially created using Enide Studio for Node.js  with a local Mongodb server running on my desktop. (Please see my post Elements of CRUD with Node Express and MongoDB) Once you have ironed out the issues in this local application you are ready to deploy on IBM Bluemix.

The code for this Bluemix application can be forked from bluemix-mongo from IBM Devops.

You can also clone the code from GitHub at bluemix-mongo

Here are the key changes that need to be made for running the NodeExpress Webserver with MongoDB as the backend DB

1) Webserver : Setup the port and host for the Webserver.

  1. app.js

var port = (process.env.VCAP_APP_PORT || 1337);
var host = (process.env.VCAP_APP_HOST || '0.0.0.0');
var app = express();
app.configure(function(){
app.set('port', port);

As seen above the host & port for the Webserver are obtained from the process.env variable.
2) Routes and Middleware
Setup the routes and invoke them appropriately in app.js
var express = require('express')
, routes = require('./routes')
, user = require('./routes/user')
, userlist = require('./routes/userlist')
, newuser = require('./routes/newuser')
, adduser = require('./routes/adduser')
, changeuser = require('./routes/changeuser')
, updateuser = require('./routes/updateuser')
, remuser = require('./routes/remuser')
, deleteuser = require('./routes/deleteuser')

app.get('/users', user.list);
app.get('/helloworld', routes.index);
app.get('/userlist', userlist.list);
app.get('/newuser', newuser.list);
app.post('/adduser',adduser.list);
app.get('/changeuser', changeuser.list);
app.post('/updateuser', updateuser.list);
app.get('/remuser', remuser.list);
app.post('/deleteuser',deleteuser.list);

3) Initialize MongoDB database: Create a set of 3 records when the Webserver starts as follows

if (process.env.VCAP_SERVICES) {
var env = JSON.parse(process.env.VCAP_SERVICES);
if (env['mongodb-2.2']) {
var mongo = env['mongodb-2.2'][0]['credentials'];
}
} else {
var mongo = {
"username" : "user1",
"password" : "secret",
"url" : "mongodb://user1:secret@localhost:27017/test"
}
}
var MongoClient = mongodb.MongoClient;
var db= MongoClient.connect(mongo.url, function(err, db) {
if(err) {
log("failed to connect to the database");
} else {
log("connected to database");
}
var collection = db.collection('phonebook');
//Clear DB and insert 3 records
remove(mycallback);
var user1 = { "FirstName" : "Tinniam", "LastName" : "Ganesh","Mobile": "916732177728" };
var user2 = { "FirstName" : "Darth", "LastName" : "Vader","Mobile": "6666699999" };
var user3 = { "FirstName" : "Bill", "LastName" : "Shakespeare","Mobile": "8342189991" };

  1. insert(user1,function(err,result){});
  2. insert(user2,function(err,result){});
  3. insert(user3,function(err,result){});
  4. find().toArray(function(err, items) {

});
});

3) Home Page: Setup up a Home page with the CRUD operations when the Bluemix cloud application’s route  for e.g. http://bluemix-mongo.mybluemix.net is clicked. This is shown below.

1


2

4) Display Users: To display the list of users the route /userlist is invoked. This function gets all the records from the collection and stores them into a toArray element, which is then used for rendering the list of uses with a ‘userlist.jade’ template

userlist.js
var MongoClient = mongodb.MongoClient;
var db= MongoClient.connect(mongo.url, function(err, db) {
if(err) {

  1. log(“Failed to connect to the database”);

} else {

  1. log(“Connected to database”);

}
var collection = db.collection(‘phonebook’);
//Get all records and display them

  1. find().toArray(function(err, items) {
  2.    log(items);
  3. render(‘userlist’, {

“userlist” : items
});
});
});

  1. jade

This template displays the list of users as a table. The code is shown below

extends layout
block content
h1= "Display the list of Users"
p
strong Firstname Lastname   Mobile
table
each user, i in userlist
tr
td #{user.FirstName}
td #{user.LastName}
td #{user.Mobile}
p
p
a(href='/') Home

Note: A link back to the Home page is included in here at the bottom.

7


5) Adding a User
There are 2 parts to this
a) Invoking the /newuser route to display the input form through the newuser.jade
b) Invoking the /adduser route to insert the values entered in the form. The changes are shown below
a) app.js
..
newuser = require('./routes/newuser')
adduser = require('./routes/adduser')
..
app.get('/newuser', newuser.list);
app.post('/adduser',adduser.list);

b) newuser.js
exports.list = function(req, res){

  1. render(‘newuser’, { title: ‘Add User’});

};

The newuser jade displays the input form
c) newuser.jade
extends layout
block content
h1= "Add a User"
form#formAddUser(name="adduser",method="post",action="/adduser")
input#inputUserFirstName(type="text", placeholder="firstname", name="firstname")
input#inputUserLastName(type="text", placeholder="lastname", name="lastname")
input#inputUserLastName(type="text", placeholder="mobile", name="mobile")
button#btnSubmit(type="submit") submit
p
p
a(href='/') Home

3

d) adduser.js

The adduser.js gets the mongo url from the process.env.VCAP_SERVICES and  setups up the connection to the DB and inserts the values received in the ‘newuser.jade’ form into the database

exports.list = function(req, res) {
if (process.env.VCAP_SERVICES) {
var env = JSON.parse(process.env.VCAP_SERVICES);
if (env['mongodb-2.2']) {
var mongo = env['mongodb-2.2'][0]['credentials'];
}
} else {
var mongo = {
"username" : "user1",
"password" : "secret",
"url" : "mongodb://user1:secret@localhost:27017/test"
}
}
// Set up the DB connection
var MongoClient = mongodb.MongoClient;
var db= MongoClient.connect(mongo.url, function(err, db) {
if(err) {

  1. log(“Failed to connect to the database”);

} else {

  1. log(“Connected to database”);

}
// Get our form values. These rely on the “name” attributes
var FirstName = req.body.firstname;
var LastName = req.body.lastname;
var Mobile = req.body.mobile;
// Set our collection
var collection = db.collection(‘phonebook’);
// Insert the record into the DB

  1. insert({

“FirstName” : FirstName,
“LastName” : LastName,
“Mobile” : Mobile
}, function (err, doc) {
if (err) {
// If it failed, return error

  1. send(“There was a problem adding the information to the database.”);

}
else {
// Redirect to userlist – Display users

  1. location(“userlist”);

// And forward to success page

  1. redirect(“userlist”);

}
});
});

If the insert is successful the userlist page is displayed with the new user

4

6) Updating a User & Deleting a User: Updating and Deleting users follow the same format as Adding a user.

7) index.jade The Home page is built using index.jade with a hyperlink invoking the route for each database operation
extends layout
block content
h1= title
p Welcome to #{title}
ul
li
a(href='/userlist') Display list of users
li
a(href='/newuser') Add a user
li
a(href='/changeuser') Update a user
li
a(href='/remuser') Delete a user

Tip: “Return of the Jadei : Getting the jade template right is truly an art as Jade is extremely finicky about spaces, tabs, indents and outdents(???). Creating the Jade template had me run into circles. I found out that you can debug the jade template individually by executing

C:> npm install jade -g"
and then  running
C:> jade <template name>

from the command prompt. If the result of the command is “rendered <template name>.html” then you are in luck and you can incorporate this jade template into your views folder for e.g.

C: >jade index.jade
rendered index.html

8) Push changes to Bluemix: Once the changes have been made push the changes on to Bluemix with ‘cf’ as follows

cf login -a https://api.ng.bluemix.net
cf push bluemix-mongo -p . -m 512M
cf create-service mongodb 100 mongodb01
cf bind-service bluemix-mongo mongodb01


The last 2 commands can also be performed through the Bluemix dashboard in which you add the mongodb service to your Node.js app/

8) Files and Logs: In the Bluemix dashboard you can check your logs in the Files and Logs

5


6

Important tip: Finally if the application fails to start when you  push the application with ‘cf’ for e.g.

cf push <app name> -p . -m 512M
....
.....
----> Writing a custom .npmrc to circumvent npm bugs
----> Installing dependencies
----> Caching node_modules directory for future builds
----> Cleaning up node-gyp and npm artifacts
----> No Procfile found; Adding npm start to new Procfile
----> Building runtime environment
----> Checking and configuring service extensions
----> Uploading droplet (7.6M)
of 1 instances running, 1 down

or if  it crashes when you click a link then your debugging friend is

cf logs <app name > — recent
This will dump the error that was encountered either while the application was being started of why the application crashed.

You can fork this Bluemix application from bluemix-mongo at  IBM Devops or from GitHub at bluemix-mongo

Disclaimer: This article represents the author’s viewpoint only and doesn’t necessarily represent IBM’s positions, strategies or opinions

You may also like
1. Brewing a potion with Bluemix, PostgreSQL & Node.js in the cloud
2. A Bluemix recipe with MongoDB and Node.js
3. A Cloud Medley with IBM’s Bluemix, Cloudant and Node.js
4. Rock N’ Roll with Bluemix, Cloudant & NodeExpress


Find me on Google+

Mixing Twilio with IBM Bluemix

This post walks you through the steps to get started with Twilio on IBM’s Bluemix. Twilio comes as a service that you can add  to your Mobile Cloud or Node.js app. Here’s a quick look at Twilio. Twilio, is a cloud communications IaaS organization which  allows you use standard web languages to build voice, SMS and VOIP applications via a Web API.

Twilio provides the  ability to build VOIP applications using APIs. Twilio itself resides in the cloud and is always available. It also provides SIP integration which means that it can be integrated with Soft switches. Twilio looks really  interesting with its ability to combine the  cloud, Web and VOIP, SMS  and  the like.

This post barely scratches the surface of Twilio & Blue mix. This article provides aa hands-on experience for integration of Twilio with Bluemix and is based on this Twilio blog post. It enables you to send a SMS to your mobile phone by typing in a URL.

As in my earlier post the steps are

1) Fire-up a Node.js  Webstarter application from the  Bluemix dashboard.  In my case I have named the application websms. Once this is up and running

2) Click Add a Service and under ‘Web and Application’ choose Twilio.

3) Enter a  name for the Twilio service. You will also need the Account SID and Authorization token

4) For this go to http://www.twilio.com and sign up2

5) Once you have registered, go to your Dashboard for the Account SID and Auth Token. If the Auth token is encrypted, you can click the ‘lock’ symbol to display the Auth token in plain text.

6) Enter the Accout SID and Auth Token in the Twilio service in Bluemix

7)  To get started you can simply  fork my Twilio  websms code from devops.

8) Now clone the code into a folder you create as follows

git clone https://hub.jazz.net/git/tvganesh/websms

9) You will need to modify the following files

package.json

manifest.yml

app.js


10) You can create package.json by running
npm init. Make sure you enter the name of the application you created in Bluemix. In my case it is “websms’ For the rest of the options you can choose the default. Here is the package.json file
"name": "websms",
"version": "0.0.0",
"description": "This README.md file is displayed on your project page. You should edit this \r file to describe your project, including instructions for building and \r running the project, pointers to the license under which you are making the \r project available, and anything else you think would be useful for others to\r know.",
"main": "app.js",
"dependencies": {
"gopher": "^0.0.7",
"express": "^3.12.0",
"twilio": "^1.6.0",
"ejs": "^1.0.0"
},
"devDependencies": {},
"scripts": {
"test": "echo \"Error: no test specified\" && exit 1"
},
"repository": {
"type": "git",
"url": "https://hub.jazz.net/git/tvganesh/websms"
},
"author": "",
"license": "ISC"
}

11) In the manifest.yml make sure you enter the name of your application and the host

applications:
- host: websms
disk: 1024M
name: websms
command: node app.js
path: .
domain: <your domain>
mem: 128M
instances: 1

12) Lastly make changes to your app.js.

// dependencies
var app = require('gopher'),
twilio = require('twilio');
var config = JSON.parse(process.env.VCAP_SERVICES);
var twilioSid, twilioToken;
config['user-provided'].forEach(function(service) {
if (service.name == 'Twilio') {
twilioSid = service.credentials.accountSID;
twilioToken = service.credentials.authToken;
}
});
// URL test
app.get('/', function(request, response) {
var client = new twilio.RestClient(twilioSid, twilioToken);
client.sendMessage({
to:'<Your mobile number>',
from:'<Number from Twilio dashboard',
body:'Twilio notification through Bluemix!'
}, function(err, message) {
response.send('Message sent! ID: '+message.sid);
});
});

13) After you have made the changes you will need to push the changes to Bluemix using the command line based ‘cf’ tool
14) Login into cf with
cf login – a http://api.ng.bluemix.net

15) Push the websms onto bluemix

16) In the folder where you websms files reside entr the following command
cf push websms -p . -m 512M

17) This should push the code to Bluemix.
Note: If you happen to get a
Server error, status code: 400, error code: 170001, message: Staging error: cannot get instances since staging failed
then you need to make sure to check the changes made to  files app.js, package.,json or the manigfest,yml.

18)  If all things went smoothly, go to your Bluemix dashboard and click the link adjacent to the Routes. You should see that an SMS has been sent as shown

3

19) Your mobile should now display the message that was sent as shown below
Screenshot_2014-06-22-13-41-44

20) Check the  analytics in your Twilio dashboard
1

Disclaimer: This article represents the author’s viewpoint only and doesn’t necessarily represent IBM’s positions, strategies or opinions

Find me on Google+

Getting started with a Mobile Cloud app with Bluemix

This post gives the key steps to get going in building a Mobile Cloud application on IBM’s Bluemix. This post focuses on using the Android Platform for building the application. IBM Bluemix’es mobile cloud application includes under its hood mobile services like mobile application security, push and mobile data. A Node.js is also thrown in to provide server-side functions.

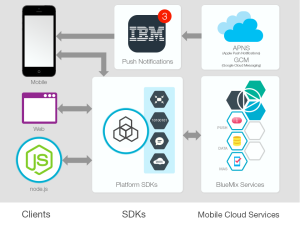
The Bluemix Mobile architecture is shown below

BuildingMobile


As in the previous post an existing Mobile cloud application IBM’s bluelist -base is cloned to get familiarity with the steps involved. The IBM’s bluelist-base app enables the user to maintain a grocery list that persists as mobile data in the cloud instance. To get started perform the following

1) Install ADT + Eclipse bundle from the aforementioned link

2) Unzip and install Eclipse and the ADT bundle

3) Make sure you have the Java JDK for Eclipse. If not install from the following site Java SE Development Kit 8 Downloads

4) Since we will be cloning an existing application and using Eclipse to make the changes we need to install EGit.

5) To do this open Eclipse and select Help-> Install New Software and type in http://download.eclipse.org/egit/updates in the Work with text field and hit enter. You should see the following

1

6) Once EGit is installed the IBM’s bluelist-base App can be cloned as follows

7) In Eclipse click File->Import->Git->Import from Git and click Next

8) Choose Clone URI and Click Next

9) Enter the URI for IBM’s bluelist-base. This shown below

2

10) This will download all the necessary source files and other Android related files and directories into the workspace.

11) After this perform the Steps 2 to Step 6 from the link given Build an Android app using the MobileData cloud service

12) After you make the necessary code changes you are good to go

13) Make sure you right-click and add all the necessary imports required (also Ctrl+Shift + O)

14) Build the Project and make sure that there are no errors

15) You are now ready to run the mobile cloud application. We need to run the mobile app on a Virtual simulator. This can be done as

a) In Eclipse click Window->Android Virtual Device Manager. Click the Device Definitions tab.

b) Choose Nexus 7 (Google) and Click Create AVD.
c) This will open a New Window. Set the following Skin->QVGA and Enter 100 MiB in SD Card size and click OK. This will add this as a AVD.

16) Now run the application.

17) This will bring up the AVD. This takes some time You should see the IBM bluelist showing up as one of the apps.

18) Click on IBM Bluelist. You can add grocery items. These items will persist even if you have to restart your application

3

19) The data is persisted in the IBM’s cloud. This can be checked by logging into BlueMix’es dashboard

4

20) Click the Mobile Data and the data entered in the AVD device will show up in Data Classes drop down.

5

21) The Analytics tab will give a graphical output of the API calls

6

So not the mobile app that is cloud enabled is ready.

Clearly the ability to build Android Apps with the data stored at a cloud opens up numerous possibilities for apps like Evernote, Pocket across several devices.

There you have your first Mobile Cloud App.

Watch this space!

Disclaimer: This article represents the author’s viewpoint only and doesn’t necessarily represent IBM’s positions, strategies or opinions

Find me on Google+

Get your feet wet with IBM Bluemix

This post provides the initial steps to get started on IBM’s Bluemix (currently in beta). Bluemix is open-standard, cloud based Platform-as-a-Service (PaaS) from IBM. Bluemix allows one to quickly put together mobile, web, Big Data, IoT applications. Bluemix is an implementation of IBM’s Open Cloud Architecture, Cloud Foundry which enables developers to rapidly build, deploy, and manage their cloud applications. The developers can tap into a growing ecosystem of available services and runtime frameworks.

Bluemix uses the Softlayer infrastructure to host the user applications. Clients/developers interact with Bluemix either with HTTP or REST as shown below
8

Here are the steps to get going on Bluemix

First things first

I would suggest that you get all the registrations and installations right away.

Bluemix dashboard– Get started by creating an account on Bluemix. This will provide you access to the Bluemix’s dashboard from which you can quickly create applications (mobile, Web, IoT, BigData) etc

Devops: Register for an account with Devops. Devops allows you to easily develop, deploy and track your code online. Devops also allows you to collaborate with others by forking code from their Git repositories

Cf Interface : Install the Command line interface ‘cf” to Bluemix. The ‘cf’ command interface is built with Google’s Go programming language. With ‘cf ‘you can login to Bluemix, create an application, add services and manage your application. You can also do this from the Bluemix’es dashboard.

Install Git: There are multiple ways to develop code for Bluemix. Git command line happens to be one of them, So it makes sense to have this installed. You can install this from this link https://hub.jazz.net/tutorials/clients#installing_git

Install Node.js:The application that this post discusses is based on a Node.js based application so it will help to have it installed. Node.js is a platform that enables building of fast, scalable network applications and created by Ryan Dahl.

Kicking off Bluemix : A good first application to get moving on in Bluemix is the already available Sentiment Analysis of Twitter. This application uses the Node.js ‘sentiment’ module to perform some basic sentiment analysis.

The quickest and most painless way to get started on Bluemix is to ‘fork’ the code for Sentiment Analysis from Devops.

1) Login to your Devops account. Click the following Sentiments link from Devops, in which I have created a slight modification to the sentiment analysis application. You can also clone the code from GitHub at sentiments.

2) Click the Edit Code button at the top. This will open the files and directories in this project (see picture below)

3) Next click the “Fork’ button on the panel on the left side. This will create a copy of the above code in your own repository (see picture below )

1

4) The Twitter sentiment analysis code is in app.js written in Node.js. You can make changes to the code as needed. I have made a few modifications to the code that I had forked. I added changes which adds a textual output of the Twitter sentiment

;

How to make code changes with Web IDE

5) To make code changes double click the app.js file. This will open up the code window. You can use the GUI based IDE to make the code changes and merge with the master branch, The steps are
a) Make the necessary changes and click the symbol shown

2

3. This will open a new window as shown below

3

4) Click the ‘Stage to change’ button.

5) This will move the changes to Staged. Click the ‘Commit’ button and enter the reason for the change and click the “Submit’

4

6) This will move the changes from ‘Staged’ to ‘Commits for master branch’

7) Now click ‘Push all’ and click ‘Ok’ in the Git Push popup window. This will merge the changes into the master branch.

8) Once this done click ‘Build & Deploy’ button

9) Your changes will transition from ‘Pending’ to ‘OK’. Now click the ‘Manage’ button. This will deploy the application with the latest changes on to Bluemix.

10) Do the following to populate the details for the parameters below  with a Twitter app that you create for your application

var tweeter = new twitter({
consumer_key:  <your API key>,
consumer_secret: <your API secret>,
access_token_key:<your access token >,
access_token_secret: <your access token secret>
});

11) To do this log into http://dev.twitter.com

12) Click My applications where your picture is displayed and then click Create application.

13) Enter the details for Name,Description & Website (can be any valid website) and then click Create Twitter application.. This will create the Twitter application.

1

14) Click the API tab. Scroll down to the bottom and click “Create my access token”.

15) This will generate the Access token & Access token secret. Enter all the details (API Key, API secret, Access Token, Access Token secret into app.js and push to the master branch before deploying on Bluemix


Code changes with Git command line

11) Incidentally the changes to code can also be made through the Git command shell as follows

a) git clone https://hub.jazz.net/git/tvganesh/sentiments

b) Modify the code using any editor and save the changes

c) Go the directory containing the files and do

git add *

d) git commit -m “Cosmetic” app.js

e) git push

This will push the changes to the git repository in the master branch

8) Click the ‘Build & deploy’ in the top right corner. You should see this

5

9) Click the ‘Manage’ button which will push the application onto the BlueMix

10) To test this application click the link next to ‘Routes’ . Enter a phrase that you would like to search and hit ‘Go’

6

You should see the application checking Twitter periodically for the tweets.

7

Thats it! You have built your first Bluemix application.

The ability to integrate Node.js into your cloud application allows one to easily create powerful applications.

Hasta la vista! I’ll be back!

Disclaimer: This article represents the author’s viewpoint only and doesn’t necessarily represent IBM’s positions, strategies or opinions

Find me on Google+