Sixer – R package cricketr’s new Shiny avatar

Published in R-bloggers: Sixer – R package cricketr’s new Shiny app

In this post I create a Shiny App, Sixer, based on my R package cricketr. I had developed the R package cricketr, a few months back for analyzing the performances of batsman and bowlers in all formats of the game (Test, ODI and Twenty 20). This package uses the statistics info available in ESPN Cricinfo Statsguru. I had written a series of posts using the cricketr package where I chose a few batsmen, bowlers and compared their performances of these players. Here I have created a complete Shiny app with a lot more players and with almost all the features of the cricketr package. The motivation for creating the Shiny app was to

  • To show case the  ‘cricketr’ package and to highlight its functionalities
  • Perform analysis of more batsman and bowlers
  • Allow users to interact with the package and to allow them to try out the different features and functions of the package and to also check performances of some of their favorite crickets

If you are passionate about cricket, and love analyzing cricket performances, then check out my racy book on cricket ‘Cricket analytics with cricketr and cricpy – Analytics harmony with R & Python’! This book discusses and shows how to use my R package ‘cricketr’ and my Python package ‘cricpy’ to analyze batsmen and bowlers in all formats of the game (Test, ODI and T20). The paperback is available on Amazon at $21.99 and  the kindle version at $9.99/Rs 449/-. A must read for any cricket lover! Check it out!!

Untitled


$4.99/Rs 320 and $6.99/Rs448 respectively

Important note 1: The latest release of ‘cricketr’ now includes the ability to analyze performances of teams now!!  See Cricketr adds team analytics to its repertoire!!!

Important note 2 : Cricketr can now do a more fine-grained analysis of players, see Cricketr learns new tricks : Performs fine-grained analysis of players

Important note 3: Do check out the python avatar of cricketr, ‘cricpy’ in my post ‘Introducing cricpy:A python package to analyze performances of cricketers

a) You can try out the interactive  Shiny app Sixer at – Sixer
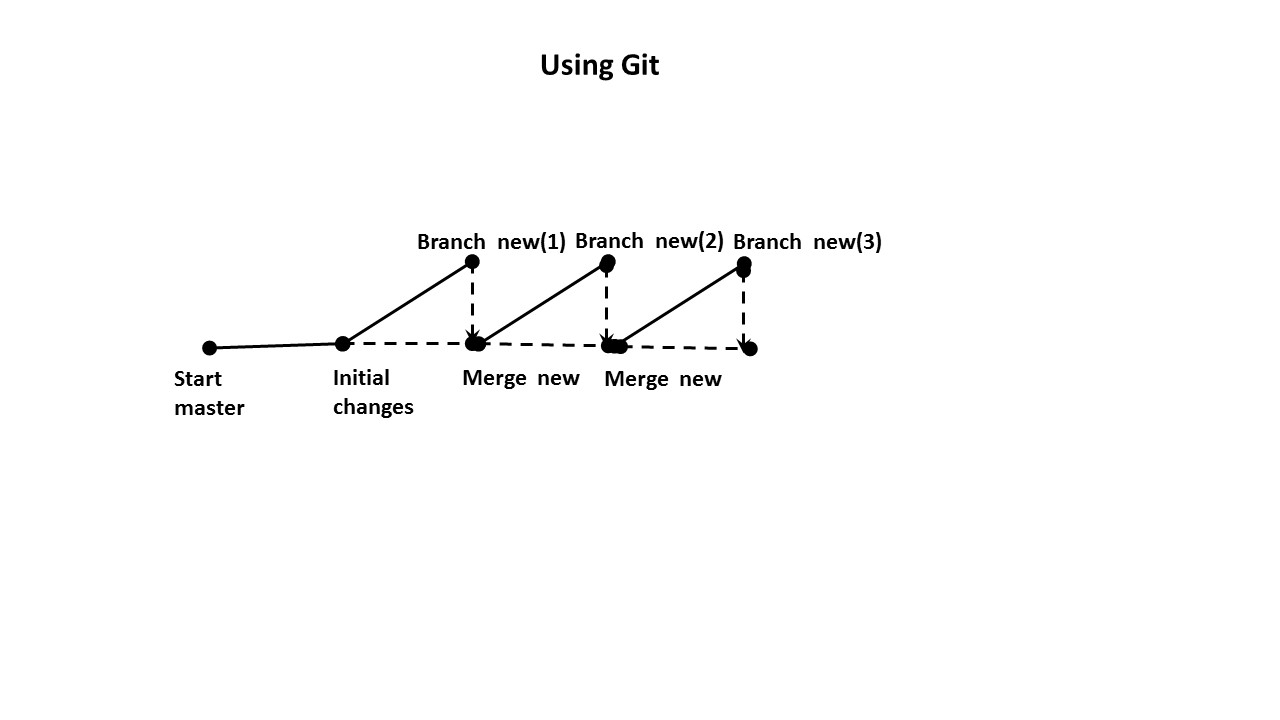
b) The code for this Shiny app project can be cloned/forked from GitHub – Sixer
Note: Please be mindful of  ESPN Cricinfo Terms of Use.
(Take a look at my short video tutorial on my R package cricketr on Youtube – R package cricketr – A short tutorial)

Important note: Do check out my other posts using cricketr at cricketr-posts

In this Shiny app I have 5 tabs which perform the following function
1.  Analyze Batsman
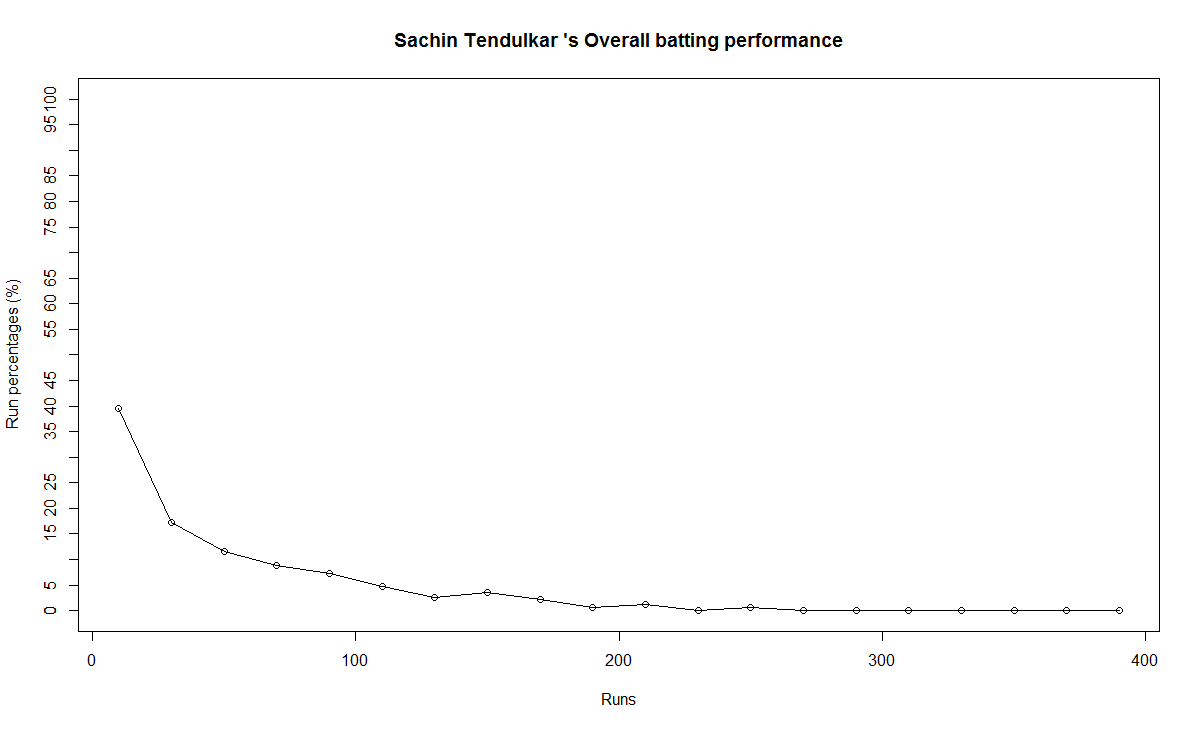
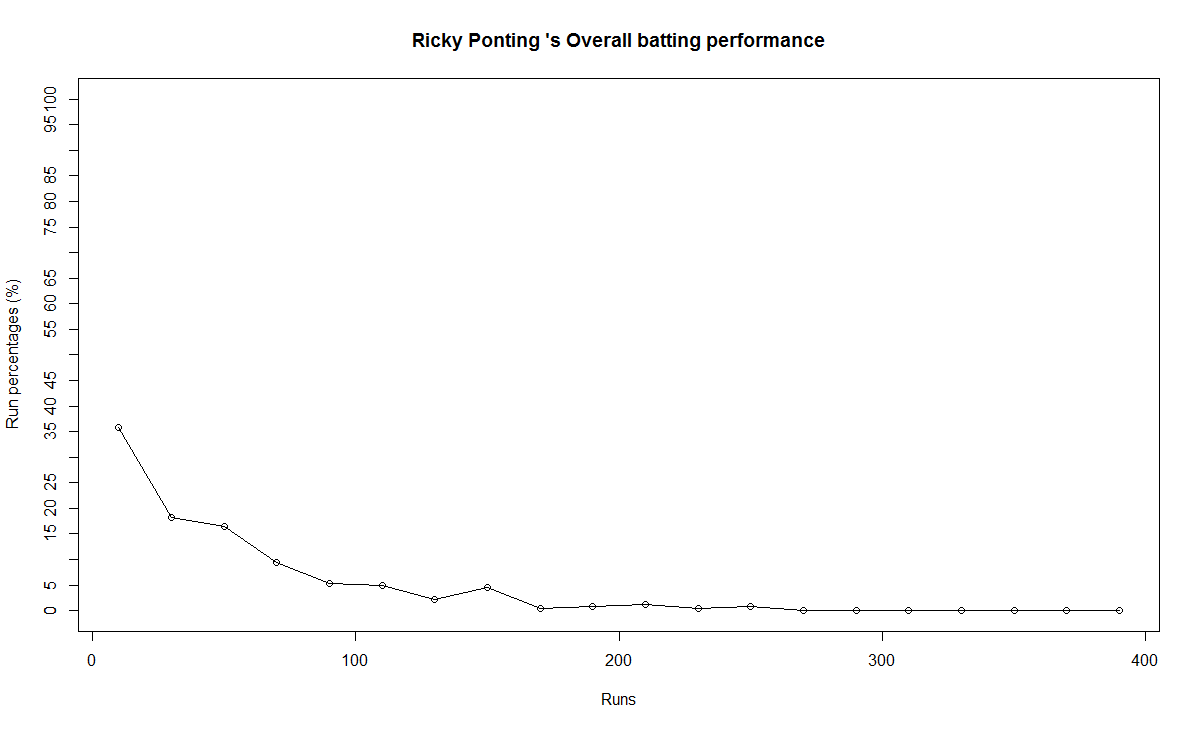
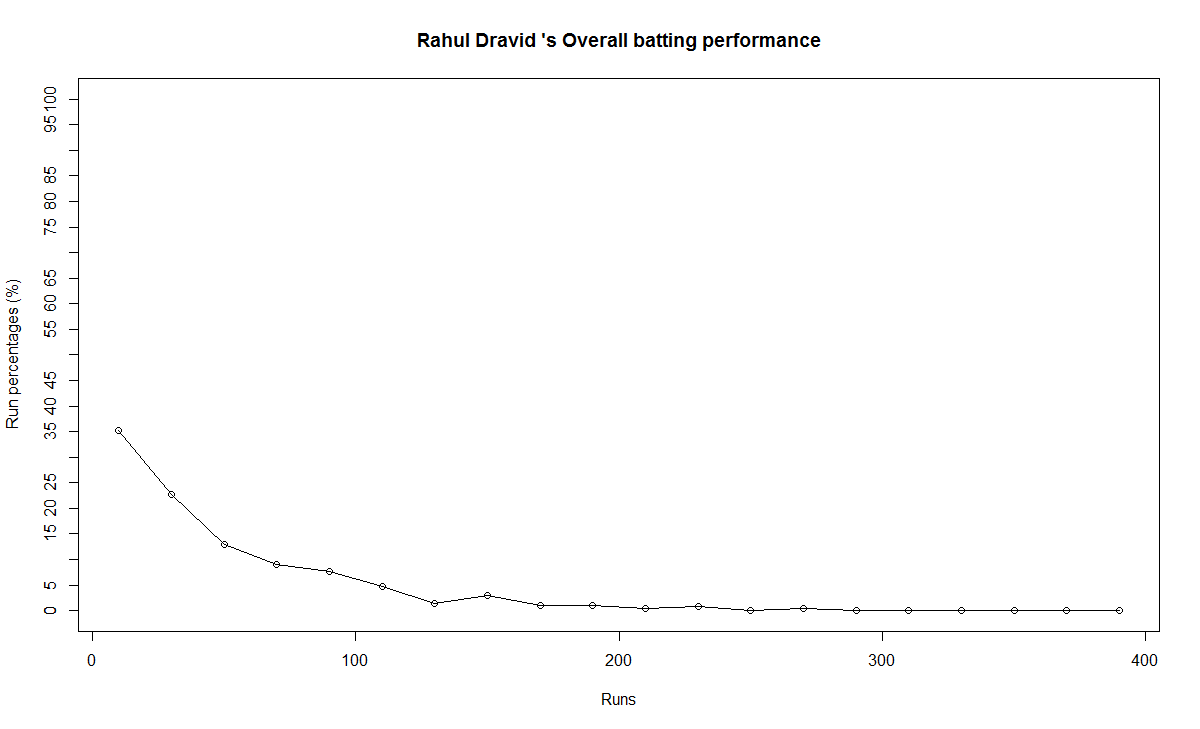
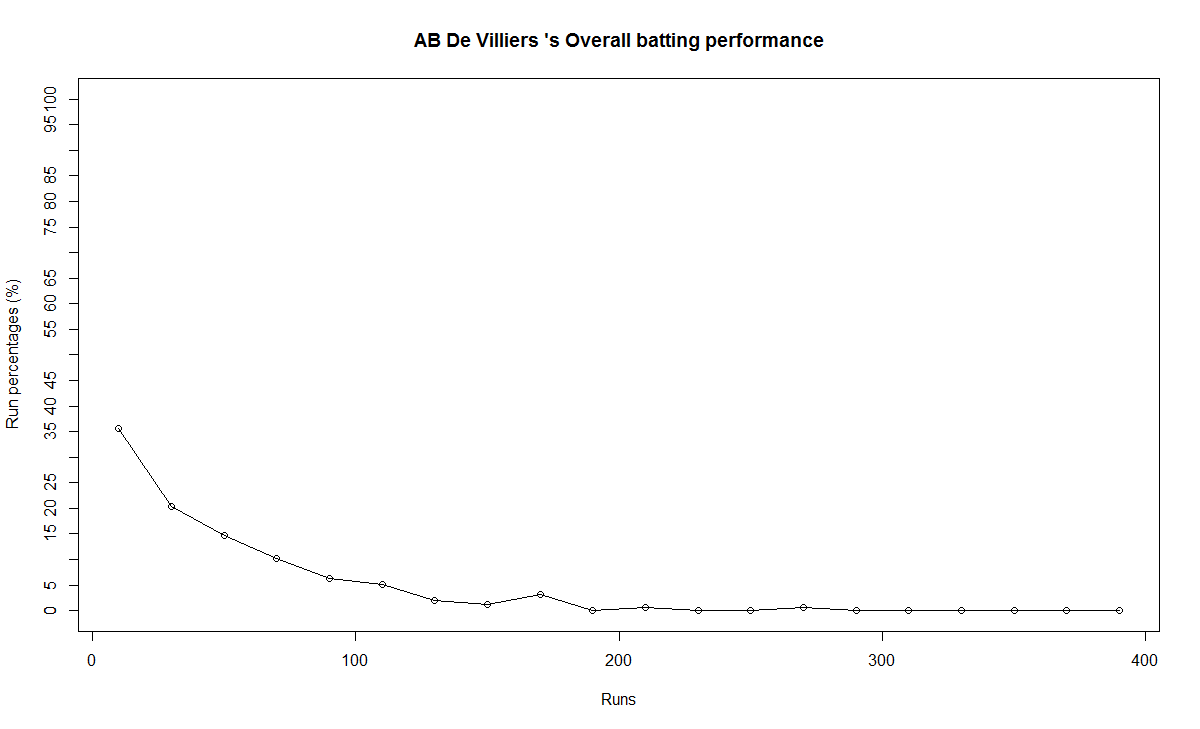
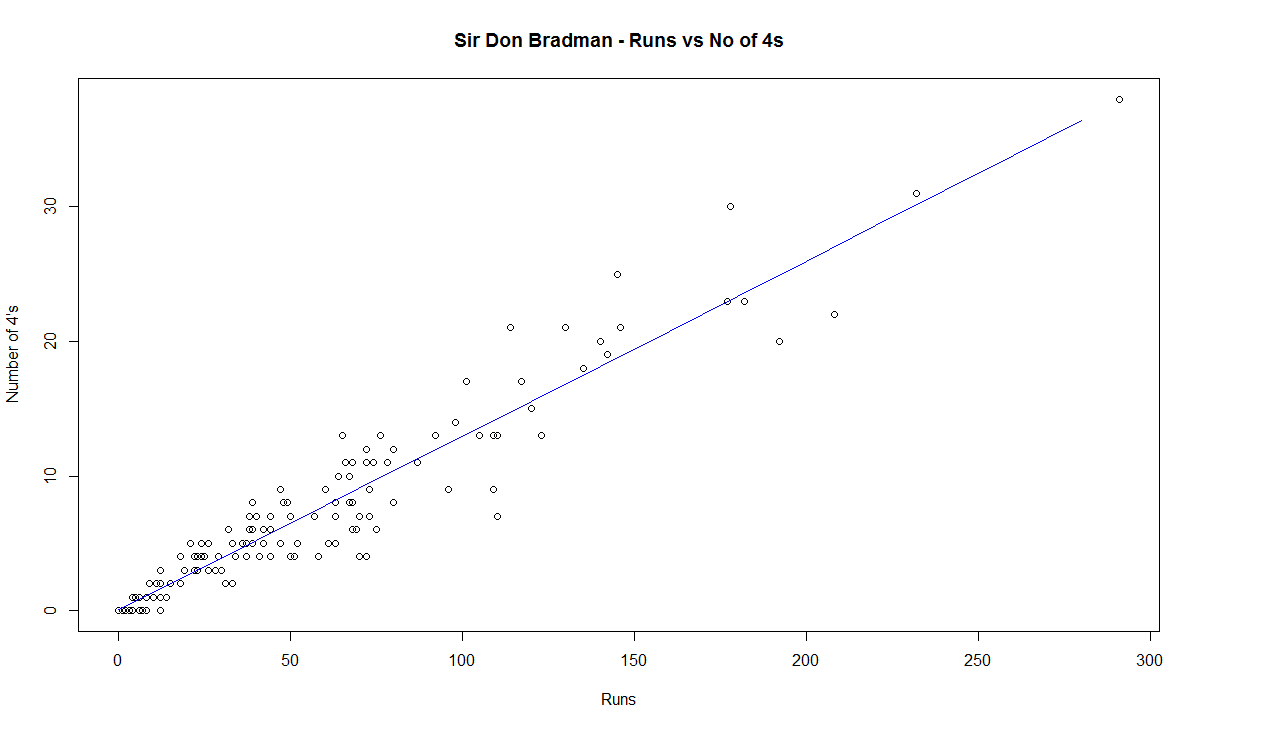
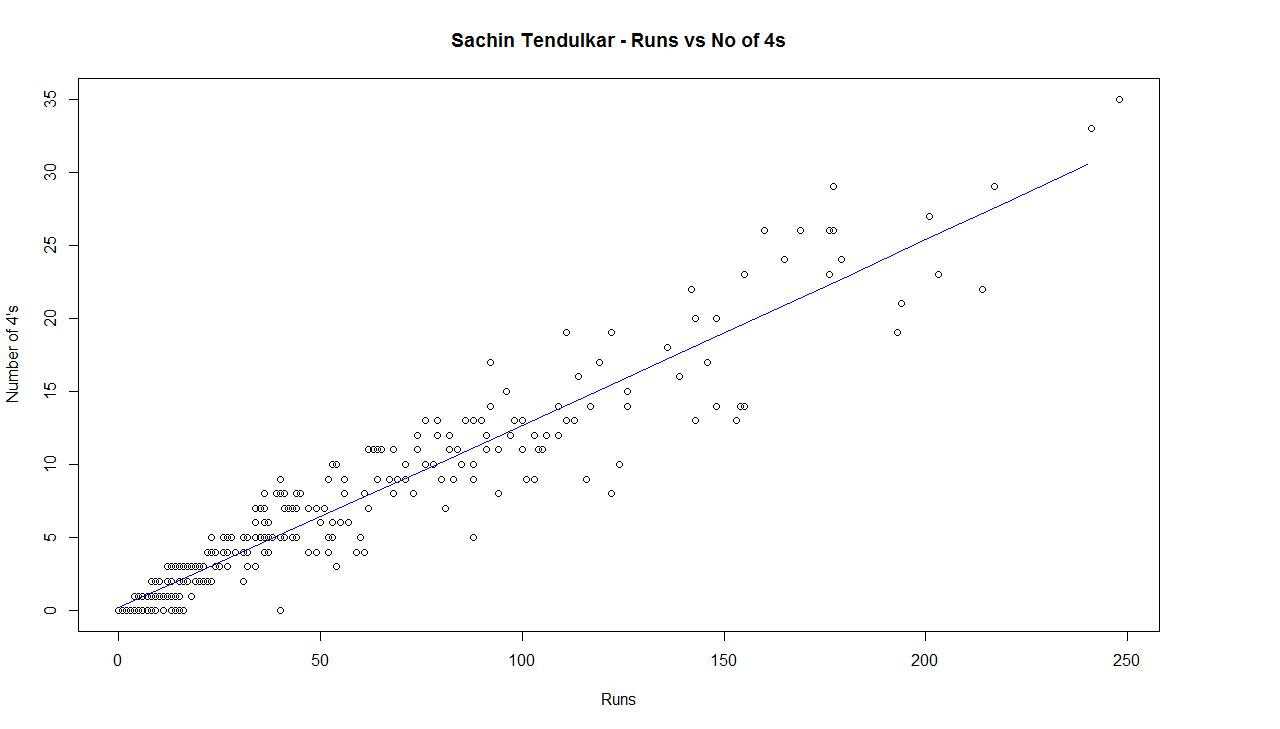
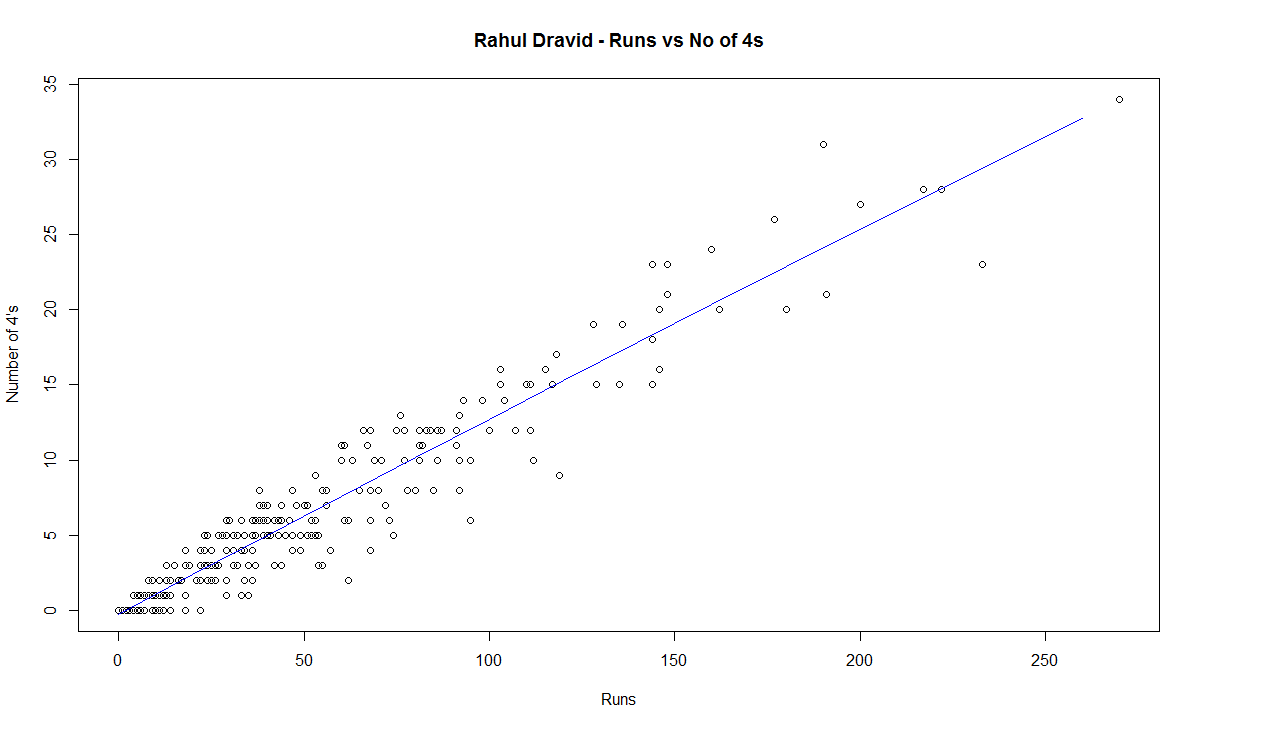
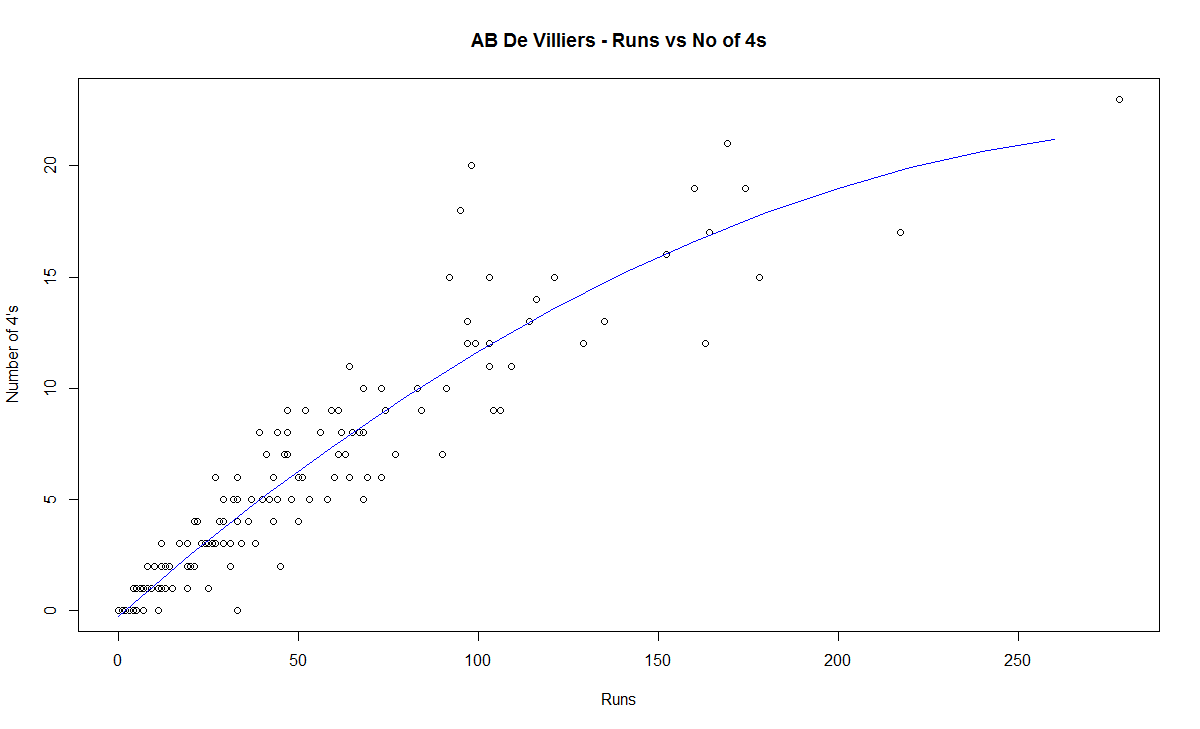
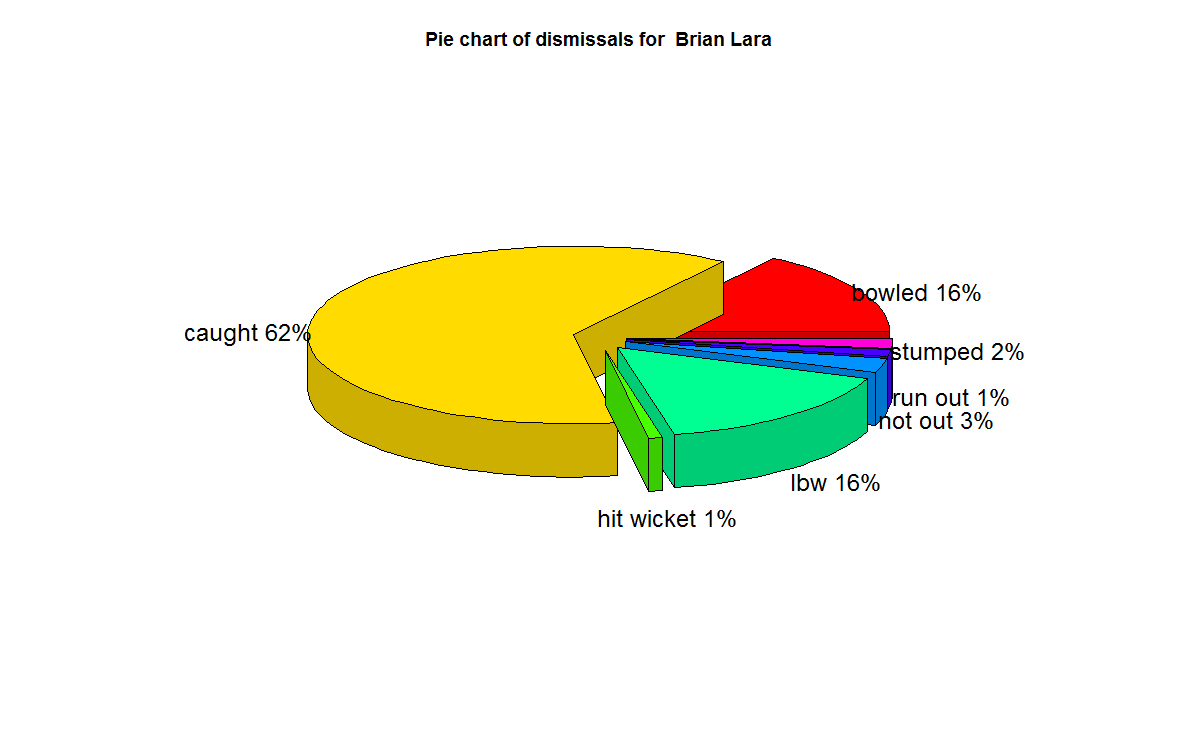
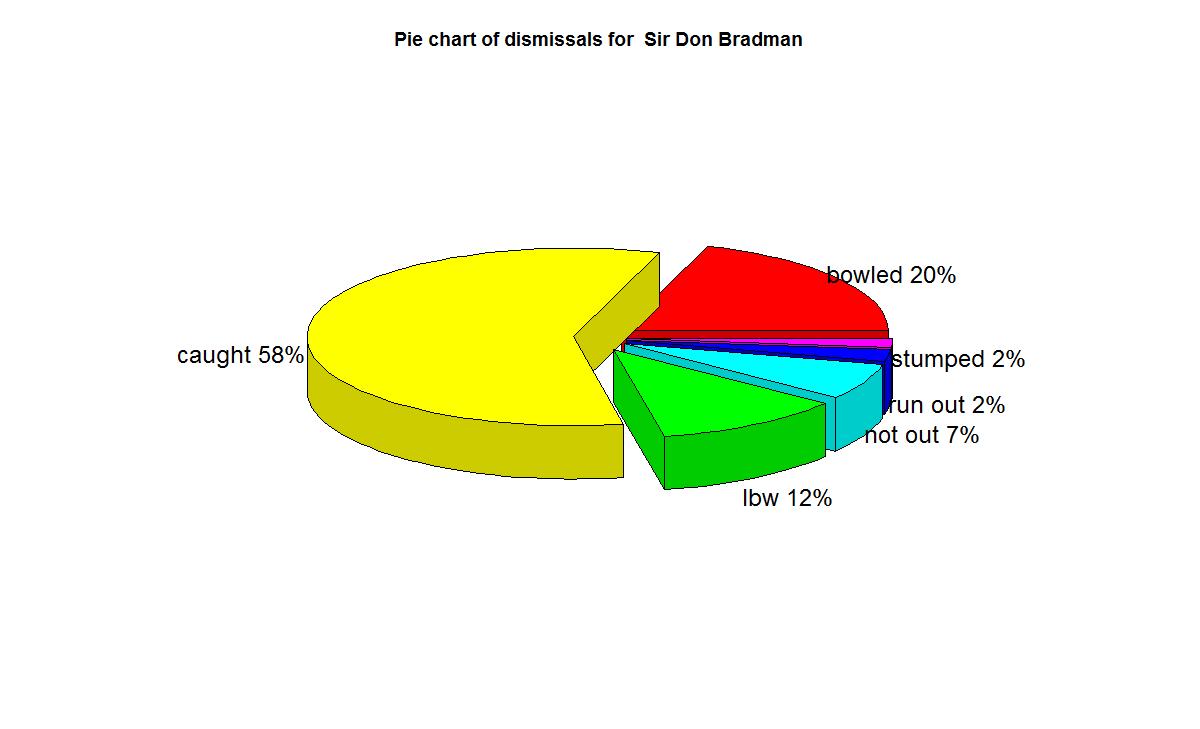
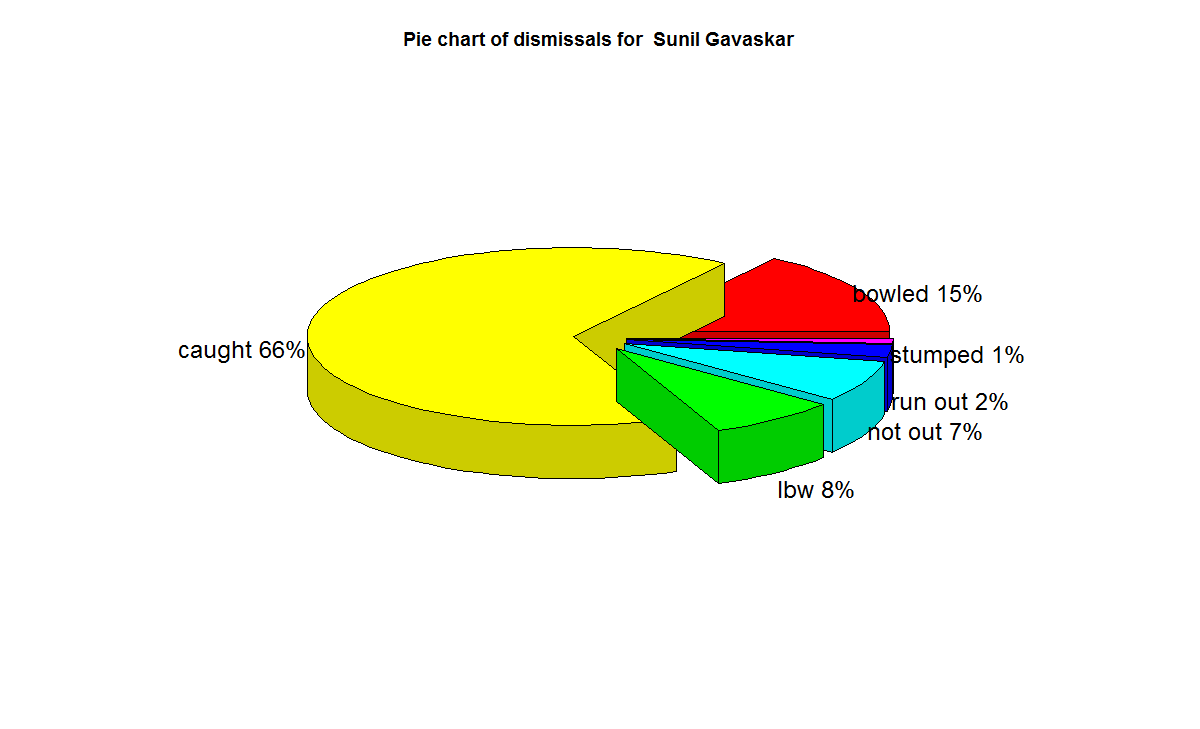
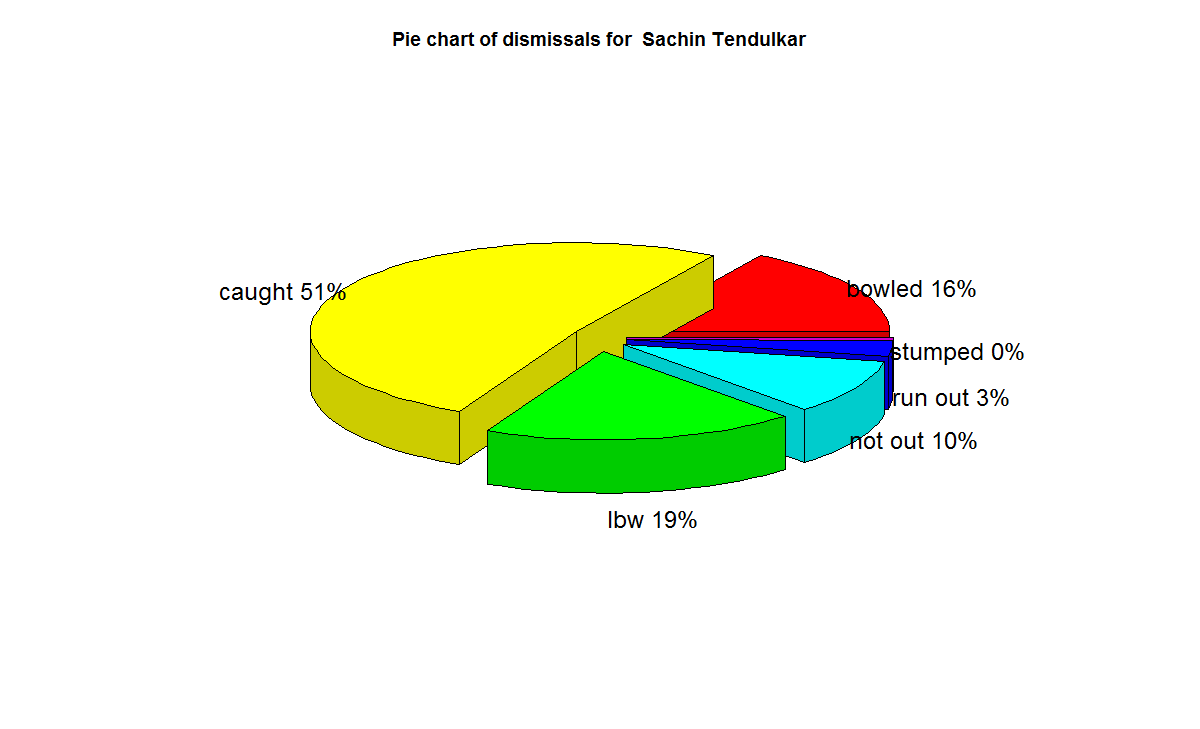
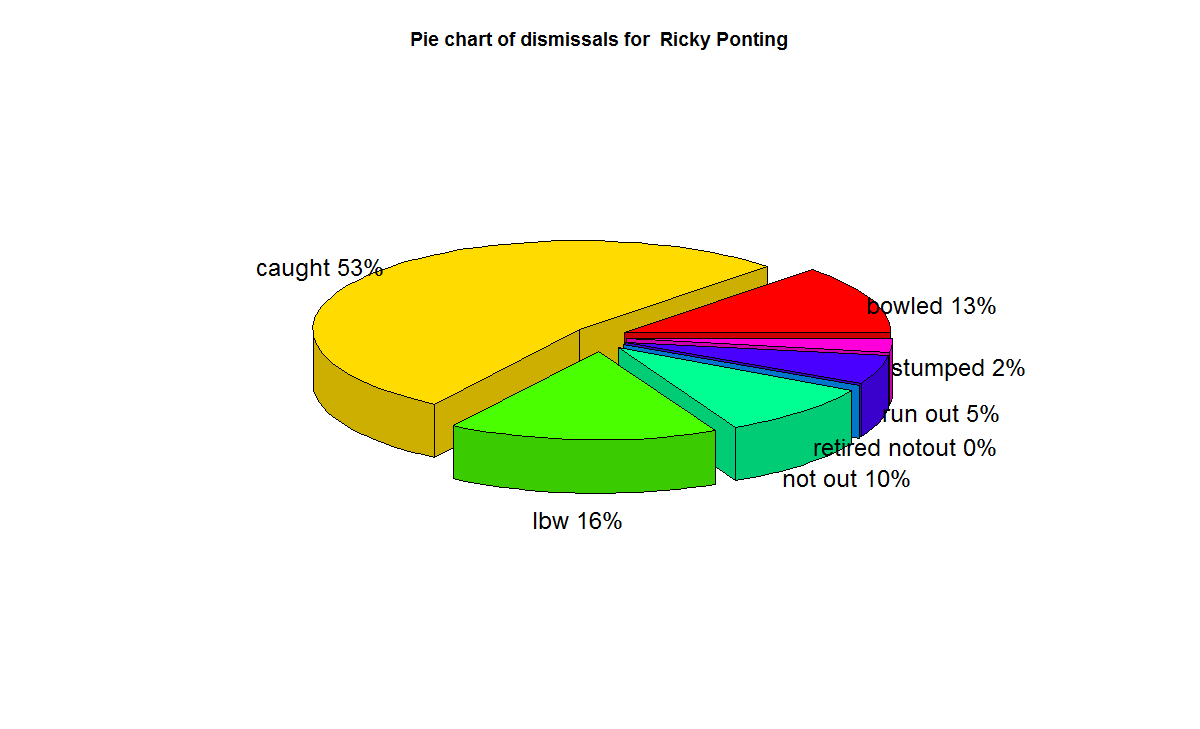
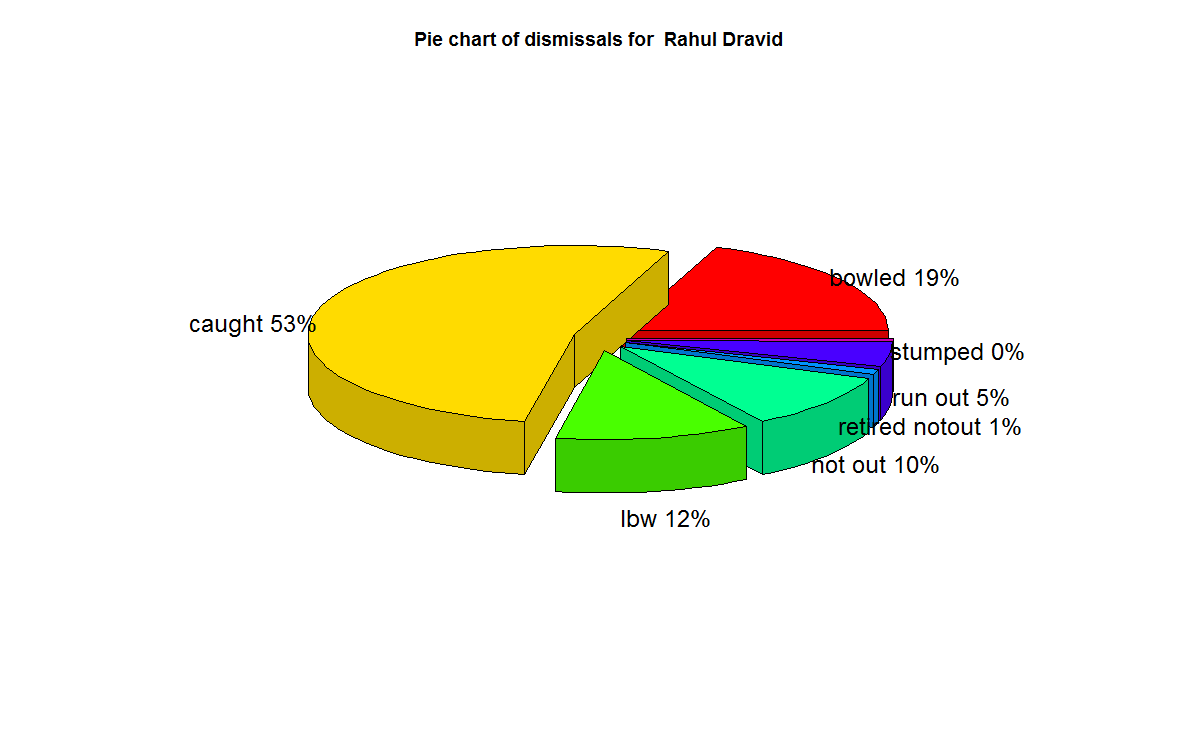
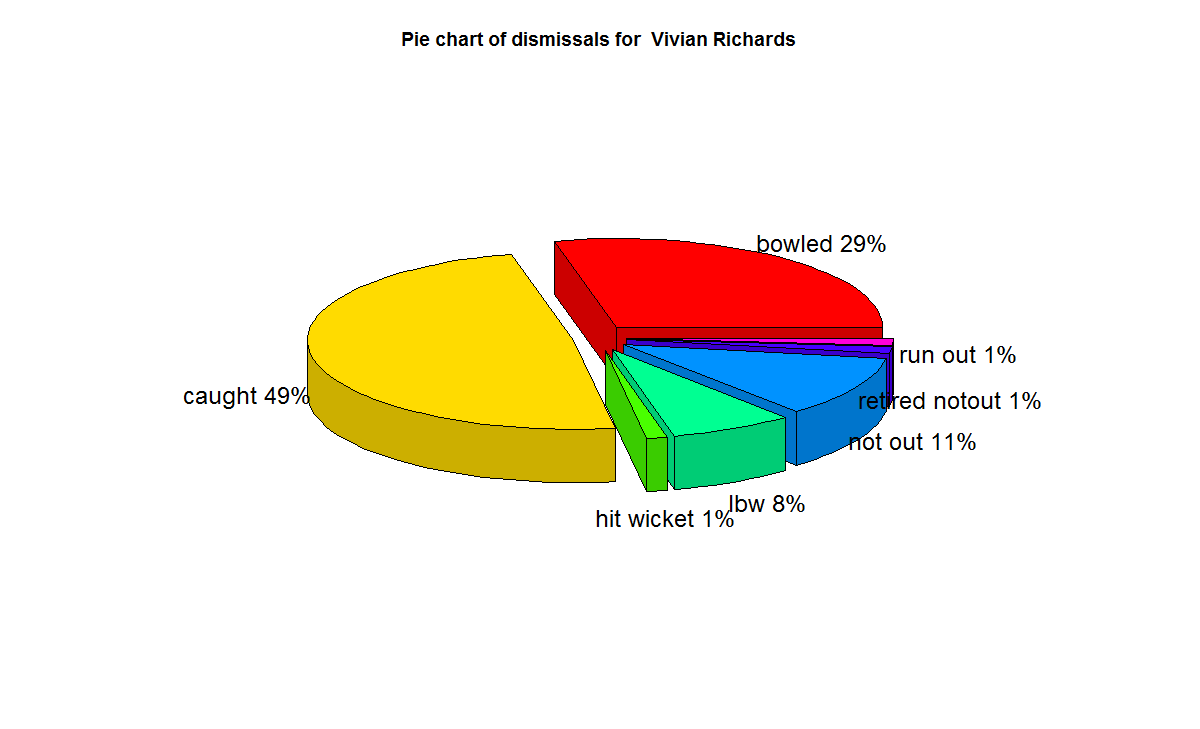
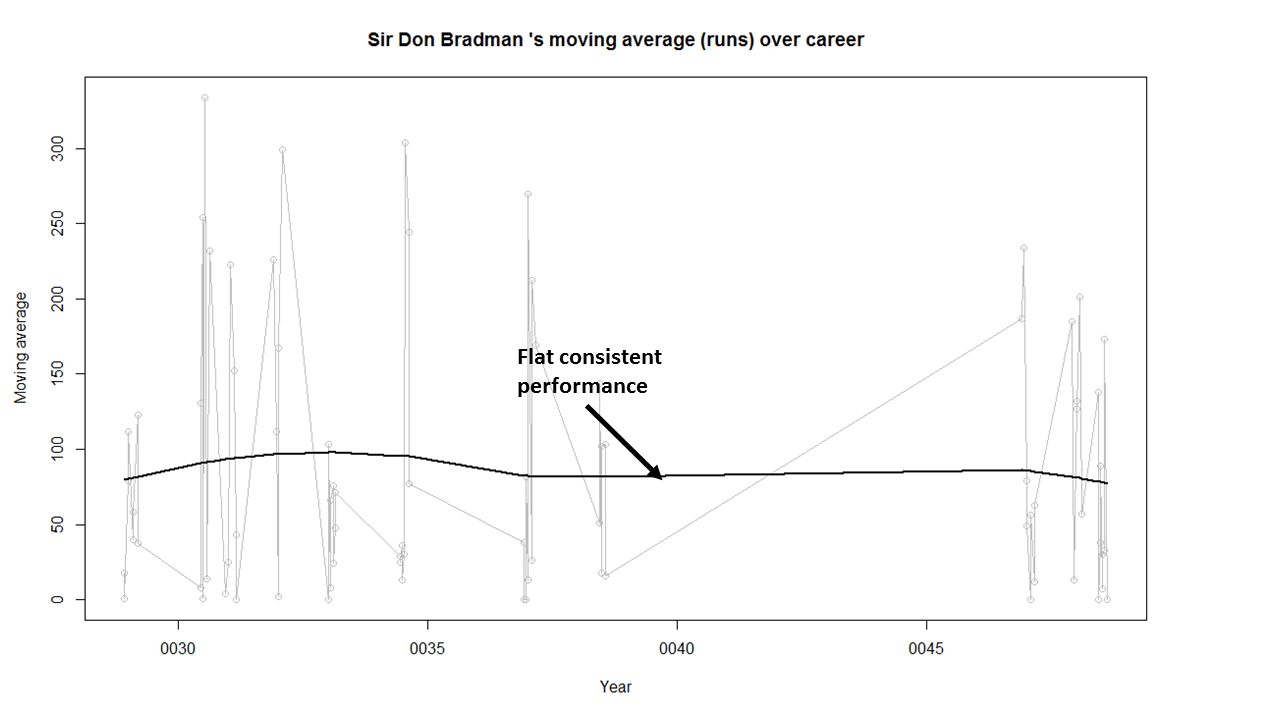
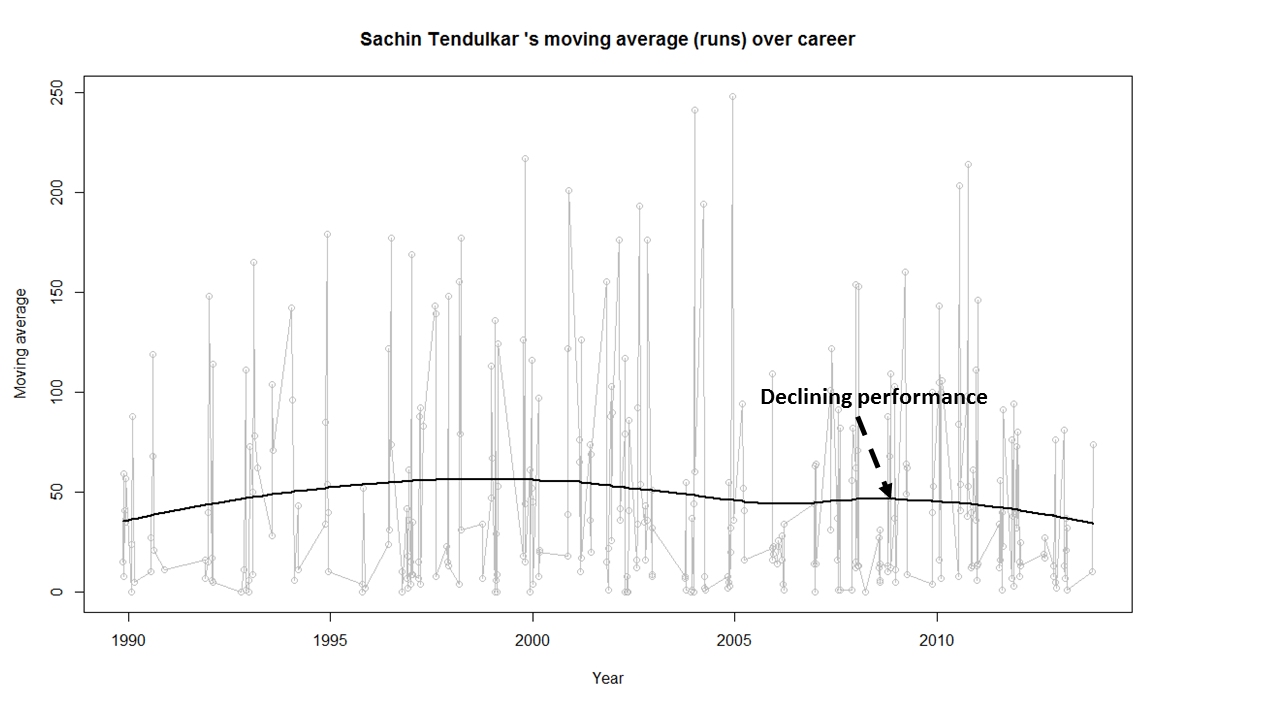
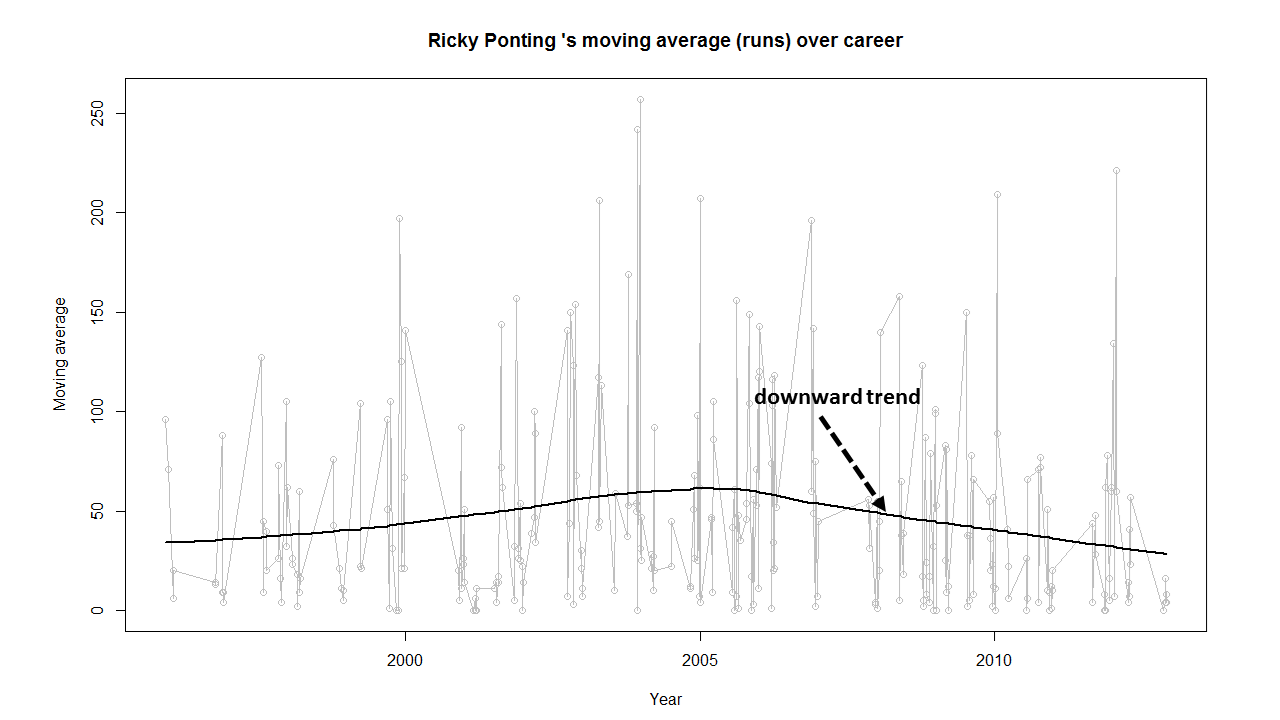
This tab analyzes batsmen based on different functions and plots the performances of the selected batsman. There are functions that compute and display batsman’s run-frequency ranges, Mean Strike rate, No of 4’s, dismissals, 3-D plot of Runs scored vs Balls Faced and Minutes at crease, Contribution to wins & losses, Home-Away record etc. The analyses can be done for Test cricketers, ODI and Twenty 20 batsman. I have included most of the Test batting giants including Tendulkar, Dravid, Sir Don Bradman, Viv Richards, Lara, Ponting etc. Similarly the ODI list includes Sehwag, Devilliers, Afridi, Maxwell etc. The Twenty20 list includes the Top 10 Twenty20 batsman based on their ICC rankings

2. Analyze bowler
This tab analyzes the bowling performances of bowlers, Wickets percentages, Mean Economy Rate, Wickets at different venues, Moving average of wickets etc. As earlier I have all the Top bowlers including Warne, Muralidharan, Kumble- the famed Indian spin quartet of Bedi, Chandrasekhar, Prasanna, Venkatraghavan, the deadly West Indies trio of Marshal, Roberts and Holding and the lethal combination of Imran Khan, Wasim Akram and Waqar Younis besides the dangerous Dennis Lillee and Jeff Thomson. Do give the functions a try and see for yourself the performances of these individual bowlers

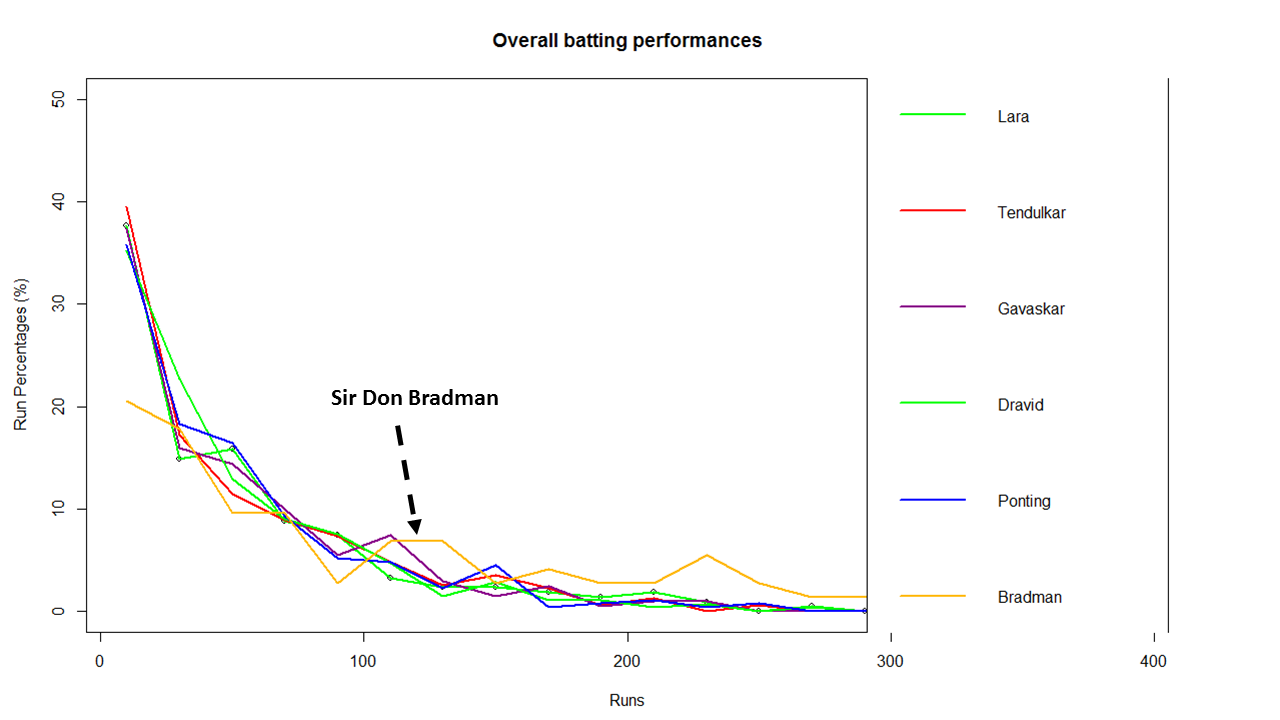
3. Relative performances of batsman
This tab allows the selection of multiple batsmen (Test, ODI and Twenty 20) for comparisons. There are 2 main functions Relative Runs Frequency performance and Relative Mean Strike Rate

4. Relative performances of bowlers
Here we can compare bowling performances of multiple bowlers, which include functions Relative Bowling Performance and Relative Economy Rate. This can be done for Test, ODI and Twenty20 formats

5. Check for In-Form status of players
This tab checks the form status of batsman or bowler selected for all of the different formats of the game. The below computation uses Null Hypothesis testing and p-value to determine if the batsman is in-form or out-of-form. For this 90% of the career runs is chosen as the population and the mean computed. The last 10% is chosen to be the sample set and the sample Mean and the sample Standard Deviation are calculated. Note: The accuracy of the p-value test depends on the size of the population and the size of the sample set. It  may not be very significant for players with a few innings played.

Some of my earlier posts based my R package cricketr are listed below
1. Introducing cricketr!: An R package for analyzing performances of cricketers
2. Taking cricketr for a spin – Part 1
3. cricketr plays the ODIs
4. cricketr adapts to the Twenty20 International
5. cricketr digs the Ashes

Do try out the interactive Sixer Shiny app – Sixer
You can clone the code from Github – Sixer

There is not much in way of explanation. The Shiny app’s use is self-explanatory. You can choose a match type ( Test,ODI or Twenty20), choose a batsman/bowler  from the drop down list and select the plot you would like to seeHere a few sample plots
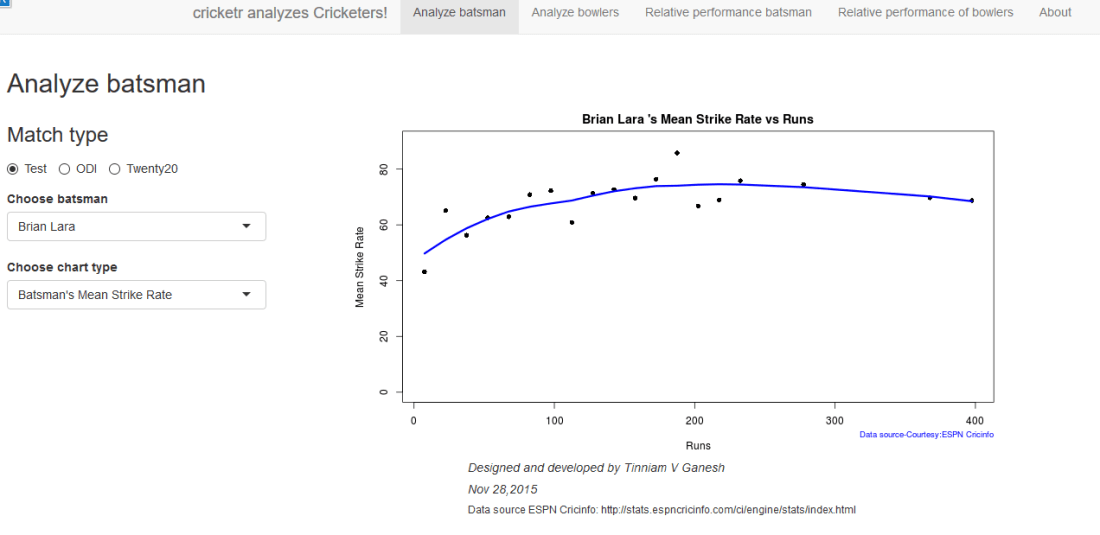
A. Analyze batsman tab
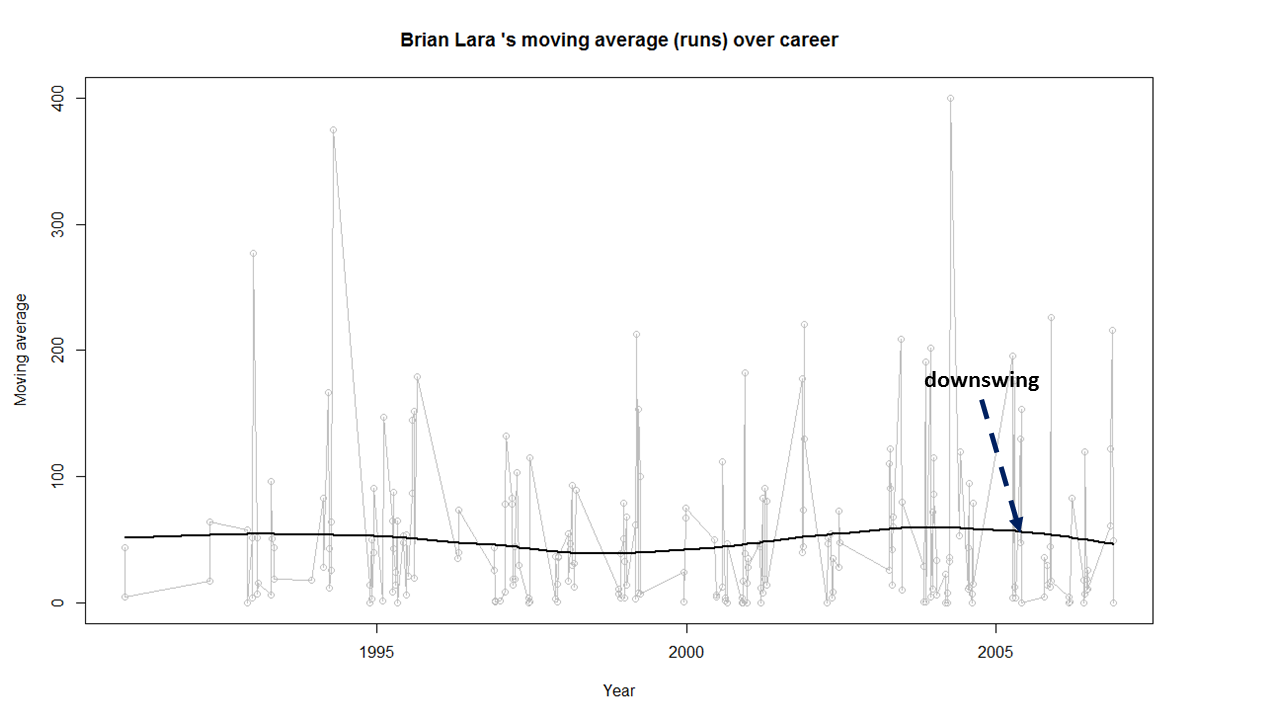
i) Batsman – Brian Lara , Match Type – Test, Function – Mean Strike Rate
sxr-1ii) Batsman – Shahid Afridi, Match Type –  ODI, Function – Runs vs Balls faced
The plot below shows that if Afridi faces around 50 balls he is likely to score around 60 runs in ODIs.
sxr-2iii)   Batsman – Chris Gayle, Match Type – Twenty20  Function – Moving Average
sxr-3B. Analyze bowler tab

i. Bowler – B S Chandrasekhar, Match Type – Test, Function – Wickets vs Runs
sxr-4ii)  Bowler – Malcolm Marshall, Match Type – Test, Function – Mean Economy Ratesxr-5iii)  Bowler – Sunil Narine, Match Type – Twenty 20, Function – Bowler Wicket Rate
sxr-6
C. Relative performance of batsman (you can select more than 1)
The below plot gives the Mean Strike Rate of batsman. Viv Richards, Brian Lara, Sanath Jayasuriya and David Warner are best strikers of the ball.
sxr-7

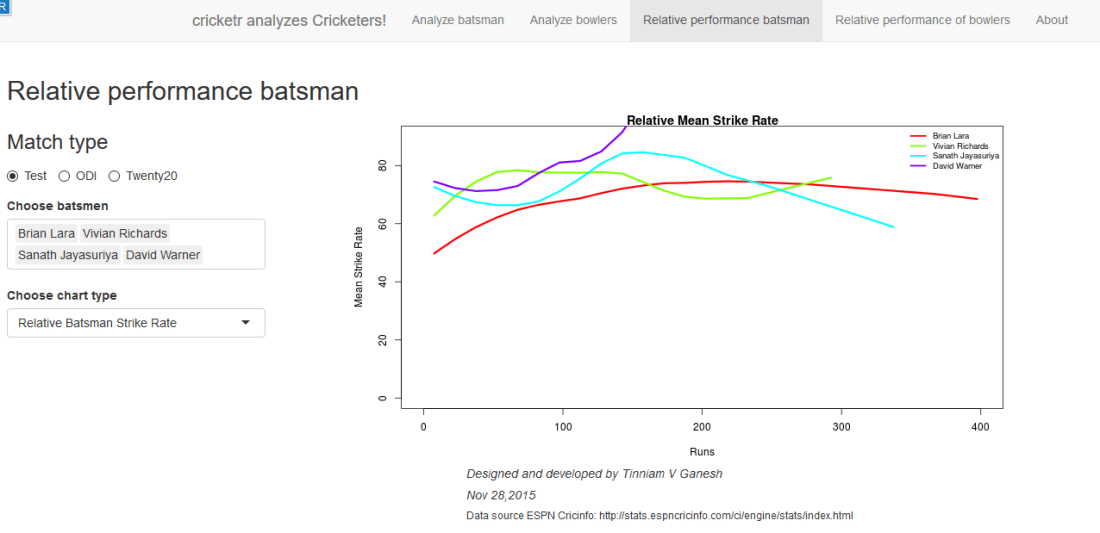
Here are some of the great strikers of the ball in ODIs
sxr-8D. Relative performance of bowlers (you can select more than 1)
Finally a look at the famed Indian spin quartet.  From the plot below it can be seen that  B S Bedi  & Venkatraghavan were more economical than Chandrasekhar and Prasanna.
sxr-9

But the latter have a better 4-5 wicket haul than the former two as seen in the plot below

sxr-11Finally a look at the average number of balls to take a wicket by the Top 4 Twenty 20 bowlers.
sxr-10

E. Check for In-form status of players
Note: The accuracy of the p-value depends on the size of the population and the size of the sample set. It  may not be very significant for smaller data sizes

i. Match Type – Test,  Player Type – Batsman  Name – Wickets v
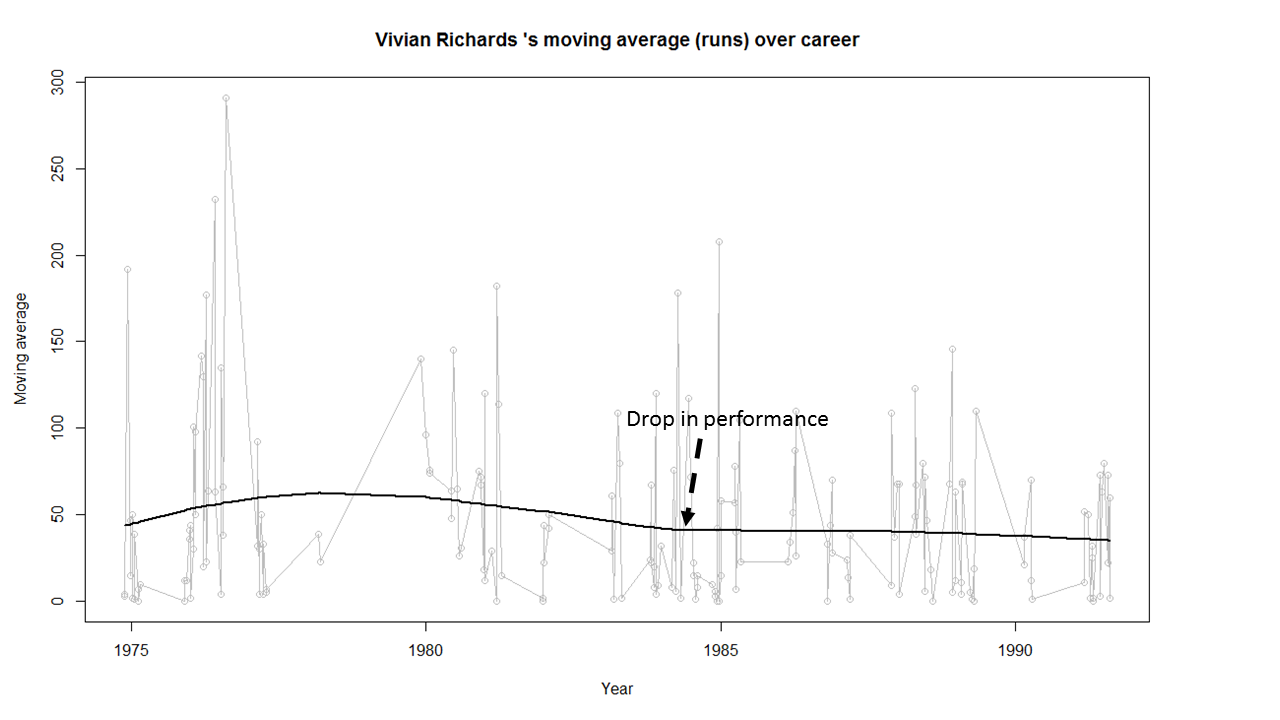
In this plot the in-form status of Viv Richards is checked. This shows that Viv Richards was out-of-form
sxr-12In the plot below the form status of S. Venkataraghavan is shown. According to this at the time of  his retirement S Venkat was still in-form
sxr-13

Do give the Shiny app Sixer a try.

Also see
1. Literacy in India : A deepR dive.
2.  Natural Language Processing: What would Shakespeare say?
3. Revisiting crimes against women in India
4. Informed choices through Machine Learning : Analyzing Kohli, Tendulkar and Dravid
5. Experiments with deblurring using OpenCV
6.  What’s up Watson? Using IBM Watson’s QAAPI with Bluemix, NodeExpress – Part 1
7.  Working with Node.js and PostgreSQL
8. A method for optimal bandwidth usage by auctioning available bandwidth using the OpenFlow Protocol
9.  Latency, throughput implications for the cloud
10.  A closer look at “Robot horse on a Trot! in Android”

Analyzing cricket’s batting legends – Through the mirage with R

In this post I do a deep dive into the records of the all-time batting legends of cricket to identify interesting information about their achievements. In my opinion, the usual currency for batsman’s performance like most number of centuries or highest batting average are too gross in their significance. I wanted something finer where we can pin-point specific strengths of different  players

This post will answer the following questions.
– How many times has a batsman scored runs in a specific range say 20-40 or 80-100 and so on?
– How do different batsmen compare against each other?
– Which of the batsmen stayed well beyond their sell-by date?
– Which of the batsmen retired too soon?
– What is the propensity for a batsman to get caught, bowled run out etc?

For this analysis I have chosen the batsmen below for the following reasons
Sir Don Bradman : With a  batting average of 99.94 Bradman was an obvious choice
Sunil Gavaskar is one of India’s batting icons who amassed 774 runs in his debut against the formidable West Indies in West Indies
Brian Lara : A West Indian batting hero who has double, triple and quadruple centuries under his belt
Sachin Tendulkar: A prolific run getter, India’s idol, who holds the record for most test centuries by any batsman (51 centuries)
Ricky Ponting:A dangerous batsman against any bowling attack and who can demolish any bowler on his day
Rahul Dravid: He was India’s most dependable batsman who could weather any storm in a match single-handedly
AB De Villiers : The destructive South African batsman who can pulverize any attack when he gets going

The analysis has been performed on these batsmen on various parameters. Clearly different batsmen have shone in different batting aspects. The analysis focuses on each of these to see how the different players stack up against each other.

The data for the above batsmen has been taken from ESPN Cricinfo. Only the batting statistics of the above batsmen in Test cricket has been taken. The implementation for this analysis has been done using the R language.  The R implementation, datasets and the plots can be accessed at GitHub at analyze-batting-legends. Feel free to fork or clone the code. You should be able to use the code with minor modifications on other players. Also go ahead make your own modifications and hack away!

If you are passionate about cricket, and love analyzing cricket performances, then check out my 2 racy books on cricket! In my books, I perform detailed yet compact analysis of performances of both batsmen, bowlers besides evaluating team & match performances in Tests , ODIs, T20s & IPL. You can buy my books on cricket from Amazon at $12.99 for the paperback and $4.99/$6.99 respectively for the kindle versions. The books can be accessed at Cricket analytics with cricketr  and Beaten by sheer pace-Cricket analytics with yorkr  A must read for any cricket lover! Check it out!!

1

Important note: Do check out the python avatar of cricketr, ‘cricpy’ in my post ‘Introducing cricpy:A python package to analyze performances of cricketers

Key insights from my analysis below
a) Sir Don Bradman’s unmatchable record of 99.94 test average with several centuries, double and triple centuries makes him the gold standard of test batting as seen in the ‘All-time best batsman below’
b) Sunil Gavaskar is the king of batting in India, followed by Rahul Dravid and finally Sachin Tendulkar. See the charts below for details
c) Sunil Gavaskar and Rahul Dravid had at least 2 more years of good test cricket in them. Their retirement was premature. This is based on the individual batsmen’s career graph (moving average below)
d) Brian Lara, Sachin Tendulkar, Ricky Ponting, Vivian Richards retired at a time when their batting was clearly declining. The writing on the wall was clear and they had to go (see moving average below)
e) The biggest hitter of 4’s was Vivian Richards. In the 2nd place is Brian Lara. Tendulkar & Dravid follow behind. Dravid is a surprise as he has the image of a defender.
e) While Sir Don Bradman made huge scores, the number of 4’s in his innings was significantly less. This could be because the ground in those days did not carry the ball far enough
f) With respect to dismissals  Richards was able to keep his wicket intact (11%) of the times , followed by Ponting  Tendulkar, De Villiers, Dravid (10%) who carried the bat, and Gavaskar & Bradman (7%)

A) Runs frequency table and charts
These plots normalize the batting performance of different batsman, since the number of innings played ranges from 89 (Bradman) to 348 (Tendulkar), by calculating the percentage frequency the batsman scores runs in a particular range.   For e.g. Sunil Gavaskar made scores between 60-80 10% of his total innings

This is shown in a tabular form below

runs-frequency
The individual charts for each of the players are shwon belowThe top performers after  removing ranges 0-20 & 20-40 are
Between 40-60 runs – 1) Ricky Ponting (16.4%) 2) Brian lara (15.8%) 3) AB De Villiers (14.6%)
Between 60-80 runs – 1) Vivian Richards (18%) 2) AB De Villiers (10.2%) 3) Sunil Gavaskar (10%)
Between 80-100 runs – 1) Rahul Dravid (7.6%) 2) Brian Lara (7.4%) 3) AB De Villiers (6.4%)
Between 100 -120 runs – 1) Sunil Gavaskar (7.5%) 2) Sir Don Bradman (6.8%) 3) Vivian Richards (5.8%)
Between 120-140 runs – 1) Sir Don Bradman (6.8%) 2) Sachin Tendulkar (2.5%) 3) Vivian Richards (2.3%)

The percentage frequency for Brian Lara is included below
1) Brian Lara
lara-run-freq

The above chart shows out of the total number of innings played by Brian Lara he scored runs in the range (40-60) 16% percent of the time. The chart also shows that Lara scored between 0-20, 40%  while also scoring in the ranges 360-380 & 380-400 around 1%.
The same chart is displayed as continuous graph below
lara-run-perf

The run frequency charts for other batsman are
2) Sir Don Bradman
a) Run frequency
bradman-freq
Note: Notice the significant contributions by Sir Don Bradman in the ranges 120-140,140-160,220-240,all the way up to 340
b) Performance
bradman-perf
3) Sunil Gavaskar
a) Runs frequency chart
gavaskar-freq
b) Performance chart
gavaskar-perf
4) Sachin Tendulkar
a) Runs frequency chart
tendulkar-freq
b) Performance chart
tendulkar-perf
5) Ricky Ponting
a) Runs frequency
ponting-freq
b) Performance
ponting-perf
6) Rahul Dravid
a) Runs frequency chart
dravid-freq
b) Performance chart
dravid-perf
7) Vivian Richards
a) Runs frequency chart
richards-freq
b) Performance chart
richards-perf
8) AB De Villiers
a) Runs frequency chart
villiers-freq
b)  Performance chart
villier-perf

 B) Relative performance of the players
In this section I try to measure the relative performance of the players by superimposing the performance graphs obtained above.  You may say that “comparisons are odious!”. But equally odious are myths that are based on gross facts like highest runs, average or most number of centuries.
a) All-time best batsman
(Sir Don Bradman, Sunil Gavaskar, Vivian Richards, Sachin Tendulkar, Ricky Ponting, Brian Lara, Rahul Dravid, AB De Villiers)
overall-batting-perf
From the above chart it is clear that Sir Don Bradman is the ‘gold’ standard in batting. He is well above others for run ranges above 100 – 350
b) Best Indian batsman (Sunil Gavaskar, Sachin Tendulkar, Rahul Dravid)
srt-sg-dravid-perf
The above chart shows that Gavaskar is ahead of the other two for key ranges between 100 – 130 with almost 8% contribution of total runs. This followed by Dravid who is ahead of Tendulkar in the range 80-120. According to me the all time best Indian batsman is 1) Sunil Gavaskar 2) Rahul Dravid 3) Sachin Tendulkar

c) Best batsman -( Brian Lara, Ricky Ponting, Sachin Tendulkar, AB De Villiers)
This chart was prepared since this comparison was often made in recent times

rel

This chart shows the following ranking 1) AB De Villiers 2) Sachin Tendulkar 3) Brian Lara/Ricky Ponting
C) Chart of 4’s

fours-batsman
This chart is plotted with a 2nd order curve of the number of  4’s versus the total runs in the innings
1) Brian Lara
bradman-4s
2) Sir Don Bradman
bradman-4s
3) Sunil Gavaskar
gavaskar-4s
4) Sachin Tendulkar
tendulkar-4s
5) Ricky Ponting
ponting-4s
6) Rahul Dravid
dravid-4s
7) Vivian Richards
richards-4s
8) AB De Villiers
villiers-4s
D) Proclivity for type of dismissal
The below charts show how often the batsman was out bowled, caught, run out etc
1) Brian Lara
lara-dismissals
2) Sir Don Bradman
bradman-dismissals
3) Sunil  Gavaskar
gavaskar-dismissals
4) Sachin Tendulkar
tendulkar-dismissals
5) Ricky Ponting
ponting-dismissals
6) Rahul Dravid
dravid-dismissals
7) Vivian Richard
richards-dismissals
8) AB De Villiers
villiers-dismissals
E) Moving Average
The plots below provide the performance of the batsman as a time series (chronological) and is displayed as the continuous gray lines. A moving average is computed using ‘loess regression’ and is shown as the dark line. This dark line represents the players performance improvement or decline. The moving average plots are shown below
1) Brian Lara
lara-ma
2) Sir Don Bradman
bradman-ma
Sir Don Bradman’s moving average shows a remarkably consistent performance over the years. He probably could have a continued for a couple more years
3)Sunil Gavaskar

2

Gavaskar moving average does show a good improvement from a dip around 1983. Gavaskar retired bowing to public pressure on a mistaken belief that he was under performing. Gavaskar could have a continued for a couple of more years
4) Sachin Tendulkar

1

Tendulkar’s performance is clearly on the decline from 2011.  He could have announced his retirement at least 2 years prior
5) Ricky Ponting
ponting-ma
Ponting peak performance was around 2005 and does go steeply downward from then on. Ponting could have also retired around 2012
6) Rahul Dravid

1

Dravid seems to have recovered very effectively from his poor for around 2009. His overall performance shows steady improvement. Dravid’s announcement appeared impulsive. Dravid had another 2 good years of test cricket in him
7) Vivian Richards
richards-ma
Richard’s performance seems to have dropped around 1984 and seems to remain that way.
8) AB De Villiers
villiers-ma
AB De Villiers moving average shows a steady upward swing from 2009 onwards. De Villiers has at least 3-4 years of great test cricket ahead of him.

Finally as mentioned above the dataset, the R implementation and all the charts are available at GitHub at analyze-batting-legends. Feel free to fork and clone the code. The code should work for other batsman as-is. Also go ahead and make any modifications for obtaining further insights.

Conclusion: The batting legends have been analyzed from various angles namely i)  What is the frequency of runs scored in a particular range ii) How each batsman compares with others for relative runs in a specified range iii) How does the batsman get out?  iv) What were the peak and lean period of the batsman and whether they recovered or slumped from these periods.  While the batsman themselves have played in different time periods I think in an overall sense the performance under the conditions of the time will be similar.
Anyway feel free to let me know your thoughts. If you see other patterns in the data also do drop in your comment.

You may also like
1. Informed choices through Machine Learning : Analyzing Kohli, Tendulkar and Dravid
2. Informed choices through Machine Learning-2: Pitting together Kumble, Kapil,

Also see
– A crime map of India in R – Crimes against women
– What’s up Watson? Using IBM Watson’s QAAPI with Bluemix, NodeExpress – Part 1
– Bend it like Bluemix, MongoDB with autoscaling – Part 1

Programming Zen and now – Some essential tips-2

This post is a follow-up to my earlier post – How to program – Some essential tips. In this post I expand on some of the ideas of my earlier post.

Programming means different things to different people. To some programming is a drudgery almost akin to manual labor, to others programming is an insurmountable mountain full of frustrations and disappointments while to others it is an intense problem solving and a creative activity. In my opinion programming can mean anything to you. It is your attitude towards coding that make it a chore, a daunting task or something really creative.

Here are some my insights on how to go about learning to code

Eyes wide open:  People generally get frustrated when a piece of code that they wrote does not do what they intended it to do. In some cases the code snippet will do nothing when they were expecting final result, sometimes the code will crash or it will go into an infinite loop and drive the person nuts. (Let me assure you – I have been there, done that!) The usual reaction when this happens is anger and frustration where we generally tinker around with the code only to get the same result. Soon the emotions will progress from anger to hopelessness.

The first thing that one needs to while coding is to keep your ‘eyes wide open’. We tend to be  guilty of ignoring the error messages that show up. Here one way to attack coding

a) Fully understand the ‘what’ of the problem. If there is an infinite loop or a core dump check after which point does it happen? If there is an execution error, what is the error trying to tell us?
b) Next look into ‘why’  the error occurred.  You could either use debugger or insert appropriate print statements to take the offending code apart.
c) Thirdly think ‘how‘ you can address the situation. Make appropriate changes and re-run the code
d) Did it solve the issue.If yes, move forward. Otherwise go to step a)

Remember that we learn more from our programming mistakes more than when our code just ‘happens’ to work!  Mistakes in our code make us to explain every part of the program

Changing times:

Times have changed. Programming Zen and programming now are worlds apart. In many ways, IDEs, Git, Google etc. have made the programmer’s life a lot easier

‘Git’ing from here to there:  Here is a trick that I learnt fairly recently, though it should have occurred to me more than 2 years back. This is using Git judiciously for all programming tasks (Note:  I am saying nothing new here!).  I find it really useful in writing code with incremental changes.  I create my initial code on the master and then test out incremental changes on a ‘new branch’ even for personal projects. Once I have proved a small increment works, I merge it with the ‘main’ branch. I again start working on the ‘new’ for the next incremental change followed by a merge to the master

The steps are

Make initial changes

1. git add  .
2. git commit –m “ Initial changes’

Create a new branch
3. git checkout –b ‘new

Make incremental changes. Test.
4.git add  .
5. git commit –m “Change 1”

Merge with the master
6.git checkout master
7. git merge new

Continue to work with ‘new’.
8 . git checkout new
9. Go to step 4)

This process can be continued till you get your final product. I find this extremely useful instead of just using an IDE to make code changes. Invariably you can run into a situation where you had something working some time back and in the next instant it is broken and you can’t figure out all the changes you made to the working code. This can be extremely frustrating. With Git you have a history of changes and you can switch to an earlier version of working code and start from there.

Rarely do I find a reason to have more than 1 branch

Here is a pictorial version of this

1

Taking help from Dr. Google: For most questions and errors that you encounter you will find others who have hit similar bugs. Just google it. You will more than surprised that others went down the exact same path that you are treading.  Besides the internet is full of tutorials, blogs and articles on key aspects of programming

Explore the cave of Stack overflow:   Spend time exploring Stack overflow. Stack overflow is replete with code snippets and questions that you wanted to ask. There is so much information out there. If you really don’t find an answer to your problem, post it in Stack overflow and you are bound to get an answer or a link to a similar question asked previously

Finally programming requires dollops of patience. Develop patience along with your skill in coding and soon programming will much more enjoyable to you.

1. Programming languages in layman’s language
2. The common alphabet of programming languages
3. How to program – Some essential tips
4. The mind of a programmer

You may also like
1. A crime map of India in R: Crimes against women
2.  What’s up Watson? Using IBM Watson’s QAAPI with Bluemix, NodeExpress – Part 1
3.  Bend it like Bluemix, MongoDB with autoscaling – Part 2
4. Informed choices through Machine Learning : Analyzing Kohli, Tendulkar and Dravid
5. Thinking Web Scale (TWS-3): Map-Reduce – Bring compute to data
6. Deblurring with OpenCV:Weiner filter reloaded

How to program – Some essential tips

If one follows the arrow of time from the early 1980s to the present day, the number of programming problems have not only proliferated but have also become more difficult. Fortunately  programming in itself has  become more manageable with massive increases in computing horsepower, smarter tools and instant availability of information on the internet, typically with the click of a mouse.

Learning to program is no easy task, but can be done with the right mix of attitude, curiosity and interest. Becoming adept at programming, however, is something else. An interesting essay in this context is Peter Norvig’s ‘Teach yourself programming in 10 years’

Back in the 1980s when I wrote my first Fortran program on my college Mainframe, programming was a lengthy exercise, spanning several days.

1

My first program was to plot a sine wave of characters on a computer printout. Running this program required the following several steps

  1. Enter the program on a teletype terminal and create a stack of Hollerith (punched) cards
  2. Submit the stack of cards to the computer center
  3. The computer center would do a batch execute in the evening on the Mainframe
  4. God forbid, if your program has a syntax error. If you did find an error, go back to step 1, the next day.
  5. Assuming everything is fine, the computer center would run your program and your output (printout) would be placed in the appropriate pigeon hole which you would need to pick up the next day.

The whole exercise to write a small-sized program could take anywhere between a couple of days to a whole week.

In the early 1990s things got a little better where one could code, compile, link and execute sitting at one’s desk. However while the programming itself got much simpler than before, certain tasks were still difficult.  Till the late 90s programs of any sort had to be written using a regular text editor (vi , emacs etc.)  You would then have to go through the process of compiling, linking and executing.

An angry compiler would typically spew forth venom at missing semi-colons, undeclared variables, and uninitialized values. This would happen till you are able to iron out all syntax errors.  Then you would link, get undefined symbols and have to include appropriate libraries etc. And then finally you would execute your code, only to have it crash. The process of debugging would then start.

Luckily technology has made life a whole lot easier except for the last step where you could still  run into an execution errors . In these days an IDE (Interactive Development Environment) like Eclipse will flag syntax errors, missing definitions/declarations etc. as you write your code. Moreover Eclipse can also indicate which libraries (imports) you would need to include in your package for it to build. The only missing step in IDEs of these days is the ability to predict possible execution errors in your program.  I wouldn’t be surprised, if in future, like Microsoft Word,  the IDE is able to tell you if a programming construct does not make sense.

So things have gotten a lot easier for the programmer. The following tips for are particularly useful as you progress along in programming

  1. These days when you are learning a new programming language it is not necessary to know the language from cover to cover by reading a book. In those days when we learnt C it was necessary to know everything from bit structures, macros, pragma etc. The reason being that every syntax or execution error one had to rush to get the textbook and thumb through it for the answer. Not so, in these days of Google. You have the world’s library at your fingertips.
  2. To get started it is necessary to learn just the most important programming constructs of the language say structure, class, car, cdr besides the usual suspects like loops, conditions and case constructs
  3. Download and install an IDE for the language. In most case Eclipse will work
  4. Try to write a simple program and test out your code.
  5. To do any sort of programming these days you will necessarily need to make 3 friends
    1. Google
    2. Stackoverflow
    3. Git & GitHub
  6. Honing your Googling skills is very important. There are answers to almost any sort of programming problems out there. You would be surprised to know that there are many others who did exactly the same stupid mistake that you did out there. Also googling will take you to interesting tutorials, blogs, articles that discuss different aspects of the programming language and the problem you are trying to solve
  7. Stackoverflow is really a God send to all programmers. There are so many questions on so many aspects of every programming language on earth there. If you spend time searching Stackoverflow you are bound to find answers, code snippets that you can readily use in your code
  8. Post your questions in stackoverflow when you don’t find the answers there. You are bound to get quick answers. Thanks to the gamification of Stackoverflow (points, upvotes,badges  etc) that has been created on Stackoverflow.
  9. Git & GitHub: I would suggest that you download and install GitHub for Windows. This will provide you with version control on your desktop. You can modify code while being to switch back to an earlier version with Git. Read up a good tutorial on Git for Windows
  10. Once you have working code you push it onto GitHub and share with other programmers

Now that you have the basic setup here are few other extremely important tips

  1. The most important criteria for programming is ‘attitude’. Initially you are bound to get frustrated, angry, irritated etc. But it is necessary to look at the errors that you get with the right attitude. Know that an error is telling you something. Usually the answers to your mistake are in the ‘error message’ itself. Look at it closely and try to understand it. You will learn a lot more when you learn from errors than from copy-pasting from somebody else’s code, even if works right the first time around!
  2. Make sure you do something different each time. As Einstein said “ If you keep doing the same thing, you will keep getting the same result’
  3. There are different ways to debug your code. You could use the debugger and single step through the code and keep checking the values of the variables. I personally prefer print statements to localize where things are going wrong. I then try to narrow down the problem to a few lines of code and try to take it apart.

Hopefully the above tips are useful. Programming can be creative activity and will be indispensable in our future.

Above all have fun coding, there are so many possibilities these days!

Also see

1. Programming languages in layman’s language
2. The common alphabet of programming languages
3. The mind of the programmer
4. Programming Zen and now – Some essential tips -2 

You may also like
1. A crime map of India in R: Crimes against women
2.  What’s up Watson? Using IBM Watson’s QAAPI with Bluemix, NodeExpress – Part 1
3.  Bend it like Bluemix, MongoDB with autoscaling – Part 2
4. Informed choices through Machine Learning : Analyzing Kohli, Tendulkar and Dravid
5. Thinking Web Scale (TWS-3): Map-Reduce – Bring compute to data
6. Deblurring with OpenCV:Weiner filter reloaded

Programming Zen and now – Some essential tips-2

A Cloud medley with IBM Bluemix, Cloudant DB and Node.js

Published as a tutorial in IBM Cloudant – Bluemix tutorial and demos

Here is an interesting Cloud medley based on IBM’s Bluemix PaaS platform, Cloudant DB and Node.js. This application  creates a Webserver using Node.js and uses REST APIs to perform CRUD operations on a Cloudant DB. Cloudant DB is a NoSQL Database as a service (DBaaS) that can handle a wide variety of data types like JSON, full text and geo-spatial data. The documents  are stored, indexed and distributed across a elastic datastore spanning racks, datacenters and perform replication of data across datacenters.Cloudant  allows one to work with self-describing JSON documents through  RESTful APIs making every document in the Cloudant database accessible as JSON via a URL.

This application on Bluemix uses REST APIs to perform the operations of inserting, updating, deleting and listing documents on the Cloudant DB.  The code can be forked from Devops at bluemix-cloudant. The code can also be clone from GitHub at bluemix-cloudant.

1) Once the code is forked the application can be deployed on to Bluemix using

cf login -a https://api.ng.bluemix.net
cf push bm-cloudant -p . -m 512M

2) After this is successful go to the Bluemix dashboard and add the Cloudant DB service.  The CRUD operations can be performed by invoking REST API calls using an appropriate REST client like SureUtils ot Postman in the browser of your choice.

Here are the details of the Bluemix-Cloudant application

3) Once the Cloudant DB service has been added to the Web started Node.js application we need to parse the process.env variable to obtain the URL of the Cloudant DB and the port and host to be used for the Web server.

The Node.js Webserver is started based on the port and host values obtained from process.env

require('http').createServer(function(req, res) {
//Set up the DB connection
if (process.env.VCAP_SERVICES) {
// Running on Bluemix. Parse for  the port and host that we've been assigned.
var env = JSON.parse(process.env.VCAP_SERVICES);
var host = process.env.VCAP_APP_HOST;
var port = process.env.VCAP_APP_PORT;
....
}
....
// Perform CRUD operations through REST APIs
// Insert document
if(req.method == 'POST') {
insert_records(req,res);
}
// List documents
else if(req.method == 'GET') {
list_records(req,res);
}
// Update a document
else if(req.method == 'PUT') {
update_records(req,res);
}
// Delete a document
else if(req.method == 'DELETE') {
delete_record(req,res);
}
}).listen(port, host);

2) Access to the Cloudant DB Access to Cloudant DB is obtained as follows

if (process.env.VCAP_SERVICES) {
// Running on Bluemix. Parse the port and host that we've been assigned.
var env = JSON.parse(process.env.VCAP_SERVICES);
var host = process.env.VCAP_APP_HOST;
var port = process.env.VCAP_APP_PORT;
console.log('VCAP_SERVICES: %s', process.env.VCAP_SERVICES);
// Also parse Cloudant settings.
var cloudant = env['cloudantNoSQLDB'][0]['credentials'];
}
var db = new pouchdb('books'),
remote =cloudant.url + '/books';
opts = {
continuous: true
};
// Replicate the DB to remote
console.log(remote);
db.replicate.to(remote, opts);
db.replicate.from(remote, opts);

Access to the Cloudant DB is through the cloudant.url shown above

3)  Once the access to the DB is setup we can perform CRUD operations. There are many options for the backend DB. In this application I have PouchDB.

4) Inserting a document: To insert documents into the Cloudant DB based on Pouch DB we need to do the following

var insert_records = function(req, res) {
//Parse the process.env for the port and host that we've been assigned
if (process.env.VCAP_SERVICES) {
// Running on Bluemix. Parse the port and host that we've been assigned.
var env = JSON.parse(process.env.VCAP_SERVICES);
var host = process.env.VCAP_APP_HOST;
var port = process.env.VCAP_APP_PORT;
console.log('VCAP_SERVICES: %s', process.env.VCAP_SERVICES);
// Also parse Cloudant settings.
var cloudant = env['cloudantNoSQLDB'][0]['credentials'];
}
var db = new pouchdb('books'),
remote =cloudant.url + '/books';
opts = {
continuous: true
};
// Replicate the DB to remote
console.log(remote);
db.replicate.to(remote, opts);
db.replicate.from(remote, opts);
// Put 3 documents into the DB
db.put({
author: 'John Grisham',
Title : 'The Firm'
}, 'book1', function (err, response) {
console.log(err || response);
});
...
...
res.writeHead(200, {'Content-Type': 'text/plain'});
res.write("3 documents is inserted");
res.end();
}; // End insert_records

The nice part about Cloudant DB is that you can access your database through the URL. The steps are shown below. Once your application is running. Click on your application. You should see the screen as below.

1

Click on Cloudant as shown by the arrow.

Next click on the “Launch’ icon

2

This should bring up the Cloudant dashboard. The database will be empty.

3

If you use a REST API Client to send a POST API call then the Application will insert 3 documents.

4

The documents inserted can be seen by sending the GET REST API call.

5

The nice part of Cloudant DB is that you can use the URL to see your database. If you refresh your screen you should see the “books” database added. Clicking this database you should see the 3 documents that have been added

6

If you click “Edit doc” you should see the details of the document

7

5) Updating a document

The process to update a document in the database is shown below

// Update book3
db.get('book3', function(err, response) {
console.log(response);
return db.put({
_id: 'book3',
_rev: response._rev,
author: response.author,
Title : 'The da Vinci Code',
});
}, function(err, response) {
if (err) {
console.log("error " + err);
} else {
console.log("Success " + response);
}
});

This is performed with a PUT REST API call

8

The updated list is shown below

9

This can be further verified in the Cloudant DB dashboard for book3.

10

6) Deleting a document

The code to delete a document in PouchDB is shown below

//Deleting document book1
db.get('book1', function(err, doc) {
db.remove(doc, function(err, response) {
console.log(err || response);
});
});

The REST calls to delete a document and the result  are shown below

11

12

Checking the Cloudant dashboard we see that only book2 & book3 are present and book1 has been deleted

13

7) Displaying documents in the database

The code for displaying the list of documents is shown below

var docs = db.allDocs(function(err, response) {
val = response.total_rows;
var details = "";
j=0;
for(i=0; i < val; i++) {
db.get(response.rows[i].id, function (err,doc){
j++;
details= details + JSON.stringify(doc.Title) + " by  " +  JSON.stringify(doc.author) + "\n";
// Kludge because of Node.js asynchronous handling. To be fixed - T V Ganesh
if(j == val) {
res.writeHead(200, {'Content-Type': 'text/plain'});
res.write(details);
res.end();
console.log(details);
}
}); // End db.get
} //End for
}); // End db.allDocs

If you happened to notice, I had to use a kludge to work around Node.js’ idiosyncracy of handling asynchronous calls. I was fooled by the remarkable similarity of Node.js & hence  javascript to C language that I thought functions within functions would work sequentially. However I had undergo much grief  trying to get Node.js to work sequentially. I wanted to avoid the ‘async’ module but was unsuccessful with trying to code callbacks. So the kludge! I will work this out eventually but this workaround will have to do for now!

As always you can use the “Files and Logs” in the Bluemix dashboard to get any output that are written to stdout.

Note: As always I can’t tell how useful the command
'cf  logs <application name> -- recent is for debugging.

Hope you enjoyed this Cloud Medley of Bluemix, Cloudant and Node.js!

Disclaimer: This article represents the author’s viewpoint only and doesn’t necessarily represent IBM’s positions, strategies or opinions

You may also like
1. Brewing a potion with Bluemix, PostgreSQL & Node.js in the cloud
2.  A Bluemix recipe with MongoDB and Node.js
3.  Spicing up IBM Bluemix with MongoDB and NodeExpress
4.  Rock N’ Roll with Bluemix, Cloudant & NodeExpress


Find me on Google+

Spicing up a IBM Bluemix cloud app with MongoDB and NodeExpress

In this post I highlight the rudiments for a creating a cloud application on IBM’s PaaS offering Bluemix, using MongoDB and NodeExpress.   Clearly Bluemix allows one to fire up a cloud application with a NoSQL database in a matter of  a few hours which makes it really attractive. The NodeExpress  application was initially created using Enide Studio for Node.js  with a local Mongodb server running on my desktop. (Please see my post Elements of CRUD with Node Express and MongoDB) Once you have ironed out the issues in this local application you are ready to deploy on IBM Bluemix.

The code for this Bluemix application can be forked from bluemix-mongo from IBM Devops.

You can also clone the code from GitHub at bluemix-mongo

Here are the key changes that need to be made for running the NodeExpress Webserver with MongoDB as the backend DB

1) Webserver : Setup the port and host for the Webserver.

  1. app.js

var port = (process.env.VCAP_APP_PORT || 1337);
var host = (process.env.VCAP_APP_HOST || '0.0.0.0');
var app = express();
app.configure(function(){
app.set('port', port);

As seen above the host & port for the Webserver are obtained from the process.env variable.
2) Routes and Middleware
Setup the routes and invoke them appropriately in app.js
var express = require('express')
, routes = require('./routes')
, user = require('./routes/user')
, userlist = require('./routes/userlist')
, newuser = require('./routes/newuser')
, adduser = require('./routes/adduser')
, changeuser = require('./routes/changeuser')
, updateuser = require('./routes/updateuser')
, remuser = require('./routes/remuser')
, deleteuser = require('./routes/deleteuser')

app.get('/users', user.list);
app.get('/helloworld', routes.index);
app.get('/userlist', userlist.list);
app.get('/newuser', newuser.list);
app.post('/adduser',adduser.list);
app.get('/changeuser', changeuser.list);
app.post('/updateuser', updateuser.list);
app.get('/remuser', remuser.list);
app.post('/deleteuser',deleteuser.list);

3) Initialize MongoDB database: Create a set of 3 records when the Webserver starts as follows

if (process.env.VCAP_SERVICES) {
var env = JSON.parse(process.env.VCAP_SERVICES);
if (env['mongodb-2.2']) {
var mongo = env['mongodb-2.2'][0]['credentials'];
}
} else {
var mongo = {
"username" : "user1",
"password" : "secret",
"url" : "mongodb://user1:secret@localhost:27017/test"
}
}
var MongoClient = mongodb.MongoClient;
var db= MongoClient.connect(mongo.url, function(err, db) {
if(err) {
log("failed to connect to the database");
} else {
log("connected to database");
}
var collection = db.collection('phonebook');
//Clear DB and insert 3 records
remove(mycallback);
var user1 = { "FirstName" : "Tinniam", "LastName" : "Ganesh","Mobile": "916732177728" };
var user2 = { "FirstName" : "Darth", "LastName" : "Vader","Mobile": "6666699999" };
var user3 = { "FirstName" : "Bill", "LastName" : "Shakespeare","Mobile": "8342189991" };

  1. insert(user1,function(err,result){});
  2. insert(user2,function(err,result){});
  3. insert(user3,function(err,result){});
  4. find().toArray(function(err, items) {

});
});

3) Home Page: Setup up a Home page with the CRUD operations when the Bluemix cloud application’s route  for e.g. http://bluemix-mongo.mybluemix.net is clicked. This is shown below.

1


2

4) Display Users: To display the list of users the route /userlist is invoked. This function gets all the records from the collection and stores them into a toArray element, which is then used for rendering the list of uses with a ‘userlist.jade’ template

userlist.js
var MongoClient = mongodb.MongoClient;
var db= MongoClient.connect(mongo.url, function(err, db) {
if(err) {

  1. log(“Failed to connect to the database”);

} else {

  1. log(“Connected to database”);

}
var collection = db.collection(‘phonebook’);
//Get all records and display them

  1. find().toArray(function(err, items) {
  2.    log(items);
  3. render(‘userlist’, {

“userlist” : items
});
});
});

  1. jade

This template displays the list of users as a table. The code is shown below

extends layout
block content
h1= "Display the list of Users"
p
strong Firstname Lastname   Mobile
table
each user, i in userlist
tr
td #{user.FirstName}
td #{user.LastName}
td #{user.Mobile}
p
p
a(href='/') Home

Note: A link back to the Home page is included in here at the bottom.

7


5) Adding a User
There are 2 parts to this
a) Invoking the /newuser route to display the input form through the newuser.jade
b) Invoking the /adduser route to insert the values entered in the form. The changes are shown below
a) app.js
..
newuser = require('./routes/newuser')
adduser = require('./routes/adduser')
..
app.get('/newuser', newuser.list);
app.post('/adduser',adduser.list);

b) newuser.js
exports.list = function(req, res){

  1. render(‘newuser’, { title: ‘Add User’});

};

The newuser jade displays the input form
c) newuser.jade
extends layout
block content
h1= "Add a User"
form#formAddUser(name="adduser",method="post",action="/adduser")
input#inputUserFirstName(type="text", placeholder="firstname", name="firstname")
input#inputUserLastName(type="text", placeholder="lastname", name="lastname")
input#inputUserLastName(type="text", placeholder="mobile", name="mobile")
button#btnSubmit(type="submit") submit
p
p
a(href='/') Home

3

d) adduser.js

The adduser.js gets the mongo url from the process.env.VCAP_SERVICES and  setups up the connection to the DB and inserts the values received in the ‘newuser.jade’ form into the database

exports.list = function(req, res) {
if (process.env.VCAP_SERVICES) {
var env = JSON.parse(process.env.VCAP_SERVICES);
if (env['mongodb-2.2']) {
var mongo = env['mongodb-2.2'][0]['credentials'];
}
} else {
var mongo = {
"username" : "user1",
"password" : "secret",
"url" : "mongodb://user1:secret@localhost:27017/test"
}
}
// Set up the DB connection
var MongoClient = mongodb.MongoClient;
var db= MongoClient.connect(mongo.url, function(err, db) {
if(err) {

  1. log(“Failed to connect to the database”);

} else {

  1. log(“Connected to database”);

}
// Get our form values. These rely on the “name” attributes
var FirstName = req.body.firstname;
var LastName = req.body.lastname;
var Mobile = req.body.mobile;
// Set our collection
var collection = db.collection(‘phonebook’);
// Insert the record into the DB

  1. insert({

“FirstName” : FirstName,
“LastName” : LastName,
“Mobile” : Mobile
}, function (err, doc) {
if (err) {
// If it failed, return error

  1. send(“There was a problem adding the information to the database.”);

}
else {
// Redirect to userlist – Display users

  1. location(“userlist”);

// And forward to success page

  1. redirect(“userlist”);

}
});
});

If the insert is successful the userlist page is displayed with the new user

4

6) Updating a User & Deleting a User: Updating and Deleting users follow the same format as Adding a user.

7) index.jade The Home page is built using index.jade with a hyperlink invoking the route for each database operation
extends layout
block content
h1= title
p Welcome to #{title}
ul
li
a(href='/userlist') Display list of users
li
a(href='/newuser') Add a user
li
a(href='/changeuser') Update a user
li
a(href='/remuser') Delete a user

Tip: “Return of the Jadei : Getting the jade template right is truly an art as Jade is extremely finicky about spaces, tabs, indents and outdents(???). Creating the Jade template had me run into circles. I found out that you can debug the jade template individually by executing

C:> npm install jade -g"
and then  running
C:> jade <template name>

from the command prompt. If the result of the command is “rendered <template name>.html” then you are in luck and you can incorporate this jade template into your views folder for e.g.

C: >jade index.jade
rendered index.html

8) Push changes to Bluemix: Once the changes have been made push the changes on to Bluemix with ‘cf’ as follows

cf login -a https://api.ng.bluemix.net
cf push bluemix-mongo -p . -m 512M
cf create-service mongodb 100 mongodb01
cf bind-service bluemix-mongo mongodb01


The last 2 commands can also be performed through the Bluemix dashboard in which you add the mongodb service to your Node.js app/

8) Files and Logs: In the Bluemix dashboard you can check your logs in the Files and Logs

5


6

Important tip: Finally if the application fails to start when you  push the application with ‘cf’ for e.g.

cf push <app name> -p . -m 512M
....
.....
----> Writing a custom .npmrc to circumvent npm bugs
----> Installing dependencies
----> Caching node_modules directory for future builds
----> Cleaning up node-gyp and npm artifacts
----> No Procfile found; Adding npm start to new Procfile
----> Building runtime environment
----> Checking and configuring service extensions
----> Uploading droplet (7.6M)
of 1 instances running, 1 down

or if  it crashes when you click a link then your debugging friend is

cf logs <app name > — recent
This will dump the error that was encountered either while the application was being started of why the application crashed.

You can fork this Bluemix application from bluemix-mongo at  IBM Devops or from GitHub at bluemix-mongo

Disclaimer: This article represents the author’s viewpoint only and doesn’t necessarily represent IBM’s positions, strategies or opinions

You may also like
1. Brewing a potion with Bluemix, PostgreSQL & Node.js in the cloud
2. A Bluemix recipe with MongoDB and Node.js
3. A Cloud Medley with IBM’s Bluemix, Cloudant and Node.js
4. Rock N’ Roll with Bluemix, Cloudant & NodeExpress


Find me on Google+

Mixing Twilio with IBM Bluemix

This post walks you through the steps to get started with Twilio on IBM’s Bluemix. Twilio comes as a service that you can add  to your Mobile Cloud or Node.js app. Here’s a quick look at Twilio. Twilio, is a cloud communications IaaS organization which  allows you use standard web languages to build voice, SMS and VOIP applications via a Web API.

Twilio provides the  ability to build VOIP applications using APIs. Twilio itself resides in the cloud and is always available. It also provides SIP integration which means that it can be integrated with Soft switches. Twilio looks really  interesting with its ability to combine the  cloud, Web and VOIP, SMS  and  the like.

This post barely scratches the surface of Twilio & Blue mix. This article provides aa hands-on experience for integration of Twilio with Bluemix and is based on this Twilio blog post. It enables you to send a SMS to your mobile phone by typing in a URL.

As in my earlier post the steps are

1) Fire-up a Node.js  Webstarter application from the  Bluemix dashboard.  In my case I have named the application websms. Once this is up and running

2) Click Add a Service and under ‘Web and Application’ choose Twilio.

3) Enter a  name for the Twilio service. You will also need the Account SID and Authorization token

4) For this go to http://www.twilio.com and sign up2

5) Once you have registered, go to your Dashboard for the Account SID and Auth Token. If the Auth token is encrypted, you can click the ‘lock’ symbol to display the Auth token in plain text.

6) Enter the Accout SID and Auth Token in the Twilio service in Bluemix

7)  To get started you can simply  fork my Twilio  websms code from devops.

8) Now clone the code into a folder you create as follows

git clone https://hub.jazz.net/git/tvganesh/websms

9) You will need to modify the following files

package.json

manifest.yml

app.js


10) You can create package.json by running
npm init. Make sure you enter the name of the application you created in Bluemix. In my case it is “websms’ For the rest of the options you can choose the default. Here is the package.json file
"name": "websms",
"version": "0.0.0",
"description": "This README.md file is displayed on your project page. You should edit this \r file to describe your project, including instructions for building and \r running the project, pointers to the license under which you are making the \r project available, and anything else you think would be useful for others to\r know.",
"main": "app.js",
"dependencies": {
"gopher": "^0.0.7",
"express": "^3.12.0",
"twilio": "^1.6.0",
"ejs": "^1.0.0"
},
"devDependencies": {},
"scripts": {
"test": "echo \"Error: no test specified\" && exit 1"
},
"repository": {
"type": "git",
"url": "https://hub.jazz.net/git/tvganesh/websms"
},
"author": "",
"license": "ISC"
}

11) In the manifest.yml make sure you enter the name of your application and the host

applications:
- host: websms
disk: 1024M
name: websms
command: node app.js
path: .
domain: <your domain>
mem: 128M
instances: 1

12) Lastly make changes to your app.js.

// dependencies
var app = require('gopher'),
twilio = require('twilio');
var config = JSON.parse(process.env.VCAP_SERVICES);
var twilioSid, twilioToken;
config['user-provided'].forEach(function(service) {
if (service.name == 'Twilio') {
twilioSid = service.credentials.accountSID;
twilioToken = service.credentials.authToken;
}
});
// URL test
app.get('/', function(request, response) {
var client = new twilio.RestClient(twilioSid, twilioToken);
client.sendMessage({
to:'<Your mobile number>',
from:'<Number from Twilio dashboard',
body:'Twilio notification through Bluemix!'
}, function(err, message) {
response.send('Message sent! ID: '+message.sid);
});
});

13) After you have made the changes you will need to push the changes to Bluemix using the command line based ‘cf’ tool
14) Login into cf with
cf login – a http://api.ng.bluemix.net

15) Push the websms onto bluemix

16) In the folder where you websms files reside entr the following command
cf push websms -p . -m 512M

17) This should push the code to Bluemix.
Note: If you happen to get a
Server error, status code: 400, error code: 170001, message: Staging error: cannot get instances since staging failed
then you need to make sure to check the changes made to  files app.js, package.,json or the manigfest,yml.

18)  If all things went smoothly, go to your Bluemix dashboard and click the link adjacent to the Routes. You should see that an SMS has been sent as shown

3

19) Your mobile should now display the message that was sent as shown below
Screenshot_2014-06-22-13-41-44

20) Check the  analytics in your Twilio dashboard
1

Disclaimer: This article represents the author’s viewpoint only and doesn’t necessarily represent IBM’s positions, strategies or opinions

Find me on Google+

Test driving Push notification in Bluemix

This post is a continuation of my earlier post ‘Getting started with mobile cloud in Bluemix‘. Here I take a test drive of the push service that Bluemix offers based on the article “Extend an Android app using the Push cloud service” from developerWorks.

This post assumes that you have already completed the changes from my earlier post for the mobile cloud. If you haven’t,  you could clone the code from “mobile data” which is the official IBM version of this app and includes all the changes needed for persisting data in the cloud through their Android.

The Mobile Cloud App I created on Bluemix is “mobtvg“. The main steps to have Push notification service using Bluemix are

  1. GCM services : Get Google API Project number  & GCM API Key
  2. Include the Google Play services library project
  3. Add the jar files to enable Push service
  4. Modify the server side Node.js file to send push notifications to all registered devices
  5. Make necessary code changes
  6. Run the application and test for notification

Here are more details on the above steps

a) GCM services : Google Cloud Messaging for Android (GCM) is a service that allows you to send data from your server to your users’ Android-powered device, and also to receive messages from devices on the same connection. The 1st thing to do is get the Google API Project number & GCM API key.

– Click on Google Developer Console

– Click Create Project. Enter Project name & click Create.

– Note the Project Number on top of the page.

– Click API & Auth on left panel. Click API.

– Scroll down and turn-on Google Messaging for Android

–  Click credentials and click “Create new key”. Click server key. Click create

-Copy API key in the Public API access

Now go the Bluemix dashboard and click your application. Click the Push module. In the Configuration tab, scroll down to Google Cloud Messaging and  click ‘Edit’

Enter the Google API Project Number & GCM API key for both the Sandbox & Production configuration and click Save.

4
b) In Eclipse click Windows->Android SDK manager. Scroll down to the bottom and under Extras select Google Play services. Click install. Once the installation is successful import the project as follows File-Import->Android->Existing Android  code into Workspace. Click Next. In the next screen Browse to the path where your ADT bundle is installed and choose the folder

<ADT-Bundle>\ sdk\extras\google\google_play_services

and Click Ok. Also  check ‘Copy project into workspace’. This will copy.

3

Now build the Google Play Services Project. To do this the project. Click Project->Properties->Android and make sure that you select ‘Is library project’ and then click build.

5

Add a reference to the Google Play services in the Androidmanifest.xml

<meta-data

android:name=”com.google.android.gms.version”

android:value=”@integer/google_play_services_version” />

c) Make all the code changes given in Step 4 of “Extend an Android app using the Push cloud service.

d) In MainActivity.java make sure you change the app_name to the name of your app for e.g

public static final String CLASS_NAME = “MainActivity”;

public static final String APP_NAME = “mobtvg“;

Also ensure that under assets folder you have populated the Application ID in the bluemix.properties file

applicationID=<Application ID from Bluemix>

d) Add ibmcloudcode.jar, ibmpush.jar, android-support-v4.jar (from <Android_SDK_Location>/extras/android/support/v4)

e) Now the Mobile Push project need to include this library project. To do this select your Mobile App project. Click Project->Properties->Android. Click Add and select google-play-services-lib. Note: Make sure “Is library project” is unchecked otherwise you are in for a lot of grief.

8

f) Now you need to make changes to the Node.js application to push any changes from the server to all registered devices.  The code for this is in bluelist-push-node. Note; Making changes through the GUI results in an error that “manifest.yml is not in root node”. So I suggest that you take the ‘cf’ route as follows.

– Clone the code using Git

git clone https://hub.jazz.net/git/mobilecloud/bluelist-push

Go to bluelist-push-node folder

i) Open the app.js with your favorite editor and enter the Application ID of your Bluemix application

//Data Values

var values = {

version:”0.3.1″,

//change this to the actual application id of your mobile backend starter

appID : “<APPLICATION ID>”,

host : “https://mobile.ng.bluemix.net&#8221;

}

ii) Open manifest.yml and change host name & name to the name of your application for e.g.

host: mobtvg

disk: 1024M

name: mobtvg

command: node app.js

path: .

domain: ng.bluemix.net

mem: 128M

instances: 1

iii) Once the changes are complete, open a command propmpt and  login into Bluemix using ‘cf’ as follows

– cd to the directory in which Node.js & manifest.yml exist, Do

cf login – a http://api.ng.bluemix.net

cf push mobtvg -p . -m 512M

(Note the changes are pushed to the mobile cloud app on Bluemix)

This will run through and finally give the status that the app is running successfully.

f) Now that all changes are complete the Mobile Cloud with Push can be tested..

g) Click Window->Android Virtual Device Manager. Click the Device definitions. You choose Google Nexus, Nexus 7. Click Create AVD.

Note: Make sure you choose Google API Level Y and not Android x.x.x API Y.

6

Let the AVD come up and display the current items in the grocery list.

h) Login to Bluemix. Click Push and select the Notifications tab and enter a test message for e.g. “This is a notification from Bluemix” and click send.

7

This will result in a Push Notification to be sent to the AVD. You should see this popup on you AVD as shown below

1

i) Add another AVD through Windows-Android Virtual Device manager. While one AVD is running go to Run->Run Configurations->Target Device and choose the newly created AVD.

j) This will start a second AVD which will refresh with the contents of the grocery list. Now adda new item in one of AVD devices. This will result in a Push notification to the other device that the Bluelist has been updated.

2

There you have it.

1) A mobile cloud applications in which changes persist in the cloud and are refreshed each time the Android device is restarted.

2) A Push notification that is sent to all registered devices whenever there is a change to the list.

Disclaimer: This article represents the author’s viewpoint only and doesn’t necessarily represent IBM’s positions, strategies or opinions

Find me on Google+

Simulating an Edge Shape in Android

Here is a small post on how I managed to simulate an Edge Shape in Android. I wanted to do this after I saw the Java demo of Box2D in JBox2D(see RayCast). For the Edge Shape I chose a cosine curve. I used the same method I used, mentioned in my earlier post “Making of the Total Control Android Game

The simulation can be seen at Simulating an Edge Shape on YouTube
You can clone the entire project from Github at EdgeShape.

Since it is a cosine curve I place a ball shape for every point on a cosine function, close to each other to seem continuous and create a body from the Sprite with physical properties.

for (int i = 0; i < nBodies; ++i)

{

float angle = (float) ((10.0 * PI * i)/180.0);

float y1 = 300 + (float)Math.cos(angle/20) * 120;

//Log.d(“Test”,”Test” + “x:” + x1 +”y:”+ y1);

circles[i] = new Sprite(x1, y1, this.mBallTextureRegion, this.getVertexBufferObjectManager());

circlesBody[i] = PhysicsFactory.createCircleBody(this.mPhysicsWorld, circles[i], BodyType.StaticBody, FIXTURE_DEF);

this.mScene.attachChild(circles[i]);

x1 = (float) (x1 + 0.5);

}

So this can be done for every mathematical curve. I also intended to create other curves like the Archimedes Spiral and the Lemniscate. Maybe I will leave that for a rainy day!! 🙂

However, I am not sure how to create a irregular edge shape. I will probably figure that out.

The egde shape is made to be a STATIC_BODY. I then took code of creating Animated Sprites at the point where I touch from AndEngine examples (PhysicsExample.java). To make the simulation more fun I also added a Linear Impulse to the Animated Sprite.

face = new AnimatedSprite(pX, pY, this.mCircleFaceTextureRegion, this.getVertexBufferObjectManager());

body = PhysicsFactory.createCircleBody(this.mPhysicsWorld, face, BodyType.DynamicBody, gameFixtureDef);

face.animate(200);

body.applyLinearImpulse(-200,200,pX,pY);

The effect is better if the phone is horizontal to the ground and not so great if the phone is kept vertical and the bodies do not seem to shoot off.

The simulation can be seen at Simulating an Edge Shape

You can clone the entire project from Github at EdgeShape.


Take a look at some cool simulations using AndEngine & Box2D
1. Simulating the domino effect using Box2D and AndEngine
2. Blob with an attitude(stiffness) in Android
3. The making of Total Control Android game
4. Simulating a Web Joint in Android
20. A closer look at “Robot horse on a Trot! in Android”
and many more …
Find me on Google+

Bull in a china shop – Behind the scenes in Android

DSC00032Here are the details about how I constructed the “Bull in a china shop” demo. For this demo I used Box2D physics engine and AndEngine to make the demo. I decided to use sprites for the china shop and picked up images of glasses, wine glasses, bottles etc from www.openclipart.org.

Be extremely careful when creating the TextureRegion using BitmapTextureAtlas. If you don’t get the co-ordinates right the display can be weird.

Here are 2 clips of Bull in a China Shop demo
1.Bull in a china shop in Moon’s gravity
2.Bull in a china shop in Earth’s gravity
The code for this can be cloned  from Github from Bulldozed

Here is a snippet of this

this.mBitmapTextureAtlas = new BitmapTextureAtlas(this.getTextureManager(), 556, 246, TextureOptions.BILINEAR);
this.mTumblerTextureRegion = BitmapTextureAtlasTextureRegionFactory.createFromAsset(this.mBitmapTextureAtlas, this, "tumblr.png", 0, 0);
this.mBitmapTextureAtlas.load();
this.mBottleTextureRegion = BitmapTextureAtlasTextureRegionFactory.createFromAsset(this.mBitmapTextureAtlas, this, "bottle.png",20, 29);
this.mBitmapTextureAtlas.load();
this.mGlassTextureRegion = BitmapTextureAtlasTextureRegionFactory.createFromAsset(this.mBitmapTextureAtlas, this, "glass.png",36, 69);
this.mBitmapTextureAtlas.load();
this.mVaseTextureRegion = BitmapTextureAtlasTextureRegionFactory.createFromAsset(this.mBitmapTextureAtlas, this, "vase.png",56, 89);
this.mBitmapTextureAtlas.load();
...
...

This is very important to get right otherwise you are setting yourself for a lot of grief.

Superficially the demo looks real easy. It appears that creating a pyramid stack should be a breeze as long as you get the coordinates right. Wrong! Building a pyramid using Box2D with the effect of gravity can be a real challenge as I found out. I would build two stacks and the stack would become unstable and collapse.

Anyway here are the findings

  1. Each row is not placed directly over the object below. I leave a gap of 2 px between them The reason is the object below exerts a force ‘F’ upward. The object above exerts a force ‘mg” below and the physics engine tries to resolve this difference in forces and causes instability in the structure. So the key is a to leave a small gap in between
  2. Now that there is a gap between 2 rows the coefficient of restitution ‘e’ is made 0. Even a value as small as 0.1f can make the objects jitter and cause instability.
  3. The friction between the platform and the objects or the objects themselves is made maximum equal to 1.0f to prevent sliding of the objects.

// Add tumblers
for(int i=0; i < 21; i++) {
tumbler = new Sprite(80 + i * 25, 450, this.mTumblerTextureRegion, this.getVertexBufferObjectManager());
FIXTURE_DEF = PhysicsFactory.createFixtureDef(1f, 0.0f, 1f);
tumblerBody = PhysicsFactory.createBoxBody(this.mPhysicsWorld, tumbler, BodyType.DynamicBody, FIXTURE_DEF);
this.mPhysicsWorld.registerPhysicsConnector(new PhysicsConnector(tumbler, tumblerBody, true, true));
this.mScene.attachChild(tumbler);
}

// Add glasses
for(int i=0; i < 14; i++) {
glass = new Sprite(130 + i * 25, 428, this.mGlassTextureRegion, this.getVertexBufferObjectManager());
FIXTURE_DEF = PhysicsFactory.createFixtureDef(1f, 0.0f, 1f);
glassBody = PhysicsFactory.createBoxBody(this.mPhysicsWorld, glass, BodyType.DynamicBody, FIXTURE_DEF);
this.mPhysicsWorld.registerPhysicsConnector(new PhysicsConnector(glass, glassBody, true, true));
this.mScene.attachChild(glass);
...
...

Hopefully if you get everything right you should have a stable structure. I had to do this through trial and error before I got it finally right. Whew!

Once you get a stable structure with the proper sprites in place most of the problem is solved. For the last part I add a bull sprite and set it off at a velocity from the point of touch.

bull = new Sprite(pX, pY, this.mBullTextureRegion, this.getVertexBufferObjectManager());
FIXTURE_DEF = PhysicsFactory.createFixtureDef(25f, 0.0f, 1f);
Log.d("here","here");
bullBody = PhysicsFactory.createBoxBody(this.mPhysicsWorld, bull, BodyType.DynamicBody, FIXTURE_DEF);
if(pX > 360)
bullBody.setLinearVelocity(-5,-5);
else
bullBody.setLinearVelocity(5,5);

DSC00031

Note: Since the sprites are not regular shapes I had to use a box shape. So the collisions are not pixel perfect.
Make sure you set up your project properly in Eclipse. The important settings are
Project->Properties->Android->Android4.2
Project->Properties->Java Compiler: Check the “Enable project specific setting” and also set compiler compliance level to 1.6
Finally click Project->Properties->Android: Under Library click ‘Add’ and add AndEngine and AndEnginePhysicsBox2DExtension
and you are good to go.

Here are 2 clips of Bull in a China Shop demo

1.Bull in a china shop in Earth’s gravity

2.Bull in a china shop in Moon’s gravity

You can clone the project from Github from Bulldozed

Have fun …

Other cool simulations using AndEngine & Box2D
1. Simulating the domino effect using Box2D and AndEngine
2. The making of Total Control Android game
3. Simulating a Web Joint in Android
4. Modeling a Car in Android
5. A closer look at “Robot horse on a Trot! in Android”

Find me on Google+